Theme
Importing users in bulk, or migrating from other server software
TIP
This article describes the importusers command as it exists in Syncplify Server! 8.1.1 and later. A much simpler version of the command has existed since 6.2.50, and everything that worked back then still works today, but the options and formats described below were added in 8.1.1. If you run v6 or v7, or a v8 release before 8.1.1, read the classic command at the end of this page.
Sometimes, to ease the transition from other SFTP servers, it is useful to import user profiles, along with their VFSs, in bulk from a file. The importusers command does exactly that, and it now does considerably more than it used to. It reads four different input formats:
| Format | What it reads |
|---|---|
native | Syncplify's own CSV format, which has grown to cover almost everything a user account can hold |
cerberus | A user export produced by Cerberus FTP Server |
sftpgo | The JSON backup SFTPGo produces from its own administration interface |
filezilla | A FileZilla Server configuration, of either generation (0.9.x and 1.x) |
There is no conversion step for any of them. You point the command at the file the other product wrote, and it reads it. In every case it can carry across passwords that you do not have in clear text, because they are already hashed, so nobody has to reset anything and nobody ever handles a password in the open.
The command
The inline help is the best place to start:
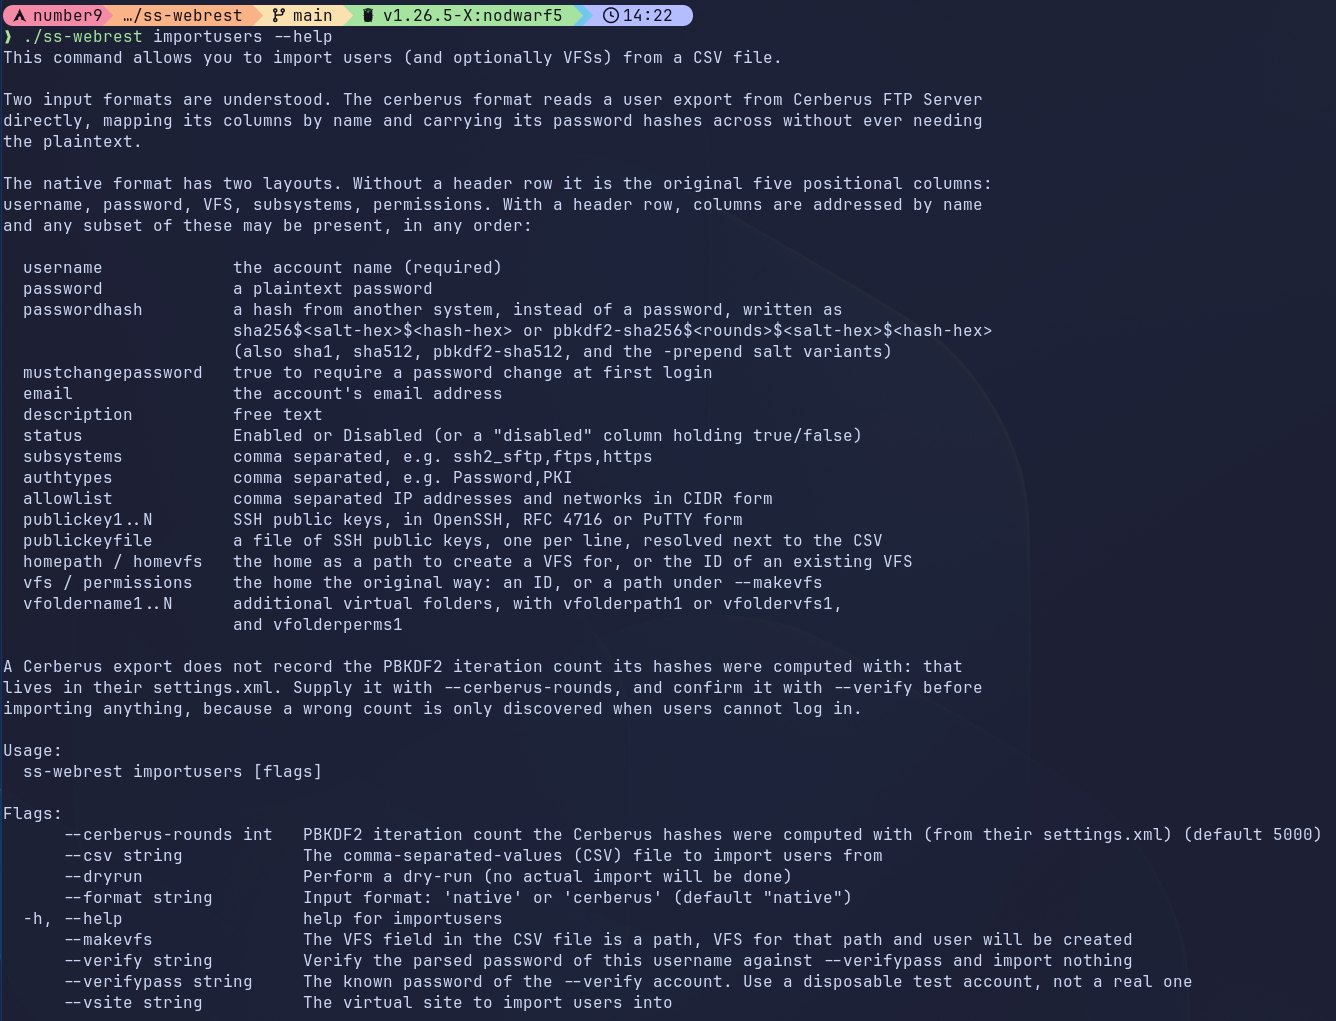
Things to notice:
- It is a verb of the
ss-webrestexecutable, found inC:\Program Files\Syncplify Server!on Windows and in/opt/Syncplify/Server/binon Linux. - It must run as Administrator (Windows) or as root, through
sudo(Linux). - Its options:
| Option | Meaning |
|---|---|
--file | Mandatory. The path to the file (CSV, JSON, XML) holding the user profiles to import. --csv is still accepted as a deprecated alias. |
--vsite | Mandatory when importing. The ID (not the friendly name) of the virtual site to import users into. |
--format | Optional, defaults to native. The other accepted values are cerberus, sftpgo and filezilla. |
--makevfs | Optional switch, native format only. When present, the VFS field of the CSV is expected to be an absolute directory path, and a Disk VFS for that path is created and assigned to the user as their home VFS. |
--dryrun | Optional switch. Nothing is changed on your Syncplify Server!; the command only evaluates whether the import would succeed. |
--cerberus-rounds | Optional, cerberus format only. The PBKDF2 iteration count of the Cerberus installation; see below, because it matters a great deal. |
--verify, --verifypass | Optional, cerberus and filezilla formats only. Check that the hashes are read correctly before you import anything. |
When the import finishes, the command prints a summary line telling you how many accounts were imported, how many were skipped because they already existed, and how many failed. If even one row failed, the command exits with a non zero exit code, so you can drive it from a script and know whether it went well without reading the output.
Some accounts import with a warning printed against them by name. A warning means the account was created, but something the other product held could not be carried across in full: a setting Syncplify Server! has no equivalent for, a credential it will not store, a limit expressed in a unit the file does not state. Those are the accounts worth looking at afterwards, and the summary counts them separately so they do not disappear behind several hundred successes.
The native format
Syncplify's own format comes in two layouts. The original one is positional and has exactly five columns. The new one has a header row and lets you name the columns you actually want to use.
You do not have to choose: importusers reads the first row of the file and works it out for you. If that first row names columns, the file is read by name. If it does not, the file is read the way it always was.
The classic five column layout
This is the layout Syncplify Server! has read since 6.2.50, and it still imports exactly as it always did.
If the --makevfs parameter is present, the CSV must contain data like this:
csv
oneuser,"some password","/home/oneuser","ssh2_scp,ssh2_sftp,ftps,ftpes,https,https_sharing","dirList"
anotheruser,"some other password","/home/differenthome","ssh2_shell,ssh2_scp,ssh2_sftp","dirList,dirMake,dirRename,fileGet,filePut,fileModify,fileRename"
test,test123,"/home/oneuser","ssh2_sftp,ftps,ftpes,https,https_sharing","dirList,dirMake,filePut,fileModify"
Whereas if the --makevfs parameter is not present, the CSV must contain data like this:
csv
oneuser,"some password",2iSpTdEgRGPuYh0MVx2uWr5zxR4,"ssh2_scp,ssh2_sftp,ftps,ftpes,https,https_sharing","dirList"
anotheruser,"some other password",2l42WNHRjDtQUx8HdhGV5Jwq5j0,"ssh2_shell,ssh2_scp,ssh2_sftp","dirList,dirMake,dirRename,fileGet,filePut,fileModify,fileRename"
test,test123,2mDUa8AaNKnmebSKy1ziUMyns0d,"ssh2_sftp,ftps,ftpes,https,https_sharing","dirList,dirMake,filePut,fileModify"
The only difference is the third field: with --makevfs it is a fully qualified, absolute path to a local storage location available on your operating system; without it, it is the ID of a VFS already configured in your Syncplify Server!.
All the usual CSV rules apply, for example the need to double quote strings that contain spaces, wherever they are. The accepted content of each field is:
- Username: all lowercase and absolutely no spaces.
- Password: free text (in double quotes if it contains spaces).
- VFS ID or absolute path, depending on the presence of
--makevfsas explained above. - Allowed subsystems: a double quoted, comma delimited list of these values:
ssh2_shell,ssh2_command,ssh2_scp,ssh2_sftp,ftp,ftps,ftpes,https,https_sharing. - Permissions: a double quoted, comma delimited list of these values:
dirList,dirMake,dirRename,dirDelete,dirEditMetadata,fileGet,filePut,fileModify,symlink,fileRename,fileDelete,fileEditMetadata.
The named layout (new, always to be preferred)
Five columns are not a lot, and for years that was all the importusers command could carry. Starting from v8.1.1 the native format has a header row.
Add a first line naming your columns, and from that point on you can supply any subset of the columns below, in any order you like. Any column this version does not recognize is simply ignored, rather than throwing everything after it out of alignment, and the spelling of a column name is forgiving: Allow List, allow_list and ALLOWLIST are all the same column.
Here is everything the named layout understands:
| Column | What it holds |
|---|---|
username | The account name, all lowercase and no spaces (this one is required) |
password | A password in clear text |
passwordhash | A password you only have as a hash, instead of password (see below) |
mustchangepassword | true to force the user to change the password at first login |
email | The user's email address |
description | Free text |
status | Enabled or Disabled. You may use a disabled column holding true or false instead |
subsystems | Comma delimited, same values as the classic layout |
authtypes | Comma delimited: Password, PKI, Keyboard-Interactive |
allowlist | Comma delimited IP addresses and networks in CIDR notation |
publickey1, publickey2, and so on | One SSH public key per column |
publickeyfile | A file containing SSH public keys, one per line |
homepath | An absolute path; a Disk VFS is created for it and used as the home VFS |
homevfs | The ID of an existing VFS, to be used as the home VFS |
vfs and permissions | The home VFS the classic way: an ID, or a path when --makevfs is present |
vfoldername1, vfolderpath1 or vfoldervfs1, vfolderperms1 | A virtual folder besides the home, numbered from 1 upward |
A file using the named layout looks like this:
csv
username,password,email,description,status,subsystems,authtypes,allowlist,homepath,permissions
alice,"some password",alice@example.com,"Accounting","Enabled","ssh2_sftp,https","Password,PKI","10.0.0.0/8","/home/alice","dirList,fileGet,filePut,fileModify,fileEditMetadata"
bob,"another password",bob@example.com,"Warehouse","Disabled","ftps,ftpes","Password","192.168.1.0/24","/home/bob","dirList,fileGet"
A word on the homepath column: it always means a path, and homevfs always means the ID of an existing VFS, so neither of them needs the --makevfs flag to be understood. The older vfs column still behaves the way it always has, and still follows the flag. Use whichever you prefer.
Paths are judged by the platform your Syncplify Server! actually runs on. On Windows a path like C:\ftproot\alice, or a UNC path like \\fileserver\share\alice, is perfectly ordinary and imports without complaint. On Linux the same path cannot possibly work, so it is refused with a message saying exactly that, rather than a vague complaint about a malformed file. The same holds in reverse for a POSIX path on a Windows installation.
You can also use the variable inside a path, exactly as you would when configuring a parametric VFS by hand, and it is resolved when the user logs in.
Importing users whose password you only have as a hash
This is the part that makes migrations from other servers genuinely painless.
When you move users away from another file transfer server, you almost never have their passwords. You have hashes, because any server worth using stores hashes and not passwords. Until now that left you with an unpleasant choice: assign everybody a temporary password and make several hundred people go through a password reset, or leave the old server running.
The passwordhash column takes the hash instead, and the user carries on logging in with the password they have always used. Nobody ever handles the clear text, because nobody ever has it.
Write the hash like this, all on one line, with the salt and the hash itself in base16 (hexadecimal):
text
sha256$<salt-hex>$<hash-hex>
pbkdf2-sha256$<rounds>$<salt-hex>$<hash-hex>
The accepted algorithms are sha1, sha256 and sha512 for the single pass salted digests, and pbkdf2-sha256 and pbkdf2-sha512 for PBKDF2. The salted digests are computed over the salt followed by the password. If the server you are migrating from prepends the salt to the password before handing it to PBKDF2, rather than passing it as the salt parameter, use pbkdf2-sha256-prepend or pbkdf2-sha512-prepend instead.
A complete row might look like this:
csv
username,passwordhash,subsystems,homepath,permissions
alice,pbkdf2-sha256$5000$000102030405060708090A0B0C0D0E0F$7722E3128BC944CF8B4F98C7D0DC32689191B129BB73E9D7D33F0B617B5DAE4E,"ssh2_sftp","/home/alice","dirList,fileGet"
Notice that the format records the iteration count inside the field itself. That is deliberate: a CSV that imports correctly today will still import correctly in a year, without anybody having to remember which parameters were used when it was written.
A row may carry a password or a passwordhash, but never both. If it carries both, that row is refused rather than guessed at, because guessing would decide somebody's credential by coin toss.
What happens to an imported hash afterwards
An imported hash is a temporary guest, not a permanent resident.
Syncplify Server! stores passwords as PBKDF2 with a work factor that follows the OWASP guidance, which is a great deal stronger than what most other servers use, and meets or exceeds the FIPS 140-3 requirements. An imported hash keeps whatever parameters the old server chose, because that is the only way it can verify at all, and those parameters are usually much weaker.
So the very first time an imported user logs in successfully, Syncplify Server! quietly rehashes their password with its own parameters and the storage mode configured for that virtual site, and the old hash is discarded. The user notices nothing. From that moment on, the account is indistinguishable from one created by a Syncplify Server! administrator in the first place.
You do not have to do anything to make this happen. It is automatic, and it applies to every protocol: SFTP, FTP/S and the WebClient!.
Importing SSH public keys
If your users authenticate with public keys, list them.
You can put one key per column, using publickey1, publickey2 and so on, or you can point the publickeyfile column at a file containing one key per line, in the same style as an authorized_keys file. Blank lines and lines starting with # are ignored. A relative path in that column is resolved next to the CSV file itself, so you can keep an entire migration in one directory and move it around as a unit.
Keys may be in OpenSSH format, in the RFC 4716 format, or in PuTTY's own public key format. Syncplify Server! works out which is which, computes the fingerprint, and discards duplicates.
Do remember to include PKI in the authtypes column for those users, otherwise the keys are stored but the account still expects a password.
Adding virtual folders besides the home
The vfoldername1, vfolderpath1 (or vfoldervfs1) and vfolderperms1 columns add a virtual folder mounted under the name you give it. Number them upward for as many as you need.
csv
username,password,subsystems,homepath,permissions,vfoldername1,vfolderpath1,vfolderperms1
alice,"some password","ssh2_sftp","/home/alice","dirList,fileGet","shared","/srv/shared","dirList,fileGet,filePut,fileModify,fileEditMetadata"
As with the home, vfolderpath1 always means a path that a VFS will be created for, and vfoldervfs1 always means the ID of a VFS you have already configured.
Importing from Cerberus FTP Server
Cerberus FTP Server can export its user accounts to CSV, and importusers reads that export directly. There is no conversion step, no script to run first, and no spreadsheet surgery.
bash
ss-webrest importusers --format cerberus --file cerberus-users.csv --vsite <virtual-site-id>Cerberus writes a header row naming its columns, and the export is read by column name rather than by position. This matters more than it sounds: Cerberus's own documentation warns that an export has to match the exact release it is imported into, because their columns move around between versions. Reading by name makes the import immune to precisely that.
First, and this really matters, verify the iteration count
Cerberus stores its passwords as PBKDF2 by default, and it has done so since their version 7.0. The trouble is that the number of PBKDF2 iterations is nowhere in the export. It lives in the Cerberus settings.xml file, as a server wide setting, and the password field in the CSV simply has no room for it.
The default is 5000, and that is what importusers assumes. If your Cerberus administrator ever raised it, the assumption is wrong, and here is why that is nasty: a wrong iteration count fails silently. The import succeeds. Every account looks perfect. And then every single user is rejected at login while typing their correct password, and nothing anywhere says why.
So before importing anything, verify. Create a throwaway account in Cerberus with a password you choose yourself, export it, and then:
bash
ss-webrest importusers --format cerberus --file cerberus-users.csv --verify migrationtest --verifypass "the password you chose"This reads the file, recomputes the hash, and tells you whether the parameters in use actually reproduce it. It touches no database, it needs no virtual site, and it cannot import anything, so it is entirely safe to run as many times as you like.
If everything is as expected you will see:
text
Parsed the credential of migrationtest: pbkdf2, sha256, 16 byte salt, 32 byte hash
VERIFIED: the supplied password reproduces the stored hash.
Import this export with --cerberus-rounds 5000.
And if the parameters are not what was assumed, it does not simply give up. It sweeps every plausible iteration count and tells you which one is right:
text
Parsed the credential of migrationtest: pbkdf2, sha256, 16 byte salt, 32 byte hash
The parameters supplied do not reproduce the hash. Sweeping the alternatives...
FOUND: this export uses 20000 rounds with the 'standard' salt mode.
Import this export with --cerberus-rounds 20000.
Then simply pass that number when you import:
bash
ss-webrest importusers --format cerberus --file cerberus-users.csv --vsite <virtual-site-id> --cerberus-rounds 20000INFO
If your Cerberus installation is old enough to still store passwords as plain SHA1, SHA256 or SHA512 rather than PBKDF2, those are read too, and no iteration count is involved. --verify tells you which kind you are dealing with.
Importing from SFTPGo
SFTPGo keeps its accounts in a data provider (SQLite, PostgreSQL, MySQL and so on) rather than in a file you can read, but it can export the whole thing as a single JSON document, and importusers reads that document directly.
To produce it, open the SFTPGo WebAdmin, go to the Maintenance section and take a backup, or call the dumpdata endpoint of their REST API. Either way you end up with one JSON file holding every account. Then:
bash
ss-webrest importusers --format sftpgo --file sftpgo-backup.json --vsite <virtual-site-id>No verification step needed
Unlike a Cerberus export, an SFTPGo dump needs no --verify pass and has no iteration count to supply on the command line. SFTPGo writes every parameter of a password hash inside the hash string itself, in the modular crypt format most of the Unix world uses. There is nothing to guess and nothing to sweep for.
What cannot come across
An SFTPGo account whose storage is not local fails to import, deliberately, and the report says which account and why:
- Cloud and remote backends (S3, Google Cloud Storage, Azure Blob, SFTP, HTTP). The credentials for those are secrets encrypted with that installation's own key, so they are not in the dump in any usable form, and such an account's home directory is a virtual root rather than a path. Create the equivalent VFS in Syncplify Server! first, then import the account against its ID.
- Their encrypted filesystem. The data on disk is ciphertext under a key held in SFTPGo's own key management. Importing it as an ordinary Disk VFS would hand the account its own files as unreadable rubbish, which looks exactly like data corruption to everybody involved. Decrypt it on the SFTPGo side before migrating.
SFTPGo groups are not read either. A setting an account inherits from a group rather than holding itself is not on the account in the dump, so those users arrive with the defaults and are worth reviewing.
Importing from FileZilla Server
FileZilla Server has had two quite different configuration formats over the years, and both are still very much in the field. importusers reads both, because asking somebody to upgrade the server they are leaving, in order to leave it, is a step at which migrations tend to die.
| FileZilla version (generation) | Point --file at |
|---|---|
| 1.0 and later | users.xml |
| 0.9.x | FileZilla Server.xml |
The command works out which generation it is looking at by itself.
bash
ss-webrest importusers --format filezilla --file users.xml --vsite <virtual-site-id>If a groups.xml sits beside your users.xml, it is picked up automatically.
Where to find these files: a FileZilla Server 1.x Windows service normally keeps its configuration under C:\Windows\System32\config\systemprofile\AppData\Local\filezilla-server, and an installation started with their --config-dir option keeps it wherever that says. FileZilla Server 0.9.x kept its single XML in the installation folder, typically C:\Program Files (x86)\FileZilla Server.
INFO
Counter intuitive, but true: the older format imports more faithfully than the newer one. FileZilla 1.0 replaced ten per directory permission flags with a choice of four access modes, so a 0.9.x configuration tells us considerably more about what each account was actually allowed to do. If you still have the old configuration around, import from that one.
Passwords, and the one account type that needs planning
FileZilla has used three password schemes over the years, and a single modern users.xml can hold all three at once, because FileZilla Server 1.x still accepts the two old ones and quietly rewrites them the first time their owner logs in. That is exactly what Syncplify Server! does with an imported hash, so the arrangement transfers intact rather than being compromised.
| FileZilla scheme | Written by | Comes across |
|---|---|---|
| PBKDF2-HMAC-SHA256 | 1.0 and later | Yes |
| Salted SHA512 | 0.9.55 and later | Yes |
| Unsalted MD5 | 0.9.54 and earlier | No |
That last row is the one to plan for. Syncplify Server! does not implement MD5 anywhere in its password handling, and it is not going to be added in order to store somebody's credential from 2009. An account whose password is an unsalted MD5 therefore imports without a password, is named in the report, and is then refused unless it has some other way to sign in.
There is a pleasant way around this that costs you nothing at all. FileZilla Server 1.x replaces an MD5 hash with a modern one the moment its owner logs in successfully. So get those users to sign in to FileZilla once before you migrate, export again, and their passwords come across intact. Whatever is left after that is the set of accounts nobody has used in years, which is worth a second look regardless.
What fails rather than importing approximately
Four situations refuse the account outright and say why. Each of them would otherwise produce an account quietly holding access that it did not hold in FileZilla, and that is the one category of migration error that cannot be spotted after the fact:
- A disabled mount point. In FileZilla this is an explicit denial, usually of a subdirectory whose parent another mount point exposes. Skipping it would leave that path reachable through the parent, turning a denial into an exposure without a word being said.
- A per user deny list. Syncplify Server! has a per user allow list and no per user deny list, so importing such an account would simply drop the restriction. Ban those addresses on the virtual site's Shield and remove the entry in FileZilla, or create that one account by hand.
- An allow list entry that cannot be translated exactly. Wildcards such as
192.168.1.*convert cleanly to CIDR notation; anything that cannot be converted fails the account, because an allow list that arrives empty is not a restriction, it is the absence of one. - No mount point at
/. FileZilla builds a synthetic root listing out of the other mount names when an account has no root. Syncplify Server! has no equivalent to a home that is not a directory, and choosing one of the other mount points would land the user somewhere they have never been. Give that account a root mount point in FileZilla, or create it here by hand.
FileZilla Server is an FTP server
Nothing in a FileZilla configuration can say that an account may use SFTP, because in the product that wrote the file no account can. Imported accounts therefore arrive with ftp, ftps and ftpes, and never with ssh2_sftp.
FileZilla Pro Enterprise Server does serve SFTP, along with public keys, two factor authentication and Active Directory integration. If your export came from that build, add the SFTP subsystem to those accounts after importing; the command says so once at the start of the run rather than guessing several hundred times.
One last thing worth knowing: FileZilla writes an enabled attribute on every account it creates, and its own support answer for an account that cannot log in is to check that the attribute is there. So an account arriving without one is imported disabled, and told so. An import may leave an account switched off by mistake; it may never switch one on.
Other limitations
The current version of the importusers command still makes a few assumptions:
- It can only import Local users, which are users authenticated locally by Syncplify Server!; it cannot import LDAP or OIDC users.
- It can associate users with any VFS type (Disk, S3, Azure, and so on) if the VFS ID is provided, but when creating VFSs from paths it can only create Disk VFSs.
- The VFSs it creates are not encrypted at rest. Encryption at rest cannot be enabled on a VFS after it has been created, so if you need it, create those VFSs yourself first and reference them by ID.
- It must run as Administrator (Windows) or as root, through
sudo(Linux). - Every imported account must end up with a genuine way to sign in: a password, or an SSH public key with
PKIamong its authentication types. An account that would arrive with neither is refused by name rather than created in a state where its owner is rejected at every login with nothing to explain it.
And a few limits specific to each of the three foreign formats, all described above:
- Cerberus: SSH public keys and groups are not present in their export and therefore cannot be imported.
- SFTPGo: accounts on cloud, remote or encrypted storage cannot be imported as they are, and groups are not read.
- FileZilla: accounts still carrying an unsalted MD5 password import without one, group membership in a 1.x configuration is reported rather than inherited, and no account is granted SFTP.
The classic command on 6.2.50 to 8.1.0
Syncplify Server! v6 and v7, and v8 releases before 8.1.1, ship the original importusers, which reads only the classic five column layout shown above. The differences from the command described on this page:
- The file option is
--csv, not--file(v8.1.1 and later still accept--csvas a deprecated alias). - There is no
--format: the only input is the native CSV. --vsite,--makevfsand--dryrunwork as described above.- Only password authentication can be imported: no public keys, no
authtypes. - Only the five classic details come across: username, password, VFS, subsystems and permissions.
- Only Local users, and only Disk VFSs when
--makevfscreates them, exactly as today.
The feature does not exist in versions before 6.2.50.