
How to import many users at once from a CSV file (new way, v8.1.1+)
ComingIMPORTANT: soonthis article describes the importusers command as it exists in Syncplify Server! version 8.1.1 and greater. A much simpler version of this command has existed since 6.2.50, and everything that worked back then still works today, but the options and formats described below were added in 8.1.1.
Sometimes, to ease transition from other SFTP servers, it may be useful to have the ability to import user profiles, along with their VFSs, in bulk from a comma-separated value (CSV) file.
The importusers command does exactly that, and it now does considerably more than it used to. It can read our own CSV format, which has grown to cover almost everything a user account can hold, and it can also read a user export produced by Cerberus FTP Server directly, without any conversion step in between. In both cases it can carry across passwords that you do not have in clear text, because they are already hashed.
Let's see its inline help first, to familiarize ourselves with how it works:
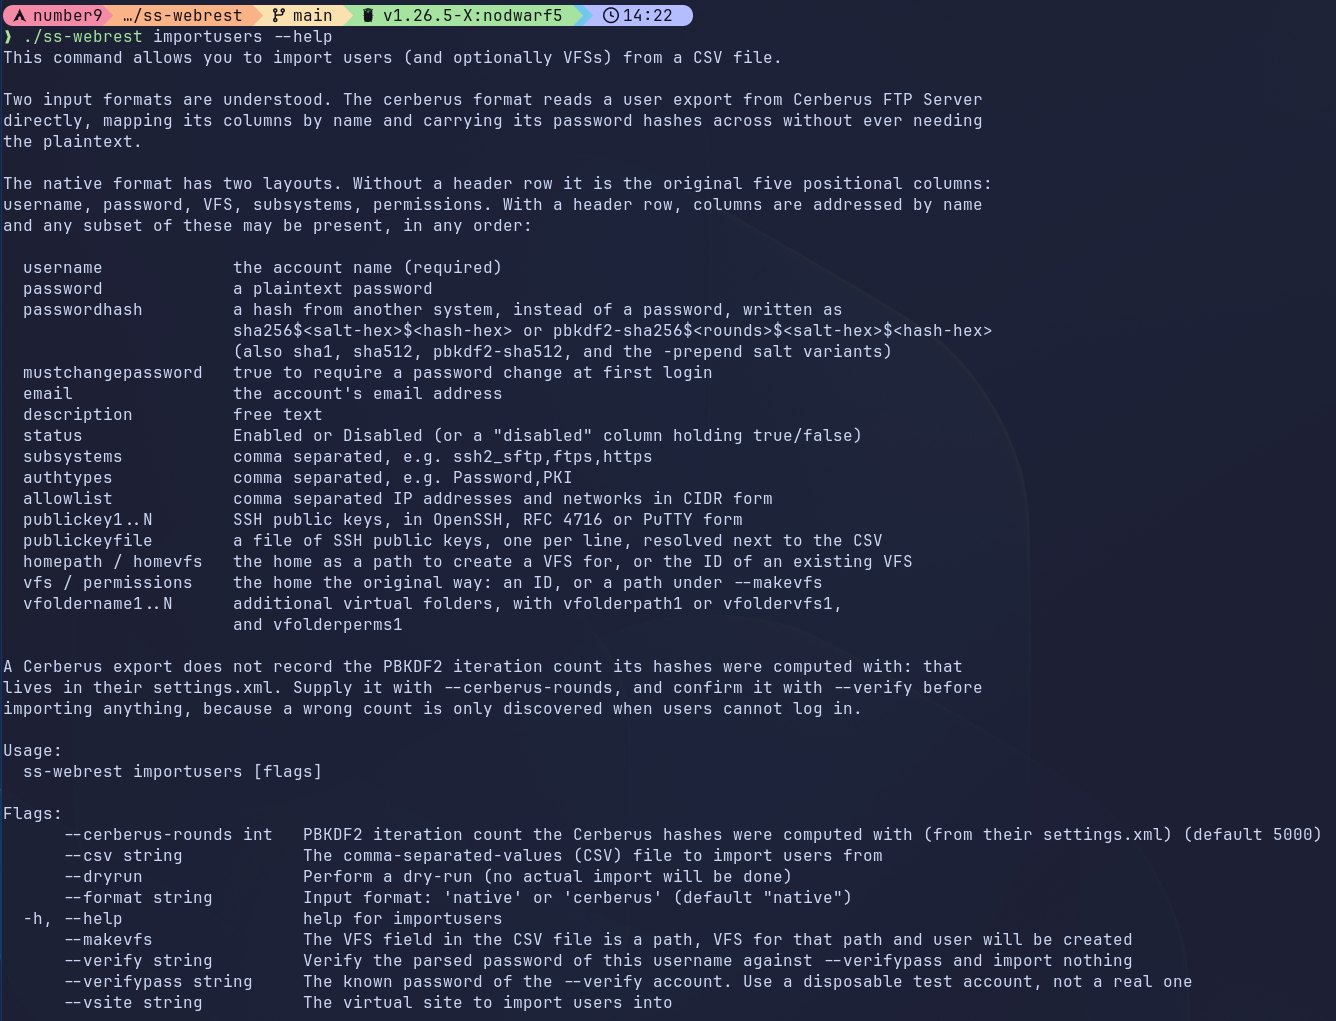
Things to notice:
- It is a command built into the
ss-webrestexecutable - It needs to be run as Administrator (in Windows) or as root/sudo (in Linux)
- It can take various options at command line:
--csvis mandatory, this is the path to the CSV file containing the info on the user profiles to be imported--vsiteis mandatory when importing, it's the ID (not the friendly name) of the virtual site you wish to import users into--formatis optional and defaults to native, the other accepted value is cerberus--makevfsis boolean and optional, if present the VFS field in the CSV file is expected to be an absolute directory path and a VFS for that path will be created and assigned to the user as its Home VFS--dryrunis boolean and optional, if present no changes will be made to your Syncplify Server! and the importusers command will only evaluate whether or not the import operation would be successful--cerberus-roundsis optional and only applies to the cerberus format, more on this later because it matters a great deal--verifyand--verifypassare optional and only apply to the cerberus format, they check that we are reading the hashes correctly before you import anything
When the import finishes, the command prints a summary line telling you how many accounts were imported, how many were skipped because they already existed, and how many failed. If even one row failed, the command exits with a non-zero exit code, so you can drive it from a script and know whether it went well without reading the output.
The native format
Our own format comes in two layouts. The original one is positional and has exactly five columns. The new one has a header row and lets you name the columns you actually want to use.
You do not have to choose: importusers reads the first row of the file and works it out for you. If that first row names columns, the file is read by name. If it does not, the file is read the way it always was.
The classic (old-school) five column layout
This is the layout Syncplify Server! has read since 6.2.50, and it still imports exactly as it always did.
If the --makevfs parameter is present, the CSV must contain data like this:
oneuser,"some password","/home/oneuser","ssh2_scp,ssh2_sftp,ftps,ftpes,https,https_sharing","dirList"
anotheruser,"some other password","/home/differenthome","ssh2_shell,ssh2_scp,ssh2_sftp","dirList,dirMake,dirRename,fileGet,filePut,fileModify,fileRename"
test,test123,"/home/oneuser","ssh2_sftp,ftps,ftpes,https,https_sharing","dirList,dirMake,filePut,fileModify"
Whereas if the --makevfs parameter is not present, the CSV must contain data like this:
oneuser,"some password",2iSpTdEgRGPuYh0MVx2uWr5zxR4,"ssh2_scp,ssh2_sftp,ftps,ftpes,https,https_sharing","dirList"
anotheruser,"some other password",2l42WNHRjDtQUx8HdhGV5Jwq5j0,"ssh2_shell,ssh2_scp,ssh2_sftp","dirList,dirMake,dirRename,fileGet,filePut,fileModify,fileRename"
test,test123,2mDUa8AaNKnmebSKy1ziUMyns0d,"ssh2_sftp,ftps,ftpes,https,https_sharing","dirList,dirMake,filePut,fileModify"
As you can see the only difference is that when --makevfs is present the 3rd field of each record in the CSV is expected to be a fully-qualified and absolute path to a local storage location available in your OS, whereas when --makevfs is absent the import process expects you to provide the ID of an existing VFS already configured in your Syncplify Server!
All other typical CSV format requirements remain in place, like, for example, the need to double-quote strings that contain spaces, wherever they might be.
So, what is the accepted content for each field in each record (line) of the CSV? Here you go:
- Username: all lowercase and absolutely no spaces
- Password: free text (within double-quotes only if it contains spaces)
- VFS ID or Absolute Path: depending on the presence of --makevfs as explained above
- Allowed subsystems: a double-quoted string containing a comma-delimited list of the following valid values: ssh2_shell, ssh2_command, ssh2_scp, ssh2_sftp, ftp, ftps, ftpes, https, https_sharing
- Permissions: a double-quoted string containing a comma-delimited list of the following valid values: dirList, dirMake, dirRename, dirDelete, dirEditMetadata, fileGet, filePut, fileModify, symlink, fileRename, fileDelete, fileEditMetadata
The named layout (new, always preferred)
Five columns are not a lot, and for years that was all the importusers command could carry. So, starting from v8.1.1 we gave the native format a header row.
Add a first line naming your columns, and from that point on you can supply any subset of the columns below, in any order you like. Any columns this version does not recognize are simply ignored rather than throwing everything after them out of alignment, and the spelling of a column name is forgiving: Allow List, allow_list and ALLOWLIST are all the same column.
Here is everything the named layout understands:
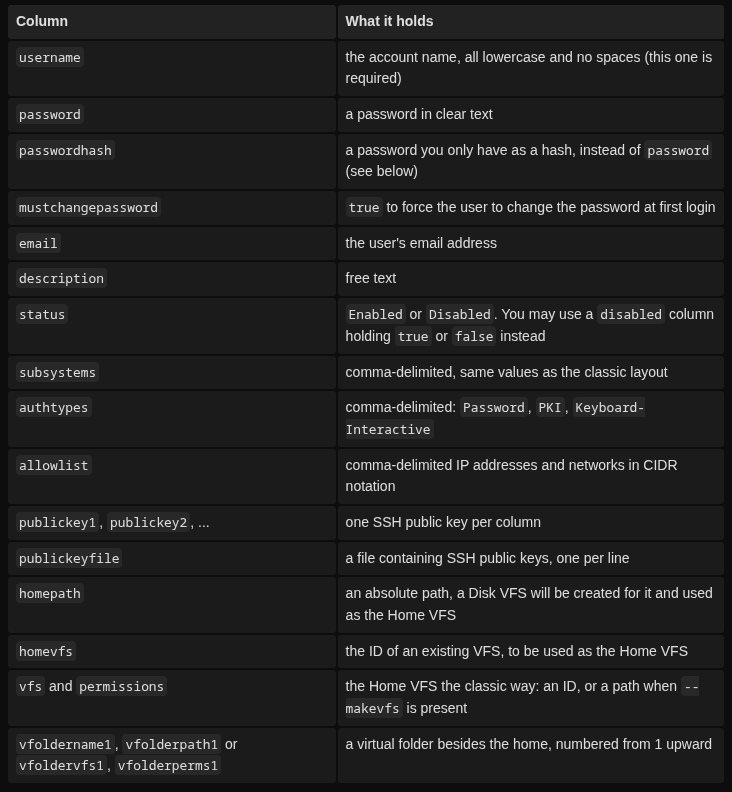
A file using the named layout looks like this:
username,password,email,description,status,subsystems,authtypes,allowlist,homepath,permissions
alice,"some password",alice@example.com,"Accounting","Enabled","ssh2_sftp,https","Password,PKI","10.0.0.0/8","/home/alice","dirList,fileGet,filePut,fileModify,fileEditMetadata"
bob,"another password",bob@example.com,"Warehouse","Disabled","ftps,ftpes","Password","192.168.1.0/24","/home/bob","dirList,fileGet"
A word on the homepath column: it always means a path, and homevfs always means the ID of an existing VFS, so neither of them needs the --makevfs flag to be understood. The older vfs column still behaves the way it always has, and still follows the flag. Use whichever you prefer.
Paths are judged by the platform your Syncplify Server! actually runs on. On Windows a path like C:\ftproot\alice, or a UNC path like \\fileserver\share\alice, is perfectly ordinary and will import without complaint. On Linux the same path cannot possibly work, so it is refused with a message telling you exactly that, rather than a vague complaint about a malformed file. The same holds in reverse for a POSIX path on a Windows installation.
You can also use our {{username}} variable inside a path, exactly as you would when configuring a VFS by hand, and it will be resolved when the user logs in.
Importing users whose password you only have as a hash
This is the part that makes migrations from other servers genuinely painless.
When you move users away from another file transfer server, you almost never have their passwords. You have hashes, because any server worth using stores hashes and not passwords. Until now that left you with an unpleasant choice: assign everybody a temporary password and make several hundred people go through a password reset, or leave the old server running.
The passwordhash column takes the hash instead, and the user carries on logging in with the password they have always used. Nobody ever handles the clear text, because nobody ever has it.
Write the hash like this, all on one line, with the salt and the hash itself in base16 (hexadecimal):
sha256$<salt-hex>$<hash-hex>
pbkdf2-sha256$<rounds>$<salt-hex>$<hash-hex>
The accepted algorithms are sha1, sha256 and sha512 for the single pass salted digests, and pbkdf2-sha256 and pbkdf2-sha512 for PBKDF2. The salted digests are computed over the salt followed by the password. If the server you are migrating from prepends the salt to the password before handing it to PBKDF2, rather than passing it as the salt parameter, use pbkdf2-sha256-prepend or pbkdf2-sha512-prepend instead.
So a complete row might look like this:
username,passwordhash,subsystems,homepath,permissions
alice,pbkdf2-sha256$5000$000102030405060708090A0B0C0D0E0F$7722E3128BC944CF8B4F98C7D0DC32689191B129BB73E9D7D33F0B617B5DAE4E,"ssh2_sftp","/home/alice","dirList,fileGet"
Notice that our format records the iteration count inside the field itself. That is deliberate, and it means a CSV that imports correctly today will still import correctly in a year, without anybody having to remember which parameters were used when it was written.
A row may carry a password or a passwordhash, but never both. If it carries both, that row is refused rather than guessed at, because guessing would decide somebody's credential by coin toss.
What happens to an imported hash afterwards
An imported hash is a temporary guest, not a permanent resident.
Syncplify Server! stores passwords as PBKDF2 with a work factor that follows the OWASP guidance, which is a great deal stronger than what most other servers use, and meets or exceeds FIPS 140-3 compliance requirements. An imported hash keeps whatever parameters the old server chose, because that is the only way it can verify at all, and those parameters are usually much weaker.
So the very first time an imported user logs in successfully, Syncplify Server! quietly re-hashes their password with our own parameters and the storage mode configured for that virtual site, and the old hash is discarded. The user notices nothing. From that moment on, the account is indistinguishable from one created by a Syncplify Server! administrator in the first place.
You do not have to do anything to make this happen. It is automatic, and it applies to every protocol: SFTP, FTP/S, and the WebClient!.
Importing SSH public keys
If your users authenticate with public keys, list them.
You can put one key per column, using publickey1, publickey2 and so on, or you can point the publickeyfile column at a file containing one key per line, in the same style as an authorized_keys file. Blank lines and lines starting with # are ignored. A relative path in that column is resolved next to the CSV file itself, so you can keep an entire migration in one directory and move it around as a unit.
Keys may be in OpenSSH format, in the RFC 4716 format, or in PuTTY's own public key format. Syncplify Server! works out which is which, computes the fingerprint, and discards duplicates.
Do remember to include PKI in the authtypes column for those users, otherwise the keys will be stored but the account will still expect a password.
Adding virtual folders besides the home
The vfoldername1, vfolderpath1 (or vfoldervfs1) and vfolderperms1 columns add a virtual folder mounted under the name you give it. Number them upward for as many as you need.
username,password,subsystems,homepath,permissions,vfoldername1,vfolderpath1,vfolderperms1
alice,"some password","ssh2_sftp","/home/alice","dirList,fileGet","shared","/srv/shared","dirList,fileGet,filePut,fileModify,fileEditMetadata"
As with the home, vfolderpath1 always means a path that a VFS will be created for, and vfoldervfs1 always means the ID of a VFS you have already configured.
Importing directly from Cerberus FTP Server
Cerberus FTP Server can export its user accounts to CSV, and importusers reads that export directly. There is no conversion step, no script to run first, and no spreadsheet surgery.
ss-webrest importusers --format cerberus --csv cerberus-users.csv --vsite <virtual-site-id>Cerberus writes a header row naming its columns, and we read that export by column name rather than by position. This matters more than it sounds: Cerberus's own documentation warns that an export has to match the exact release it is imported into, because their columns move around between versions. Reading by name makes us immune to precisely that.
First, and this really matters, verify the iteration count
Cerberus stores its passwords as PBKDF2 by default, and it has done so since their version 7.0. The trouble is that the number of PBKDF2 iterations is nowhere in the export. It lives in the Cerberus settings.xml file, as a server wide setting, and the password field in the CSV simply has no room for it.
The default is 5000, and that is what importusers assumes. If your Cerberus administrator ever raised it, the assumption is wrong, and here is why that is nasty: a wrong iteration count fails silently. The import succeeds. Every account looks perfect. And then every single user is rejected at login while typing their correct password, and nothing anywhere says why.
So before importing anything, verify. Create a throwaway account in Cerberus with a password you choose yourself, export it, and then:
ss-webrest importusers --format cerberus --csv cerberus-users.csv --verify migrationtest --verifypass "the password you chose"This reads the file, recomputes the hash, and tells you whether the parameters we are using actually reproduce it. It touches no database, it needs no virtual site, and it cannot import anything, so it is entirely safe to run as many times as you like.
If everything is as expected you will see:
Parsed the credential of migrationtest: pbkdf2, sha256, 16 byte salt, 32 byte hash
VERIFIED: the supplied password reproduces the stored hash.
Import this export with --cerberus-rounds 5000.
And if the parameters are not what we assumed, it does not simply give up. It sweeps every plausible iteration count and tells you which one is right:
Parsed the credential of migrationtest: pbkdf2, sha256, 16 byte salt, 32 byte hash
The parameters supplied do not reproduce the hash. Sweeping the alternatives...
FOUND: this export uses 20000 rounds with the 'standard' salt mode.
Import this export with --cerberus-rounds 20000.
Then simply pass that number when you import:
ss-webrest importusers --format cerberus --csv cerberus-users.csv --vsite <virtual-site-id> --cerberus-rounds 20000NOTE: if your Cerberus installation is old enough to still be storing passwords as plain SHA1, SHA256 or SHA512 rather than PBKDF2, those are read too, and no iteration count is involved. --verify will tell you which kind you are dealing with.
Limitations
The current version of the importusers command still makes a few assumptions, namely:
- It can only import "Normal" users, which are users authenticated locally by Syncplify Server!, it cannot import "LDAP" or "OIDC" users
- It can associate users to any VFS type (Disk, S3, Azure, and so on) if the VFS ID is provided, but when creating VFSs from paths it can only create Disk-type VFSs
- VFSs it creates are not encrypted at rest. Encryption at rest cannot be enabled on a VFS after it has been created, so if you need it, create those VFSs yourself first and reference them by ID
- It needs to be run as Administrator (in Windows) or as root/sudo (in Linux)
- Two Cerberus specific limitations: SSH public keys and groups are not present in their export and therefore cannot be imported