Syncplify Server!
This knowledge base covers topics like installation, configuration, and operation of your Syncplify Server! software.
- Introduction
- Installation
- How to be notified of new releases
- Setup on Windows (GUI)
- Setup on Windows (CLI)
- Setup on Linux
- Deploy v8 with Docker
- Updating/upgrading Syncplify Server!: GENERAL RULES
- Upgrading from v4/v5 to v8
- Upgrading from v6/v7 to v8 (Windows)
- Upgrading from v6/v7 to v8 (Linux)
- Upgrading a v6/v7 high-availability (HA) cluster to v8
- Upgrading from v6 to v8 (when everything else fails)
- How to move/migrate your software to a different machine/VM
- How to recover (decrypt) old v4/v5 encrypted VFSs
- High-Availability (HA) general concepts
- High-Availability (HA): how to setup
- Licensing and license codes: a complete overview
- Operation
- Where is the manual?
- Using network shares (UNC paths) with Syncplify Server! V6+ on Windows
- Using network shares (UNC paths) with Syncplify Server! V6+ on Linux
- How to backup your Syncplify.me Server! v4/v5
- Insecure warning in your browser? It might be OK...
- Virtual File System (VFS) Encryption
- Overriding permissions on folders/directories
- How to change a SuperAdmin password
- How to reset the SuperAdmin (SA) password in v4/v5
- How to disable 2FA for a SuperAdmin account
- How to auto-fix problems with the Web/REST system service
- True 2FA/MFA over SSH2/SFTP via keyboard-interactive authentication and Google Authenticator
- How to use the SFTP Virtual File System (VFS)
- How to use the S3 Virtual File System (VFS)
- How to use the Azure blob storage Virtual File System (VFS)
- How to use the s3 Virtual File System (VFS)
- How does the block-list (Protector!) work?
- Block-list, allow-list, and safe-list
- Authenticating users via PKI
- Customizing SFTP and FTP(E/S) greetings and banners
- How to override permissions on subfolders inside the user’s Home VFS
- FATAL ERROR: Connection reset by peer (could not connect to server)
- Virtual File Systems (VFS) with quotas
- Solved: insecure FTP data connection (TLS session resumption)
- Parametric home directories (VFS)
- Cannot connect: "unexpected message type 30 (expected one of [34])" reason found in log file
- How to backup your Syncplify Server!'s database
- Unsupported public key authentication algorithm SshRsa (ssh-rsa)? Here's how to fix it.
- How to import many users at once from a CSV file
- Scripting
- How to email a list of uploaded files
- VFS.ImportFile and VFS.ExportFile
- Preventing upload of EXE files
- How to download a "publicly shared" (WebClient!) file via PowerShell
- Getting started with the REST API
- Miscellaneous
- No, we are not affected by Log4j vulnerability (CVE-2021-44228)
- How Syncplify.me Server! prevents SSHPsycho attacks
- W3C log file format and UTC timestamps
- Firewalls and FTP external IP address for PASV
- Where do I download the old v4/v5/v6/v7 installers?
- Why PGP is an extremely bad choice for a file server's at-rest encryption, and how to do it right
- Timeout logging into the SuperAdmin or Admin UI? This is how you may fix it.
- Understanding FTP and Its Variants
- SFTP and SCP: Secure File Transfer Protocols
Introduction
This is the official knowledge base for Syncplify Server! It was launched shortly after the release of Syncplify Server! v6.0, so if you're looking for articles and solutions for older versions of the software you may not find them here (unless they serve a purpose, like the tutorial on how to take a backup of an older version to import it into the most recent one).
Installation
Articles and solutions related to setup, installation, deployment, and first configuration of your Syncplify Server!
How to be notified of new releases
Keeping your software up to date is always highly recommended. Keep in mind that we keep working to improve our software and to fix bugs, so updates and upgrades are of the utmost importance for your experience with the software and for your overall safety.
There only official way to be notified when a new release of our software becomes available is to subscribe to our official release notes.
Thank you for always keeping your software up to date.
Setup on Windows (GUI)
This here below is a quick "how to" and video tutorial showing how to install and setup Syncplify Server! on Windows. It also shows its initial barebone configuration and test of some of its subsystems (protocol handlers).
Choosing between the GUI and the CLI installer for Windows
- The GUI installer (shown in the video above) provides a familiar Windows desktop experience, with its graphical wizard that guides the user through the initial process of copying the files to the target system and auto-configuring some OS settings.
- The CLI installer, on the other hand, is designed for command-line based installations, which are more suitable (or even absolutely necessary) for unattended/automated installs, SCCM, or to deploy the software on Windows Server Core editions without the Desktop Experience (as Microsoft calls it).
Did you know?
The Windows GUI and CLI installers are interchangeable, meaning that you can install (for example) version 8.0.0 using the GUI installer, then upgrade to v8.0.1 via the CLI installer, and then upgrade to v8.0.2 with the GUI installer again.
Setup on Windows (CLI)
Some versions of Windows Server, especially the recent 2019 and newer, can be installed without the graphical desktop that gave Windows its name in the first place. This makes for a usage experience that many Linux administrators are most familiar with, allowing Windows Server administrators to run their operating systems without any GUI environment, where every operation has to be performed via CLI (command-line interface) just as they would do within a Linux terminal.
Fear not! We got you covered. The same CLI installer that we have developed for Linux, also works on Windows, and the only difference is how you type in the command line to use it (as Windows relies on PowerShell, while Linux may use a variety of different and mostly-POSIX shells).
The automatic way to install
The simplest and entirely automatic way to install Syncplify Server! on your Windows machine/VM without "Desktop Experience" is to run PowerShell as Administrator, and simply type in (or copy-paste) the following command:
Invoke-Expression (New-Object Net.WebClient).DownloadString('https://dl.syncplify.com/ss-setup-win-x64.ps1')Or the equivalent shorthand version:
irm https://dl.syncplify.com/ss-setup-win-x64.ps1 | iexThis will automatically download the ZIP archive containing the most recent version of the software, extract it to a temporary location, then run the CLI installer for you.
The above should work just fine with PowerShell 6, but PowerShell 7 is highly recommended. Also, please bear in mind that after the CLI portion of the installation, you'll still have to go through the web-based portion of the initial deployment as per the instructions you'll see in your PowerShell window.
Download then install manually
First of all you will need to download the most recent version of the CLI installer for Windows from our website. Extract the archive, and then type the following in a Terminal window (PowerShell or CMD.EXE):
.\ss-setup.exe install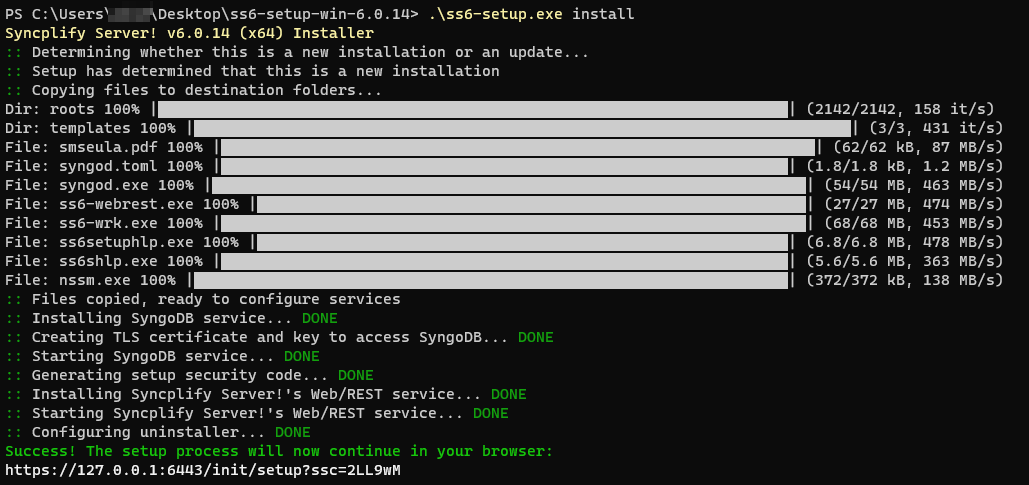
At the end of the setup process, open a browser and point it to the provided URL.
Be careful, the URL references localhost (127.0.0.1) but if you're using a browser on a different computer you will have to change 127.0.0.1 into the current IP address of the machine where you just installed Syncplify Server! on.
The same install command line argument will also update/upgrade your software (without affecting your configuration) if Syncplify Server! is already installed in your system.
How to uninstall
Use the same ss-setup from the zip archive you downloaded (or download the most recent one, doesn't matter) and type the following command into a Terminal window (PowerShell or CMD.EXE):
.\ss-setup.exe uninstallHow to update/upgrade
When the CLI installer is invoked with the install verb, it will automatically try to determine whether the software is already installed on the system, and - if that is the case - perform an update/upgrade rather than a new install.
There is, however, a way to force the CLI installer to perform an update/upgrade, when you already know that this is the case. You can simply add the --update flag to the install verb, like this:
.\ss-setup.exe install --updateAnd, just in case... you can also do a "repair"
Should anything happen, you can always use the same ss6-setup you downloaded and extracted, to "repair" your currently deployed executable and back-end DB configuration, like this:
.\ss-setup.exe install --repairMore useful command-line flags
There are a couple additional command-line flags that you may want or need to use occasionally. Both of them are intended to be used in conjunction with the install verb.
| Flag | Purpose of the flag |
--trace |
Enables trace-level logging for the installation process. This will produce a larger and more detailed installation log, useful to identify the cause of possible installation issues. |
--norollback |
Typically, should something go wrong during installation, a rollback operation is performed, to leave your system unchanged. This flag disables such rollback, so that your system remains partially modified even after a failed installation. This is useful in some cases for debugging. |
That's it. :)
Did you know?
The Windows GUI and CLI installers are interchangeable, meaning that you can install version 8.0.0 using the GUI installer, then upgrade to v8.0.1 via the CLI installer, and then upgrade to v8.0.2 with the GUI installer again.
Setup on Linux
The short one-liner
If you are not interested in a detailed overview and explanation, here's a one-line shell command that will:
- Download the current (latest release) version of the installation archive into a temporary folder
- Extract it and run the CLI setup for you via
sudowhich will install the software or automatically update it to the latest release if it's already installed in your system
For X86-64/AMD64 architecture
If you prefer wget:
wget -nv -O setup.sh https://dl.syncplify.com/ss-setup-linux-x64w.sh && sudo sh setup.shIf you prefer curl:
curl -fsS -o setup.sh https://dl.syncplify.com/ss-setup-linux-x64c.sh && sudo sh setup.shFor ARM architecture
If you prefer wget:
wget -nv -O setup.sh https://dl.syncplify.com/ss-setup-linux-armw.sh && sudo sh setup.shIf you prefer curl:
curl -fsS -o setup.sh https://dl.syncplify.com/ss-setup-linux-armc.sh && sudo sh setup.shDetailed overview and explanation
The following video shows how to install Syncplify Server! on a Linux operating system:
First of all you'll need to download the most recent version of our software from our website. After that, in order to extract it and to install it, here's a handy copy-pastable list of the two commands you'll need.
To extract the downloaded archive:
tar -xvf name_of_downloaded_targz_archive.tar.gzThen to begin installing or updating the software:
sudo ./ss-setup installAt the end of this phase, a URL will be shown to you. Simply open it in a browser to continue with the rest of the setup process.
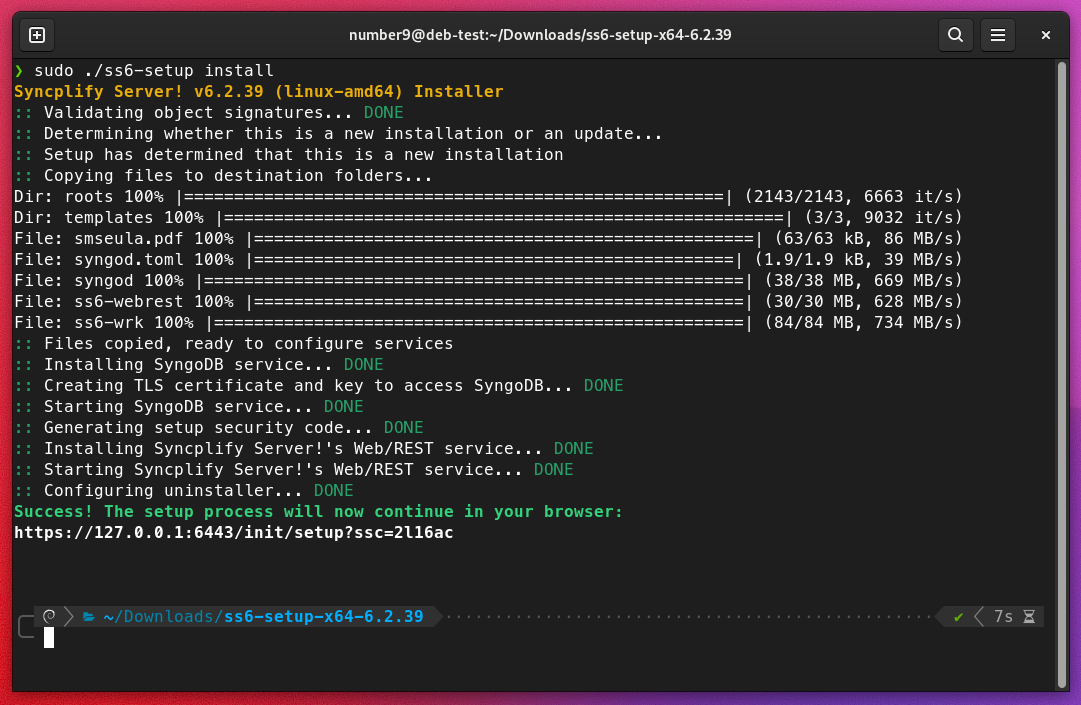
Be careful, the URL references localhost (127.0.0.1) but if you're using a browser on a different computer you will have to change 127.0.0.1 into the current IP address of the machine where you just installed Syncplify Server! on.
How to uninstall
To make uninstallation easier, the installer copies the ss6-setup executable to your /usr/bin directory. Therefore, in order to uninstall Syncplify Server! you can simply open a terminal window anywhere, and type:
sudo ss-setup uninstallAfter that, if you also want to remove the uninstaller, you may (optionally) want to do this, too:
sudo rm /usr/bin/ss-setupHow to update/upgrade
When the CLI installer is invoked with the install verb, it will automatically try to determine whether the software is already installed on the system, and - if that is the case - perform an update/upgrade rather than a new install.
There is, however, a way to force the CLI installer to perform an update/upgrade, when you already know that this is the case. You can simply add the --update flag to the install verb, like this:
sudo ./ss-setup install --updateAnd, just in case... you can also do a "repair"
Should anything happen, you can always use the same ss-setup you downloaded and extracted, to "repair" your currently deployed executable and back-end DB configuration, like this:
sudo ./ss-setup install --repairMore useful command-line flags
There are a couple additional command-line flags that you may want or need to use occasionally. Both of them are intended to be used in conjunction with the install verb.
| Flag | Purpose of the flag |
--trace |
Enables trace-level logging for the installation process. This will produce a larger and more detailed installation log, useful to identify the cause of possible installation issues. |
--norollback |
Typically, should something go wrong during installation, a rollback operation is performed, to leave your system unchanged. This flag disables such rollback, so that your system remains partially modified even after a failed installation. This is useful in some cases for debugging. |
That's it. :)
Deploy v8 with Docker
Syncplify Server! is available as a Docker image on Docker Hub. This page covers how to deploy and operate it using Docker Compose.
Prerequisites
- Linux host OS (we don't support Docker on Windows yet...)
- Docker Engine 24.0 or later
- Docker Compose v2 (the
docker composeplugin, not the legacydocker-compose) - The host must not already use ports 21, 22, 990, 6443, or 6444 for other services
Deploying with Docker Compose
Create a docker-compose.yml file on your Docker host with the following content:
services:
syncplify-server:
image: syncplify/ss:latest
container_name: syncplify-server
restart: unless-stopped
environment:
# Activates the in-process worker supervisor (replaces systemd).
# Do NOT remove or change this variable.
- SS_CONTAINER_MODE=1
ports:
- "22:22"
- "21:21"
- "990:990"
- "6443:6443"
- "6444:6444"
- "44388:44388"
volumes:
- /opt/Syncplify/Server/data:/opt/Syncplify/Server/data
- /opt/Syncplify/Server/log:/opt/Syncplify/Server/log
# Add one volume mount for each directory you want the SFTP/FTP server
# to be able to use as a home or root directory for your users.
# Example:
- /var/sftpdata:/var/sftpdata
# Access to the host machine ID is required for licensing.
- /etc/machine-id:/etc/machine-id:roIMPORTANT: Any host directory that you intend to use as a virtual site root, user home, or shared folder must be mounted into the container. The container cannot access host paths that are not explicitly listed under volumes. Add one entry per directory, keeping the host path and container path identical (e.g. - /var/sftpdata:/var/sftpdata). You can use any path that suits your environment.
Then follow the steps below.
1. Create persistent directories
sudo mkdir -p /opt/Syncplify/Server/data /opt/Syncplify/Server/log /var/sftpdataAll configuration, the license file, virtual-site definitions, and the internal database are stored under /opt/Syncplify/Server/data. Logs are written to /opt/Syncplify/Server/log. Both directories survive container restarts and upgrades.
2. Pull the image and start
docker compose pull
docker compose up -dOn the first start the container initializes a clean installation automatically.
3. Complete initial setup
Open a browser and navigate to: https://your-docker-host:6443/init/setup
Follow the on-screen setup wizard to create your first administrator account, configure your license, and set up virtual sites.
IMPORTANT: During initial setup, the setup wizard is accessible to any client that can reach port 6443. Ensure this port is not publicly reachable until setup is complete. You can restrict access temporarily using host firewall rules or Docker network policies.
A more detailed explanation is available in our official manual/documentation.
Updating/upgrading Syncplify Server!: GENERAL RULES
The process to update or upgrade your Syncplify Server! falls into one of the following scenarios. Please read the one that applies to your current situation.
Updating within the same major version (ex: from v8.x.y to v8.w.z)
If the major version remains the same, updating your software to the most recent release is very straightforward: simply download the installer from our official website, and run it.
Your virtual sites, users, VFSs, and configuration will be kept and upgraded automatically as well, so this is truly an automatic and hassle-free procedure.
Upgrading from V6/V7 to V8 (non HA)
Whether you are upgrading from V6 or V7, the procedure is identical. The same steps described in the linked article apply regardless of which version you are currently running.
Since V6, Syncplify Server! has been built on the same architectural foundation, making the upgrade process identical across all versions from V6 onwards. Simply download the V8 installer and run it. Your configuration, virtual sites, users, and VFSs are preserved automatically. For step-by-step instructions, read the other, more detailed, update/upgrade related articles in this knowledge base.
Upgrading from V6/V7 to V8 (for HA deployments)
Since high-availability (HA) has been completely redesigned and reimplemented from scratch in v8, upgrading high-availability (HA) deployments from v6/v7 to v8 requires a more careful planning, and a specific procedure. In short, you will have to:
- Detach and decommission all HA nodes except your first node from your current v6/v7 HA cluster - this will turn your v6/v7 first node into a standalone server (non HA)
- Upgrade the now-standalone node to v8 following the usual procedure
- Then uninstall v6/v6 from your other nodes (2 though N) and install v8 fresh on those nodes adding it to the now-v8 first node to recreate your HA cluster anew
Be advised that any update requires an active maintenance/support plan, the installer will warn you if your maintenance/support plan is expired to give you a chance to renew it.
Upgrading from an older version (v4/v5 to v8)
You can perform an upgrade from an older v4/v5 version of our software. Versions 1 through 3 are too old and cannot be upgraded to v8 (read below in the third section of this article).
These upgrades from v4/v5 are relatively easy, but they do require you to perform a few manual steps, to make sure we describe the entire process and all of its implications in enough detail, with precision and thoroughness, we have written a dedicated knowledge base article on this specific topic.
Please note that you'll need a v8 license, your old v4/v5 license won't work, but if you have an active maintenance/support plan you can request a v8 license FOR FREE.
Upgrading from v1/v2/v3
Upgrading from any version older than v4 is not possible. Versions 1 through 3 were based on a totally different (and now discontinued) technology, so their configuration is not exportable and therefore it cannot be imported into v8.
So, if you're running any version of our software between v1 and v3, your only option is to deploy a brand new and fresh v8, and configure it anew (from scratch). Sorry about that, we had no other option.
Upgrading from v4/v5 to v8
Upgrading from an old (discontinued and unsupported) Syncplify.me Server! v4 or v5 to Syncplify Server! v8 is a process that requires careful planning. The purpose of this article is to help the system administrator minimize this task's complexity.
Before you begin, make sure to execute these twoi preparatory steps:
- Upgrade to the latest release of your current v4/v5 version
- Take a backup of your old V4 or V5
Once you have performed the two preparatory steps, and you have the backup file from your old installation ready at hand, please make sure you read these few short observations and recommendations, they will save you a lot of headaches in the future:
- Windows Users/Groups have been dropped: this is not a Windows-only software anymore; starting with version 6, Syncplify Server! is cross-platform (Windows and Linux) so all dependencies that are uniquely tied to a specific operating system had to be removed (Active Directory users/groups are still supported and will be imported as LDAP users/groups)
- LDAP settings are now stricter: all security aspects of your LDAP connections have been boosted and improved, this though may require some reconfiguration of your settings, please make sure you check out the relevant manual section
- Your scripts (if any) will be lost: after 8 years of honorable service, we had to say goodbye to our old scripting engine; in the spirit of unifying and uniforming our product suite, all of our software products will from now on utilize SyncJS (same as AFT!) as their only built-in scripting language
- Old or insecure host keys will not be imported: the import (restore) process checks all of the host keys in your backup, if any of them is found to be insecure it will not be imported and a new host key will be auto-generated in its place
- [Related to the above] If The ssh-rsa PKI-auth algorithm may become disabled after upgrade: there are many good reasons to ditch the RSA algorithm entirely, but if your setup or your clients need it, this article explains how to use it.
- Encrypted VFSs (if any) cannot be imported, and the users using them won't be imported either (as a consequence) - there is a way to decrypt your old V4/V5 at-rest encrypted VFS contents but you will still have to recreate your VFS profiles and users accounts manually afterwards in your new v8 (this was sadly necessary, as the AES "mode" used in our old V4/V5 at-rest encrypted VFSs is no longer considered secure by the researchers at NIST)
- Passwords containing certain specific special characters (like for example) won't work after importing them in v8: the problem is not v8, but a self-consistent encoding bug in the old v4/v5. Most of your passwords will work just fine after upgrading to v8, only those containing a tiny subset of special characters won't, but you can re-set them (set them again) in v8, including the offending special characters, and after re-setting them they will work just fine in v8 as well (let us reinforce the fact that v8 has no problem with any special character, the problem was the old v4/v5).
- User account limits may have changed: the BASIC edition now supports up to 100 user accounts, while the PROFESSIONAL and ULTIMATE editions still support an unlimited number of accounts; please assess whether or not you might need to upgrade your license to a higher edition of our software
- Other minor changes here and there: minor things like, for example, certificates must be imported using their PEM-encoded (cross-platform) format, old/insecure encryption and key-exchange algorithms have been dropped... basically, after the upgrade it's recommended to check the entire configuration to make sure it's still 100% consistent
For these reasons we do not recommend in-place upgrades, what we recommend instead is to perform a migration-upgrade. Please, read below for more details.
Performing a migration-upgrade is as simple as:
- Installing Syncplify Server! V8 on a new machine or VM (fresh operating system preferably)
- Importing your old V4/V5 backup in 1 click
Important note for existing V4/V5 license holders: every new major version, traditionally, uses a new license code type, so if you own a v4/v5 license it won't work with v8. But if you do have an active maintenance/support subscription, you can simply request a free v8 upgraded license code by submitting a ticket here.
But what if, in spite of the best-practices and recommendations here above, you still wish to perform an in-place upgrade?
In-place upgrades are certainly possible, though not highly recommended. Here's the key points to keep in mind in order to successfully perform an in-place upgrade:
- First and foremost, before you start, take a full snapshot or backup of your machine/VM - this is the best way to roll-back your fully functional old v4/v5 in case anything happens
- The procedure explained here above (for migration-upgrades) remains valid for in-place upgrades as well, with only one remarkable difference (addition): AFTER taking your old v4/v5 backup, and BEFORE starting v8 installation, you'll have to stop and disable all of your old version's system services, as shown in the picture here below:

Final steps
As with all major version upgrades, upgrading to v8 provides an opportunity to review your entire configuration to enhance your security posture. We highly recommend taking advantage of this opportunity. If your previous version (the one you're upgrading from) was configured to use algorithms that are now considered weak, note that v8 may still support some of these algorithms for backward compatibility with legacy systems. After completing the upgrade, you may want to manually disable these weaker algorithms to ensure optimal security.
Upgrading from v6/v7 to v8 (Windows)
This article covers the upgrade process from Syncplify Server version 6/7 to version 8 on Windows systems. The accompanying video demonstrates each step of this straightforward procedure.
The procedure below only applies to stand-alone server upgrades, if you're running a Syncplify Server! v6/v7 HA cluster, please, check out this article instead.
Prerequisites
Before beginning the upgrade:
- Ensure you have a functional Syncplify Server v6/v7 installation
- Ensure you have a valid license with active maintenance/support plan coverage (as a general rule, an active maintenance plan is required for all upgrades)
- Download the most recent version of the software
- Close any applications that might be accessing the server
Upgrade Process
The upgrade from v6/v7 to v8 is designed to be seamless and automatic:
- Run the installer - Double-click the v8 installer executable
- Grant privileges - Accept the Windows User Account Control (UAC) prompt
- Accept license - Review and accept the software license agreement
- Wait for completion - The installer handles all migration tasks automatically
Post-Upgrade Verification
After installation completes:
- Refresh your browser (F5) to load the new interface
- Verify your virtual sites are functioning correctly
- Confirm your license information transferred properly
- Log into each virtual site's Admin UI and carefully double check every setting
Important Notes
- All existing configurations, virtual sites, and license information are preserved during the upgrade
- No manual migration steps are required
- The upgrade process typically completes within a few minutes
- Your server will be briefly unavailable during the installation
Need Help?
Watch the demonstration video below for a visual walkthrough of this process, or contact support if you encounter any issues during your upgrade, please, log into your Syncplify Customer Portal and submit a support ticket from there.
Upgrading from v6/v7 to v8 (Linux)
System Requirements
Before starting the upgrade process, ensure your Linux system meets the requirements for Syncplify Server! v8 and that you have administrative privileges (sudo access).
The procedure below only applies to stand-alone server upgrades, if you're running a Syncplify Server! v6/v7 HA cluster, please, check out this article instead.
Prerequisites Checklist
- Take a full system backup or VM snapshot to quickly go back in time should anything bad happen
- Have an active Syncplify Server! v6/v7 installation
- Valid license with active maintenance/support plan coverage (as a general rule, an active maintenance plan is required for all upgrades)
- Have root or sudo privileges on the target system
- Backup of current configuration (recommended)
Perform the Upgrade
- Download the most recent version of the software
- Extract the archive in a temporary location
- Open a terminal window in the directory where you extracted the installation files
- Type
sudo ./ss-setup installand follow the on-screen prompts
Post-Upgrade Steps
After the upgrade completes successfully:
- Clear your browser cache if the interface appears outdated
- Test all configured virtual sites for proper functionality
- Verify user accounts and permissions are intact
- Review the updated manual and documentation for new v8 features
Upgrading a v6/v7 high-availability (HA) cluster to v8
If you are running a Syncplify Server! v6/v7 HA cluster, then you probably already know that the most significant enhancement v8 bring to the game is its 100% new, much improved, and completely revolutionized HA subsystem.
A 100% new HA subsystem, though, also implies that old systems (v6/v7) and new systems (v8) are not designed to work together, and their underlying database layout is radically different, so in-place upgrades of v6/v7 HA clusters are strongly discouraged.
This here below is the correct (and the only formally sanctioned) way to perform such upgrade.
Before you begin: the procedure outlined here below requires that you own valid licenses for all of your current v6/v7 HA nodes, and that the maintenance/support plans for all such licenses are active and not expired.
Step #1: take a full backup or snapshot of your entire machine or VM
Better safe than sorry. A full system backup or a VM snapshot allows you to magically go back in time should anything undesirable happen during the upgrade process. This is only a precaution, though, as the procedure explained in this article is designed not to affect your running v6/v7 cluster at all.
Step #2: take a full backup of your v6/v7 configuration
This one is simple. Log into the SuperAdmin UI on any one of your v6/v7 HA cluster nodes, and export a full configuration backup from there. No need to do this on every node, a single backup exported from just one of your HA nodes already contains all you need to migrate the whole cluster to v8.
Step #3: install your first v8 node
This is a simple multi-step process:
- Spin up a new machine or VM, fresh operating system, nothing installed on it
- Follow the documented procedure, depending on your operating (Windows or Linux) to install your first Syncplify Server! v8 node as a stand-alone server
- After installation, import your v6/v7 backup into this newly deployed v8 node
Check point: once you get here you have a fully functional single-node (stand-alone) Syncplify Server! v8 node that has all of your old v6/v7 functionality... just not in HA (yet).
Step #4: recreate your HA cluster by adding more nodes
Now that your new v8 is up and running as a stand-alone server, test its functionality, and if it works as intended, you can follow the documented procedure to add additional nodes to it and re-establish your high-availability (HA) cluster.
Step #6: move your licenses
Your v8 cluster is ready and configured, but it's likely still running on the TRIAL licenses you activated as part of the setup process. If so, please do not forget to enact the documented procedure to move your licenses from your old v6/v7 nodes over to your new v8 nodes.
Success: if everything was executed correctly, you now have a fully functional Syncplify Server! v8 HA cluster running all the virtual sites, subsystems, and users that your previous v6/v7 cluster used to run.
Step #6 (optional): decommission your old v6/v7 nodes
Once you have verified that your new v8 cluster works perfectly, you may (under your sole and complete responsibility) want to decommission your old v6/v7 nodes to reclaim those resources or recondition them for different use.
Upgrading from v6 to v8 (when everything else fails)
More than 99.8% of v6 to v8 upgrades complete successfully without requiring any troubleshooting.
In very rare cases, the v6 database cannot be automatically exported. If this happens, there is a documented workaround available on our developers’ blog.
In an even smaller number of cases, all other documented upgrade methods may still fail (though it seems only on Windows). Only in those cases, please follow the procedure below. This method is guaranteed to work, but it does require several manual steps by the system administrator.
Step-by-Step Manual Upgrade Procedure
- Create a backup of your v6.2.60 configuration
Use the SuperAdmin UI to generate a full configuration backup. - Stop and disable all v6 system services
Stopping the services is not sufficient — they must also be disabled to prevent automatic restart. - Download the latest v8.x CLI installer
Download it from our website and make sure you select the CLI installer, not the GUI version.

- Extract the installer package
- Run the installer as Administrator
Execute the following command:.\ss-setup.exe install -F(The capital -F flag is essential.) - Import your v6 backup into v8
After the v8 installation completes successfully, log in to the v8 SuperAdmin UI and import the backup created in Step 1.
If you carefully follow the steps above, the upgrade to v8 will complete successfully and your configuration will be fully restored.
How to move/migrate your software to a different machine/VM
If you intend to do a migration-upgrade (move from one VM to another while upgrading the software at the same time, this article is not for you. You should follow this procedure instead.
This procedure applies only to Syncplify Server v6 and later versions. For older versions (v4 or v5), please use this other knowledge base article instead.
If you need to migrate your Syncplify Server! to a different/new machine or VM, please, keep in mind that this article explains the only correct procedure to accomplish the goal.
No worries, it's really easy. Simply follow these steps in this exact order:
- Log into the SuperAdmin web UI on your "old" machine/VM, the one you want to decommission, and take a full backup of Syncplify Server!'s configuration from the BACKUP page; then from the LICENSE page in the same UI use the Deactivate button to free up your license and be able to re-activate it later on your new VM
- Make sure you deploy a new machine/VM with a fresh operating system, and don't install anything else on it for now, only the operating system
- Copy the backup file (a .zip archive) to the new machine/VM
- Download the latest Syncplify Server! installer on the new machine/VM and install it as you normally would if it were a fresh/new deployment
- Once the installer is done you can log into your new Syncplify Server!'s SuperAdmin UI on the new machine/VM and do the following, in this exact order:
- activate the license first (the one you previously deactivated from the old machine/VM)
- from the RESTORE page in the SuperAdmin UI perform a restore of the backup you took from your old machine/VM onto this new node
IMPORTANT: when you use the Deactivate License function you're freeing up that license code so that it can be reactivated on another (different) machine, you will not be able to reactivate it on the same machine you have deactivated it from. This automatic deactivation requires your server to be online (have direct, unrestricted, unproxed Internet access), if you're running your server offline, please contact us to have your license deactivated.
How to recover (decrypt) old v4/v5 encrypted VFSs
As explained in our developers blog, starting from Syncplify Server! version 6 we had to change the way encrypted VFSs operate, because the old way (v4/v5) can no longer be considered 100% safe. This was not a lighthearted decision, but it had to be taken.
So what now? What does this entail for customers who were using these encrypted VFSs in old v4/v5, and now wish to upgrade to the latest v8 to take advantage of all the new features and its improved speed and stability?
Fear not. We have developed a little tool (mentioned in the blog article above) which can greatly help you with the transition.
Before we begin, it's important to understand one important detail: encrypted VFSs cannot be imported from a v4/v5 backup into your new v8, and as a result all user profiles using such encrypted VFSs also cannot be imported. So after upgrading to v8 your old encrypted VFSs (and the user profiles that used them) will be missing.
Here's what to do to recover access to the data stored in those old v4/v5 encrypted VFSs:
- Download the DiskAES256Decrypt.zip archive from our website, and extract it into a directory of your choice on the machine/VM where the encrypted VFSs content is stored
- Run it, and decrypt the content of each old v4/v5 encrypted VFS into fresh new empty folders (one per folder)
- In your new Syncplify Server! v8, create a new encrypted VFS for each one of the old ones, all of these new VFSs must point to empty folders/directories
- In your new Syncplify Server! v8, manually create the user profiles to use the newly created encrypted VFSs
- Use an actual SFTP client software to log into those user profiles and re-upload the contents from the decrypted (in clear) directories: Syncplify Server! v8 will then automatically re-encrypt all of those files as they are being uploaded via the SFTP client
This is a one-time operation, once done you'll be good to go for the entire life of your Syncplify Server! v8 (and all future versions for the foreseeable future).
High-Availability (HA) general concepts
The most important improvement brought about by Syncplify Server! version is the simplicity with which you can create a true active-active high-availability (HA) set with it.
In fact, as of version 5.x (and subsequent versions) you don’t have to deploy a database replica-set anymore, which is hard to do and requires at least 5 virtual machines (2 for the SFTP nodes, and 3 for the database); Syncplify Server! can achieve a fully fault-tolerant, active-active, highly-available deployment with as few as 2 nodes. To operate correctly, however, all nodes in the cluster must have their system clocks synchronized with a reliable time source. Enabling NTP on all nodes is the recommended way to ensure this requirement is consistently met.
Of course, Syncplify is in the secure file transfer business, not in the networking business nor in the storage business, so you’ll have to provide the networking and storage components yourself, but this is also true with any other SFTP server on the market.
So, without any further ado, let’s dig in.
If you do have a Load Balancer, we definitely recommend you use it. In such case your deployment will look somewhat like this:
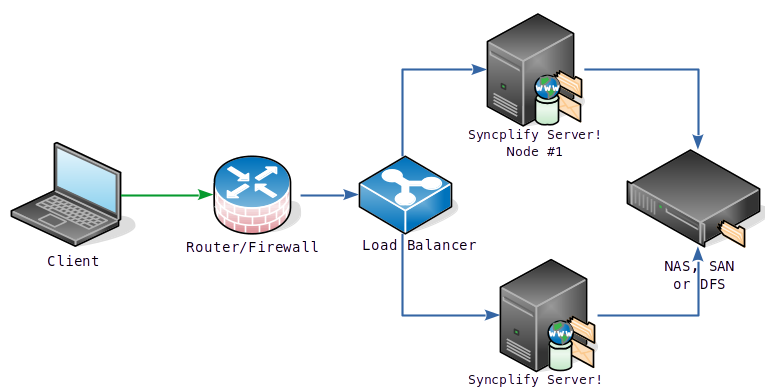
If you don’t have a Load Balancer, you can still achieve a remarkable level of High Availability by creating multiple “A records” on your DNS associated with the Host Name of the FTP/SFTP server, and configuring your DNS to provide round-robin responses. Clearly, unlike the Load.
Balancer, your DNS will not be able to probe your SFTP nodes to see if they’re alive, but it will direct all client connections equally to both nodes, de facto spreading out incoming traffic just like a load-balanced HA would.
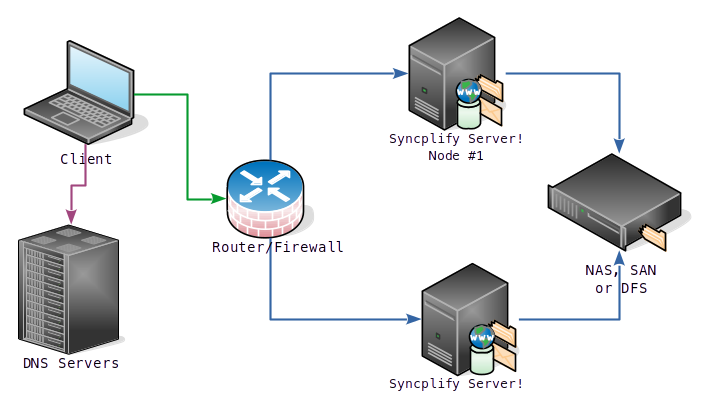
It is important to understand that in both of the cases shown here above, it is still your responsibility to provide shared storage to all SFTP nodes. In our charts, we show this can be a Windows DFS or a NAS or a SAN of your choice. It can also be any network file system that your SFTP nodes can access natively (for example, an iSCSI Target is perfectly fine).
High-Availability (HA): how to setup
This article assumes you've already read, understood, and are familiar with the general concepts explained here.
Once you have decided how to deploy your Syncplify Server! high-availability set, going from theory to practice is actually quite simple: it's just a two-step process.
Step #1: deploy the first node as if it were a single stand-alone server
This procedure is very well explained here (for Windows) and here (for Linux).
Before proceeding with Step #2, ensure that the system clock on every node in your HA cluster (including the one you are about to add) is synchronized with a reliable time source. The recommended way to achieve this is by enabling NTP on all nodes. If even a single node has an out-of-sync clock, the entire HA cluster will not function.
Step #2: adding the second (or n-th) node to make your HA set
If you are familiar with the single-node setup of Syncplify Server! (see step #1) then you surely have noticed that, at the beginning of the web-based part of the installation process, you're presented with the following choice:
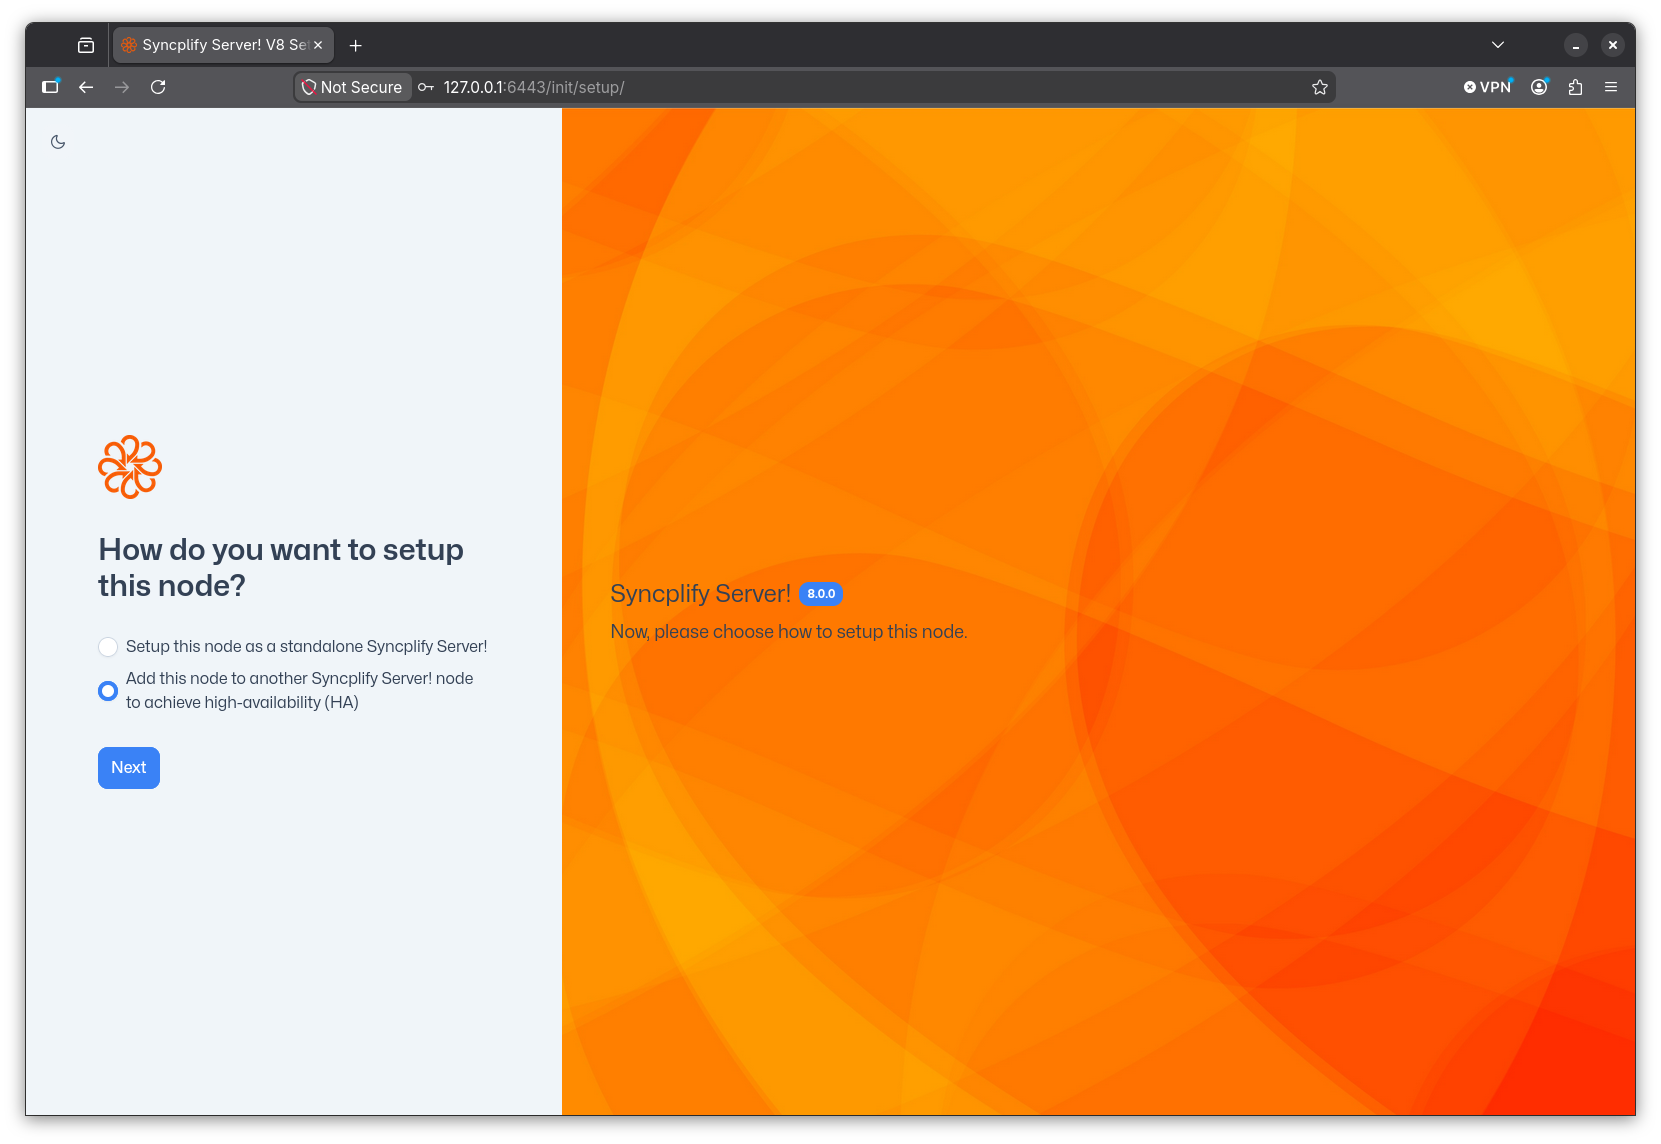
To deploy your HA set you simply have to install Syncplify Server! on another node (machine or VM) and, when presented with the above choice, you'll select the "Add this node to another..." option.
You will then need to type the IP address and port (separated by a single colon) of the first node, the one you previously installed as a single stand-alone server. For best performance and optimal routing you should always use the nodes' internal (LAN) IP addresses here.
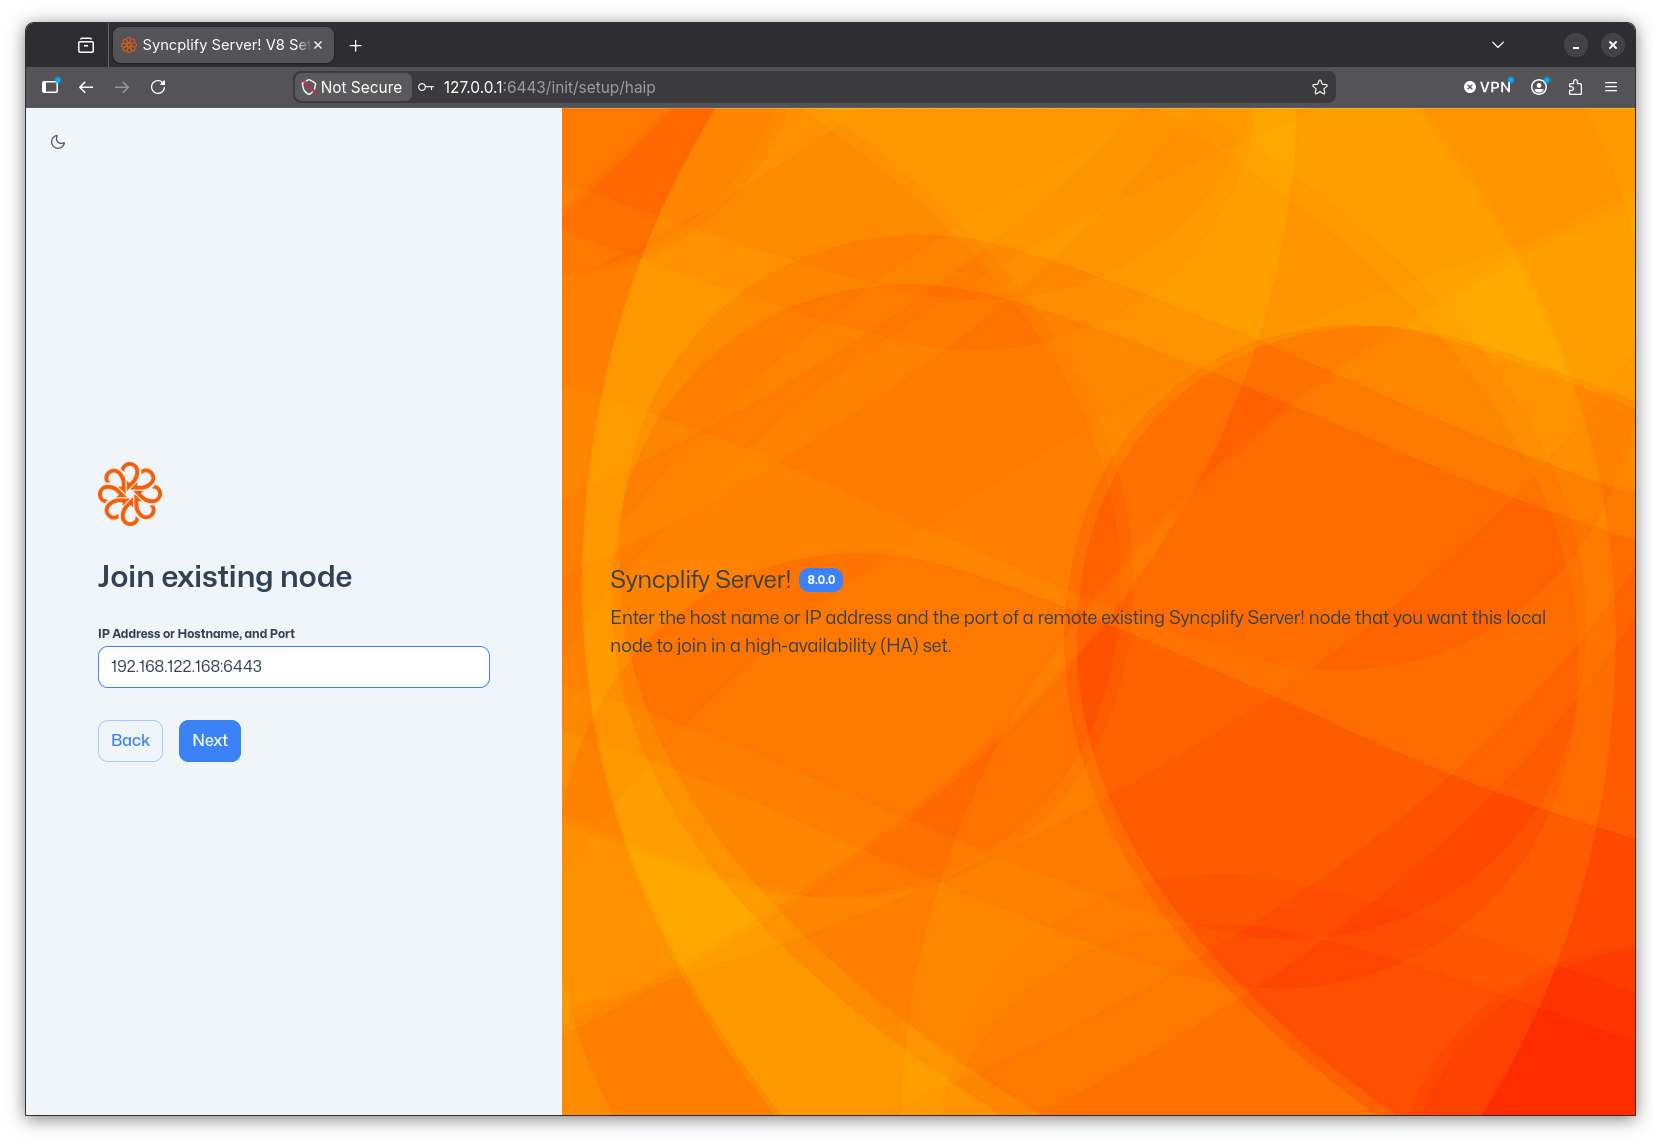
Do not try to be creative here, do not type anything exotic like the nodes' NetBEUI names "just because Windows knows it" or similar oddities. It will not work. Please, just follow the instructions and type the LAN IP address and port of the existing node you want to join to create your high-availability set. Thank you!
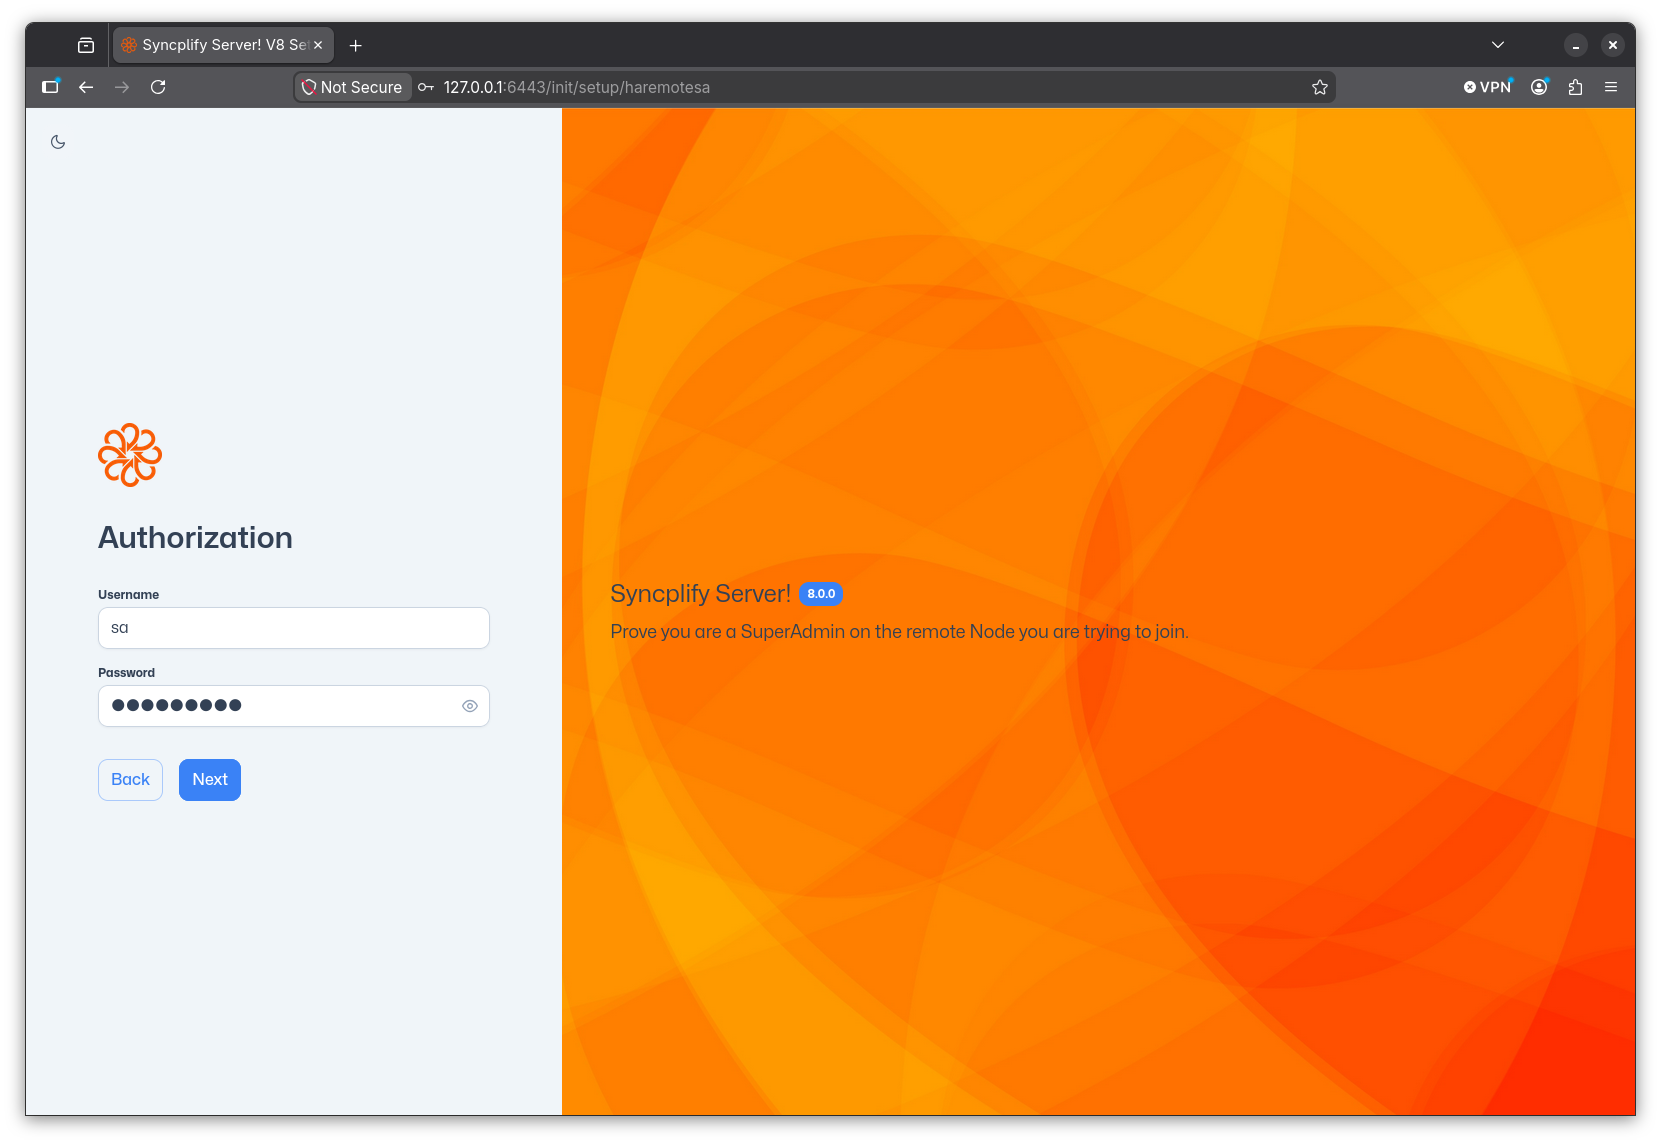
At this point you will have to provide the SuperAdmin credentials of the remote node you wish to join.
Once you click Next the node you're setting up with attempt to join the remote node to establish itself into the HA cluster. You will see a spinning progress - this process can take a while, so please be patient.

If everything goes well, once the newly installed node has become part of your HA cluster, you will simply be redirected to the SuperAdmin UI where you can login with the credentials you already know.
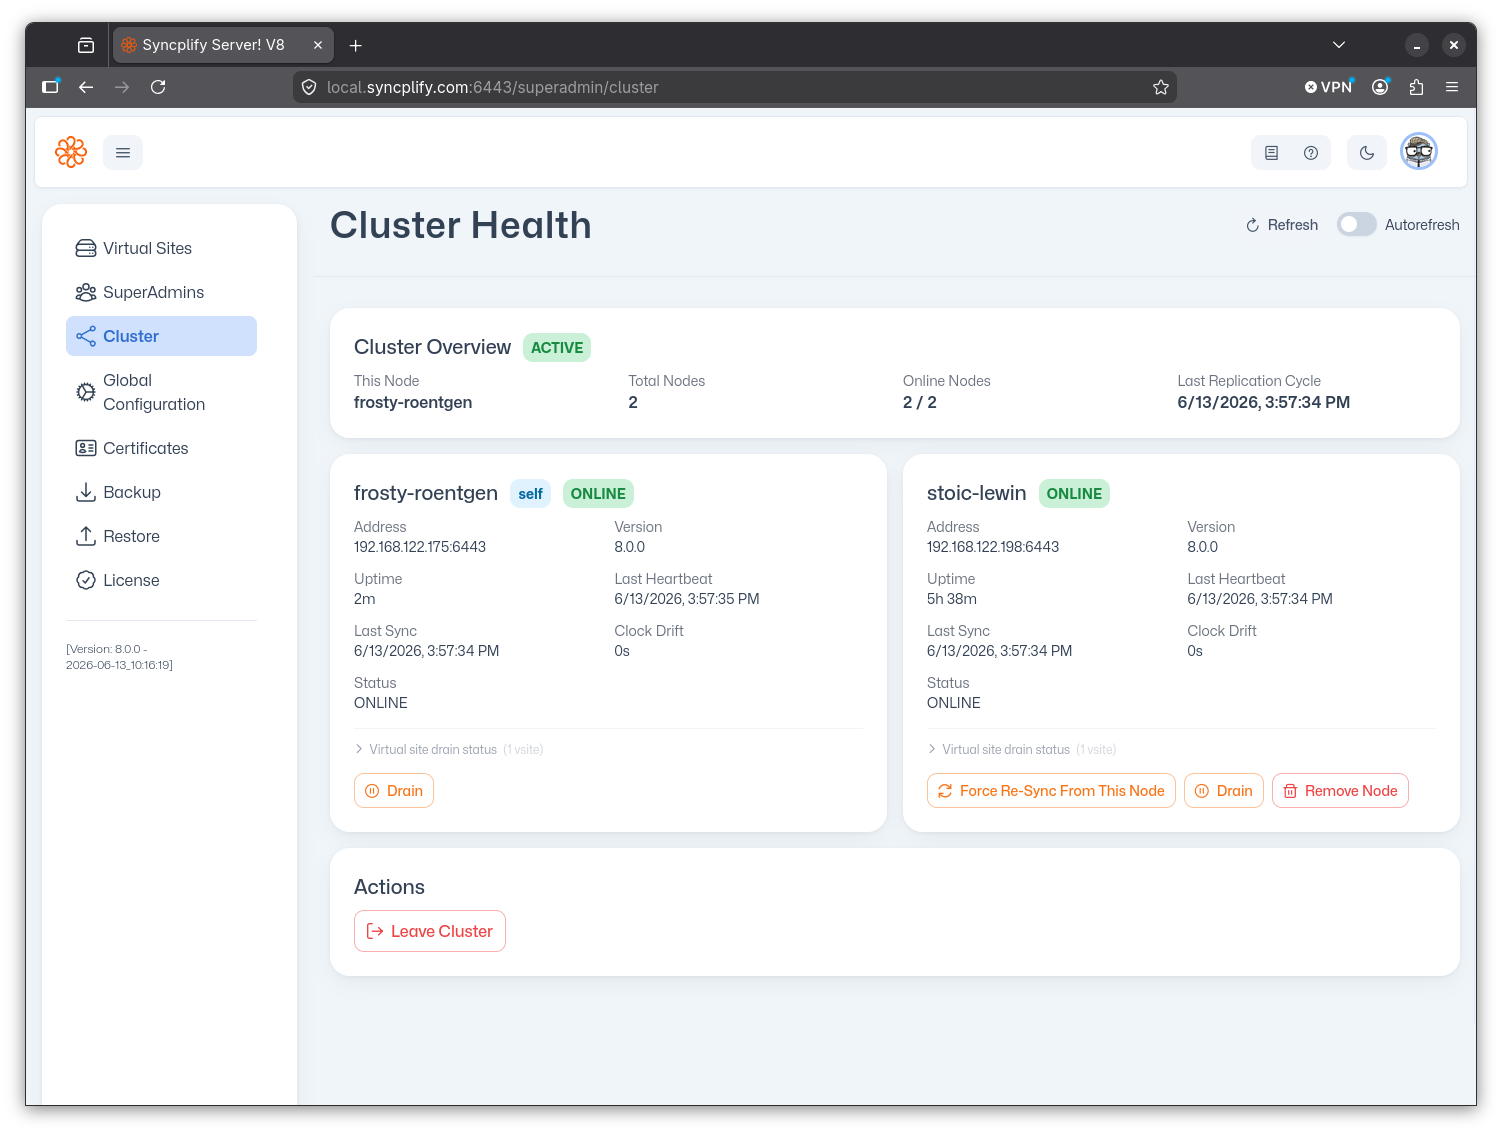
You'll notice a few things when you log into the SuperAdmin UI and your node is part of an HA cluster. Each virtual site card in the Virtual Sites page will now show the status of all the cluster nodes:
And there is now a new page in the SuperAdmin UI, called Cluster, that provides you full observability and maintenance actions for your entire HA cluster and each node that's part of it:
Step #3: safe-list your load balancer(s)
If your HA deployment includes a load balancer (or multiple load balancers), this step is mandatory.
Load balancers continuously probe SFTP nodes by opening connections and then closing them, often without completing authentication. This is normal and expected behavior. Syncplify Server!'s built-in Protector! mechanism, however, cannot distinguish between a load balancer health-check and a connection-flood attack. Without intervention, Protector! will eventually auto-block the load balancer's IP address, which will bring down the entire cluster from the clients' perspective.
The fix is straightforward: add the IP address of every load balancer to the safe-list. Safe-listed addresses are never auto-blocked by Protector!, regardless of how they behave. This is precisely the scenario the safe-list was designed for.
For a full explanation of the difference between the block-list, allow-list, and safe-list, see this article.
Licensing and license codes: a complete overview
In this article, we provide a compendium, sort of a min-FAQ, regarding the most common questions and pieces of knowledge that every Syncplify Server! user should know about Syncplify Server!'s licenses and licensing system. So here we go:
Is the license perpetual? Or is the maintenance/support plan mandatory?
Once a license has been activated, said license is perpetual relatively to the machine/VM it's been activated on, and a maintenance/support plan is not required to keep it active (as long as you never update the software).
Given the above very specific statement, it is of paramount importance to understand the following:
- An active maintenance/support plan is required to activate the license for the first time, or to reactivate the same license on a new machine/VM when you migrate the software to a new system
- An active maintenance/support plan is required to install any update or upgrade (major, minor, and hot-fixes)
What’s the license code format?
License codes look kind-of like this: S6UF-R3EP-9XDJ-BJJ7-U33Z-PKGA (not a real license, just meant as an example)
The first two characters (here above highlighted in green) are always the letter S followed by the major version the license is applicable to. So you know what version of the software can accept the license you're looking at.
Will my old (v4, v3, v5…) license code work with the most recent version of the software?
No. As you can guess by the different license code formats, you need a license code that was issued for the exact version of the software you are trying to activate. The good news is, though, that if you are covered by a maintenance/support plan, you can request one for free to Syncplify.
I have an active maintenance/support subscription for an older version, and I wish to convert it to a maintenance/support plan for the most recent version. How do I do that?
Simply open a support ticket with Syncplify, and our team will provide a dedicated link and proper instructions on how to do so.
I run Syncplify Server! on dynamic hardware, and every so often my v3/v4/v5 license reverted back to “free” because hardware changes were detected. Will this still happen with v6+ licenses?
No. We’ve done a lot of work to change this behavior, and we are confident that deactivations “by mistake” should not occur anymore. Our software can now tell the difference between, say, resizing an existing VM, and moving to an entirely different VM. Your v6/v7/v8 license will remain active as long as you make changes to the hardware of your existing VM, and will self-deactivate only if you try to use it also on a different VM. This provides us with a decent level of protection against abuse, but – more importantly – provides our customers with the level of flexibility they need to run our software in virtualized/cloud/elastic environments.
Will my license expire? Do I have to renew it?
No. Licenses never expire, if you never alter, move, or update/upgrade the software. But licenses can automatically self-deactivate if you do something you're not entitled to, like updating/upgrading the software while not covered by a maintenance/support plan. That's why we strongly encourage all customers to keep their maintenance/support plan current, and to renew it every year: that way all updates/upgrades within the same major version will be totally free of charge, and between different major versions they will come with significant discounts. Not to mention that you need an active maintenance/support plan in order to request support if you need it.
Operation
This section covers various topics related to the day-to-day operation of your Syncplify Server!
Where is the manual?
This knowledge base covers some common topics in a broader way than a manual ever could, but it's limited to those topics, and it doesn't have the full coverage that a true manual has.
You can find the full Syncplify Server! Manual here.
We strongly advise and recommend that you thoroughly study it. It will save you hours on day-to-day operation, and you won't have to wait for our support staff to respond to your assistance request, because you'll have the knowledge, the power, and the ability to manage your server effectively and independently.
Using network shares (UNC paths) with Syncplify Server! V6+ on Windows
Windows does not allow system services running as SYSTEM (or LocalSystem) to access UNC paths. This is a design choice by Microsoft, so every system service of every vendor (not just Syncplify) is subject to it.
So what can you do when you need your system service to access those "network shares"? For example you may want to place your users home-VFSs on a different storage (this is practically mandatory in high-availability environments).
The correct and secure way to do it (according to Microsoft's Best Practices) is the following:
Step #1 - Create a Windows or Active Directory "service account"
A service account is just a user account which will be used to run your system service. This particular account will have to be given permissions onto the following directories/folders:
C:\ProgramData\Syncplify\ServerV6(and all sub-dirs) - be wary that "ProgramData" is typically hidden in Windows, but it's there even if you don't see it- All of the directories, folders, and UNC (network) paths where you intend to point your VFSs to
To avoid unattended-operation complications, it's best to set this account to never expire and to never have to change its own password. An Administrator should take care of that, from time to time, according to corporate policies.

Step #2 - Grant the proper storage permissions to the service account
As already described above, this newly created service account will need to be granted access permissions to the folders and network paths listed above:

Step #3 - Run your virtual site's "worker" service impersonated with the above service account
Open Windows' SCM (Service Control Manager) and locate the "worker" (wrk) service for the virtual site you need to be able to access UNC paths:

Double click on it, and set it to run "as" the impersonation account you previously created:

Do not forget to restart the virtual site's system service for these changes to take effect
Once restarted, if you did everything correctly, the virtual site will now be able to access its users' home-VFSs located on the remote UNC paths (network shares) the service account has access to.
Using network shares (UNC paths) with Syncplify Server! V6+ on Linux
Since the Linux version of Syncplify Server! is implemented as a systemd service, this knowledge base article assumes a basic familiarity with the Linux operating system and with its systemd subsystem.
All of the operations below are assumes to be performed as root or via sudo.
First of all you need to prepare, ahead of time, a file containing the credentials that will be needed to access the SMB/CIFS shared path. For the sake of this tutorial we will save these credentials in the /etc/.smbcreds file, which will have this format and contents (but with your own credentials, of course):
username=username_to_access_smb_share
password=password_to_access_smb_shareNext, you have to create a directory that will be used as local "mount point? for the remote SMB/CIFS share when it's mounted on system boot. For the sake of this example let's call it sftpdata:
mkdir /sftpdataNow you will have to create two files in systemd's configurations directory. It doesn't matter how you call these files, as long as they have the same name, and the exact extensions shown here below:
File: /etc/systemd/system/smbsftpdata.mount
[Mount]
What=//10.0.5.23/your/remote/share
Where=/sftpdata
Options=credentials=/etc/.smbcreds,noperm,vers=2.1,_netdev
Type=cifsFile: /etc/systemd/system/smbsftpdata.automount
[Unit]
Requires=remote-fs-pre.target
After=remote-fs-pre.target
[Install]
WantedBy=remote-fs.targetThe last step is to enable the automount in systemd, so that next time the OS boots this shared path will be automatically mounted in your system:
systemctl enable smbsftpdata.automountDone! Now reboot your operating system, and after the reboot systemd services (including Syncplify Server!) will have access to your remote SMB/CIFS shared folder contents via the local mount point /sftpdata.
How to backup your Syncplify.me Server! v4/v5
This article refers to old/discontinued versions of our software.
Backing up your Syncplify.me Server! v4 or v5 is a very simple process, it basically consists of just 1 simple step shown below. But please read the whole article, as there are some important notes for those who are running very old version 4's.
Running a very old v4?
If you are running a version prior to v4.2.5 your software does not have a backup function. In order to enable such function, please make sure that you’re running v4.2.5.
How to take a backup
Backups can only be taken locally, on the same machine/VM where Syncplify.me Server! is installed, by pasting a very special URL into your browser (any browser except Internet Explorer).
Provided you're using the standard port our software comes pre-configured with, if you're running v4 this is your special URL to produce a backup file:
https://127.0.0.1:4443/dobk?dest=C:\SMSBackup&file=BK$datetimeWhile if you're running v5 this is the special URL you need:
https://127.0.0.1:5443/dobk?dest=C:\SMSBackup&file=BK$datetimeOf course if you're running our Web/REST interfaces on ports other than 4443 (for v4) or 5443 (for v5) you'll have to edit the special URLs here above, and specify the actual port you're using.
Once you paste the special URL into a local browser on the server, you'll see a small OK message. At that point you will find a zip archive containing the current full backup of your Syncplify.me Server! software in the following folder: C:\SMSBackup
Insecure warning in your browser? It might be OK...
After installing Syncplify Server! you will be able to manage it securely via web interface over HTTPS.
Now, a very common choice is to use a self-signed certificate, because it saves money and if you know what you’re doing it doesn’t compromise security. This is, in fact, the most common choice among our users (according to our surveys).
But if you use a self-signed certificate, your browser will warn you that your connection may not be private or secure. That’s because self-signed certificates are often used for man-in-the-middle (MitM) attacks. But this is not the case, of course, if you can verify that this particular self-signed certificate was created by you and for you.
To get rid of this annoying message, you basically have 2 options:
- Spend some money to buy a trusted X.509 (SSL/TLS) certificate from a Certification Authority like DigiCert, Comodo, Thawte, and the like. It goes without saying that this is the recommended choice, as it takes advantage of the inherent trust chain provided by the Certification Authority.
- Verify and accept the self-signed certificate you have just created and add it to the trusted keychain of your browser. In this case, you are advised to always verify the certificate’s fingerprint to make sure it’s really the one you created yourself, and that you’re not a victim of a Man-in-the-Middle (MitM) attack.
If you have chosen option #2, here’s how you do it in Chrome:

This is how you do it in Firefox:

And this is how you do it in the new Chrome-based Microsoft Edge (the old Edge is very similar though):

If you're using a self-signed certificate (or if you're accessing the management UI via its IP address instead of host name) it's totally normal for this to happen, and you can safely go ahead and skip the browser warning. Once you do that, you will be able to securely access Syncplify.me Server!’s a web management interface.
We purposely don’t show any screenshot taken with Internet Explorer, as its JavaScript support (depending on the browser version) is generally too buggy, and we do not support its use in conjunction with our software.
Virtual File System (VFS) Encryption
You may have notices that, depending on the Syncplify Server! edition you're running, you may be able to enable Encryption when you create a new Virtual File System (VFS).
This means that whatever you upload to that VFS will automatically be stored in an encrypted form on the server's storage, and it will be automatically decrypted when downloaded again by a client.
Note: this has nothing to do with encryption over the network, which is always on, and is guaranteed by the file transfer protocols you're using - this article refers to what's known in the industry as "at-rest encryption".
An encrypted VFS transparently encrypts and decrypts data on-the-fly during the interaction with the server machine/VM's storage medium, making sure that the files at-rest on the server-side are always encrypted. This way you can run your server externally, and still always be sure that whoever operates the server for you doesn’t have access to your files/backups. This is also a requirement in some cases when your company has to comply with the PCI/DSS or HIPAA regulations.
As long as an encrypted VFS is accessed via a secure file transfer client using a legitimate user account, a VFS will show us just like any other folder, and files in it can be downloaded in clear by the legitimate user.
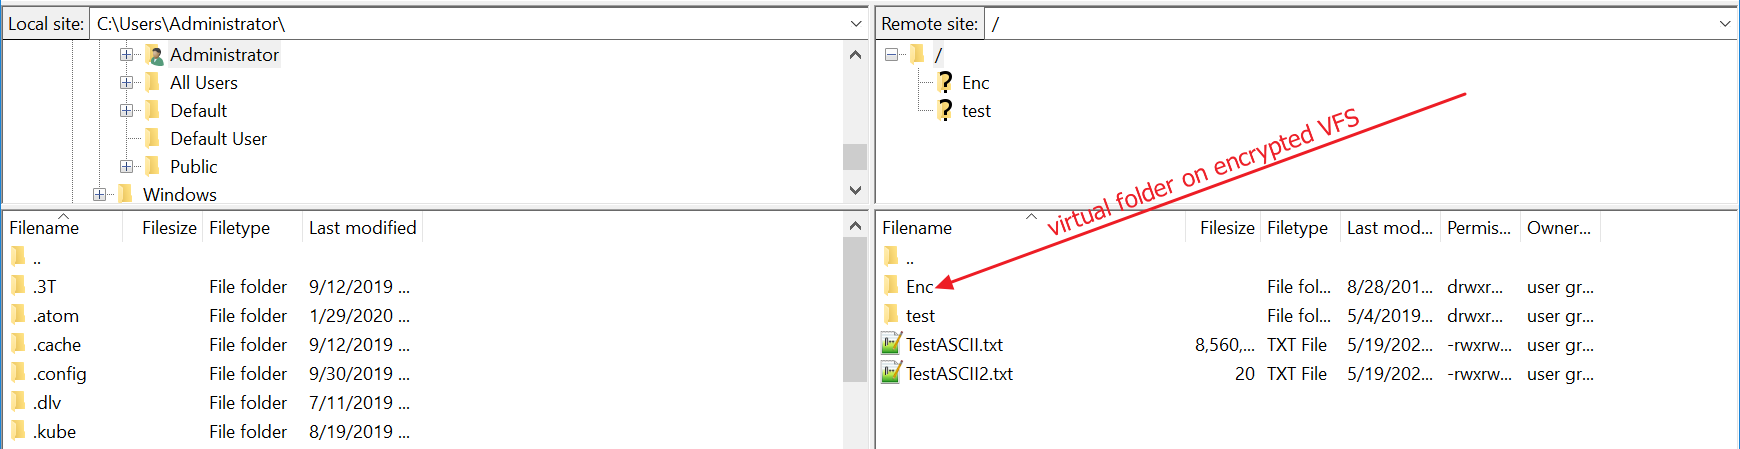
But let's say you have a text file on your client computer for example, and you want to upload it to a remote Syncplify Server! into an encrypted VFS...
The file on your client will look something like this:
Yet, once uploaded to the remote Syncplify Server!, should someone had raw direct access to the server's storage, all they would see is this:
Feel free to run your SFTP server in the cloud, or host it in any other insecure place, or delegate its management to an untrusted third party... whoever might have physical access to it, still won’t be able to acquire your files, as they’re all encrypted “at-rest” on the server’s disk drive (or any other storage medium).
Overriding permissions on folders/directories
Syncplify Server! gives you the ability to override permissions on sub-folders that are physically contained inside a user’s Home VFS.
Let’s say, for example, that the actual directory structure on the disk is the one you see in the picture here below, and that the user's Home VFS is of type "Disk" and points to C:\SFTPRoot:

When an SFTP client connects, under the root the user will see the incoming and outgoing folders, and by default they will have the same permissions as the root folder that contains them.
But what if you wanted, for example, to restrict the incoming folder to only uploads, and the outgoing folders to only downloads? What if you wanted to change (override) the user's permissions on them on a per-directory basis?
You can use the Permission Override tab inside the User profile to do so:
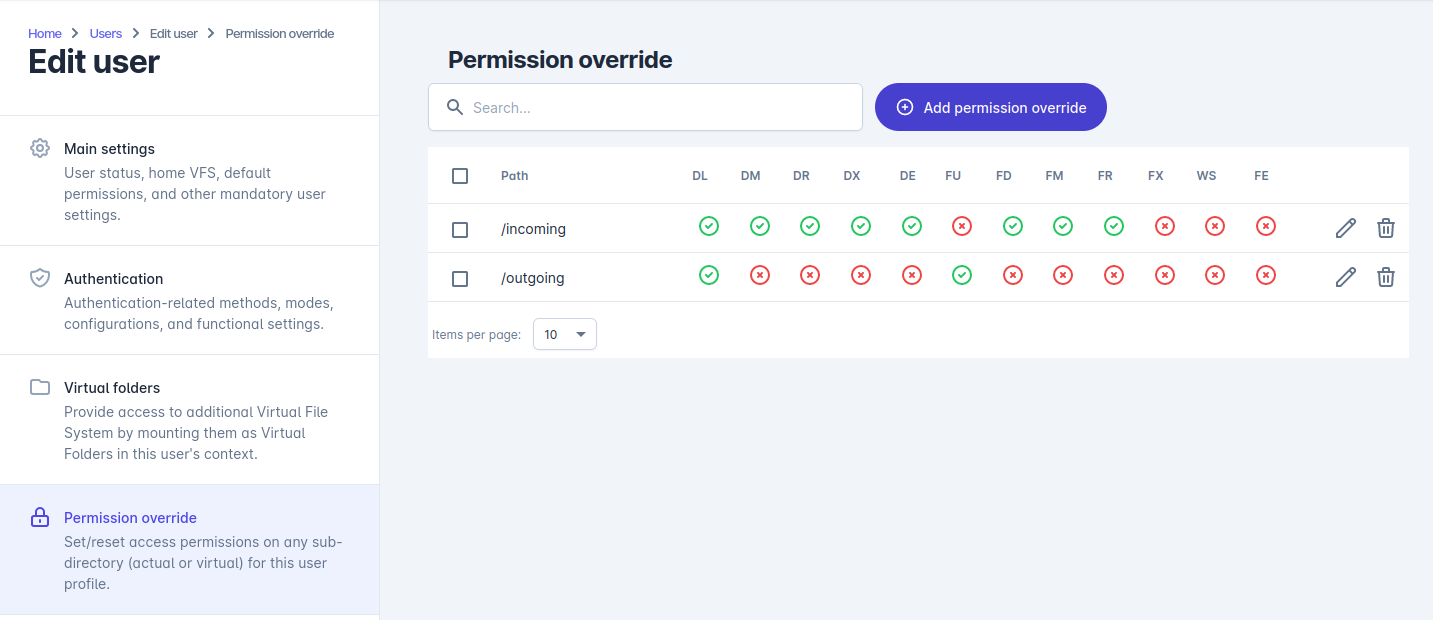
Simply specify all paths using their root-based format (assuming the User's Home VFS as the root) and specify whichever permissions you want the server to apply to them.
How to change a SuperAdmin password
As of version 6.0, Syncplify Server! supports multiple SuperAdmin accounts, and there are three ways to change or reset a SuperAdmin account's password.
Method #1: change your own password
The preferred way to reset or change a SuperAdmin account's password is to log in as such SuperAdmin, edit your own profile, and change your own password.
Method #2: change another SuperAdmin's password
Log in with one SuperAdmin account, go to the SuperAdmins section of the UI, select the SuperAdmin account whose password you want to change, and edit that account. Set the new password and save it.
Method #3: via command-line interface (CLI)
What if you only have one SuperAdmin account and you forgot its password? We still got you covered. You can open a terminal shell (cmd.exe, PowerShell, bash, zsh, ...), then change directory to the folder where the Syncplify Server! executables are located (C:\Program Files\Syncplify Server! on Windows, or /opt/Syncplify/Server/bin on Linux) and type in the following command.
On Windows:
.\ss-webrest.exe sapassreset -s your_superadmin_account -p your_new_passwordOn Linux:
./ss-webrest sapassreset -s your_superadmin_account -p your_new_passwordThank you! :)
How to reset the SuperAdmin (SA) password in v4/v5
This article refers to older versions (v4/v5) of our software. The procedure for Syncplify Server! v6 can be found here.
If you happen to forget - or simply want to change - the SuperAdmin (SA) password of your Syncplify.me Server! v4/v5 you can reset it by following the procedure here below:
First of all, you have to make sure that the Syncplify.me Server! Web/REST Service is in the "running" state. Once you’ve made sure of that, please run Syncplify's Configuration Wizard. There’s a link in the Start menu to run it.
Once the HTTP/REST Configuration Wizard is run, you will see a “Forgot Password” button. Click it!
When you click the “Forgot Password” button, you’ll be given a long identification code (also known as OTPRC) that you need to send to us in order to receive your unique one-time SA password reset code.
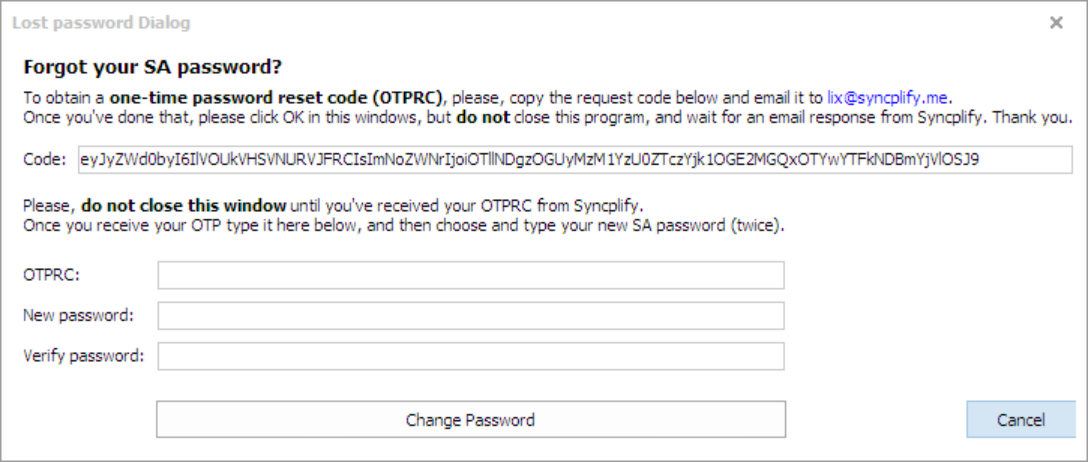
At this point, it’s important that you DO NOT CLOSE the Configuration Wizard.
Wait until someone from Syncplify technical support sends you a “reset code”. When you receive such “reset code” you can use it as a temporary (one-time) password to log in as SA.
Once logged in, follow the entire Wizard to reconfigure your HTTP/REST service, you’ll notice that one of the steps will ask you to set (in this case reset) your SA password. Set your new SA password to anything you like and complete the Wizard.
How to disable 2FA for a SuperAdmin account
As of version 6.0, Syncplify Server! supports multiple SuperAdmin accounts, and it also supports 2FA for these accounts via Google Authenticator. But what if you have enabled 2FA on your SuperAdmin, and your out-of-band device (phone, tablet) where your Google Authenticator runs becomes unusable? No worries, we got you covered.
Method #1: have another SuperAdmin disable it for you
The easiest and cleanest way to disable 2FA for a SuperAdmin account is to have a different SuperAdmin account edit it and simply switch 2FA off. After all this is one of the reasons why (as of version 6.0) we added the ability to have multiple SuperAdmins.
Method #2: disable a SuperAdmin's 2FA from the command-line
If you are an administrator/sudoer of the operating system where our software is installed, and you have console/terminal access to it, you can in fact disable 2FA for a SuperAdmin account via command line.
Open a terminal shell (cmd.exe, PowerShell, bash, zsh, ...), then change directory to the folder where the Syncplify Server! executables are located (C:\Program Files\Syncplify Serever! on Windows, or /opt/Syncplify/ServerV6/bin on Linux) and type in the following command.
On Windows (as Administrator):
.\ss6-webrest.exe disable2fa -s your_superadmin_accountOn Linux:
sudo ./ss6-webrest disable2fa -s your_superadmin_accountThank you! :)
How to auto-fix problems with the Web/REST system service
Bad things happen: you let the certificate expire, you configure the wrong binding, or simply you cut yourself out by applying the wrong security or CORS settings... and you can no longer access the SuperAdmin/Admin UIs. What now? Do you have to uninstall and reinstall everything?
No, don't worry, we got you covered.
In Windows, simply open a CMD or PowerShell as Administrator, change directory to where Syncplify Server! is installed, and type:
.\ss-webrest.exe repairhttpIn Linux, the equivalent command to be issued in a terminal is:
sudo .\ss-webrest repairhttpThis will reconfigure the HTTPS stack used by the Web/REST service itself, performing a "best effort" to repair whatever is affecting it, allowing it then to be at least restarted, so that it can be then manually reconfigured by a SuperAdmin.
Up to v6.1.3 the repairhttp command would do the following:
- disable your Web/REST service advanced security settings
- disable your Web/REST service CORS settings
As of v6.1.4 and all later minor and major version releases, the same command also does the following:
- reset the binding IP to an empty string (which means: bind to all IP addresses available on the local machine/VM)
- reset the binding port to the default 6443
- make sure at least 1 valid (though self-signed) X.509 certificate is available to perform a TLS connection (the browser may complain it's insecure, but at least you got access again, and you can change it again if you want to)
The purpose of this command is only to get you back into your SuperAdmin and Admin UIs if you've "configured yourself in a corner", after this command is executed you will have to restart the ss-webrest system service, log into the SuperAdmin UI, and reconfigure your "globalconfig" settings according to your actual needs.
True 2FA/MFA over SSH2/SFTP via keyboard-interactive authentication and Google Authenticator
The technique explained in this article requires WebClient, as well as scripting and event-handling capabilities. Therefore, it can only be employed by customers who are running the Professional, Professional+WebClient, or Ultimate editions of our software. Furthermore, it requires a scripting function that is only available in Syncplify Server! v6.0.22+.
Every good system administrator knows that the SSH2 protocol (and, therefore, all of its subsystems, including SFTP) feature its own flavor of multi-phase authentication. But this is not what we're trying to accomplish with the technique explained in this knowledge base article.
What we're going to see is how to implement true 2FA/MFA via Google Authenticator (the same you use to log into the web UIs) by taking advantage of SSH2's keyboard-interactive authentication, and a little bit of scripting and event handling.
Before we begin we need to make sure the user(s) that we want to go through this type of 2FA/MFA have actually enrolled into Google Authenticator's 2FA via their WebClient!
First of all we need to write a script to add the questions we want the user to be asked next time they try to log in. There are three possible types of questions, the example script here below shows them all:
{
// ask for user's password
Session.AddQuestionPassword(0, "Password:");
// then ask for [Google/Microsoft/...] Authenticator's current OTP
Session.AddQuestionTOTP(1, "Authentication OTP:")
// Finally ask a question with a pre-fixed answer
Session.AddQuestion(2, "Your age:", 42, true);
}Now we need to associate the above script to a very specific event handler: OnAuthInteractiveSetQuestions.

We also have to make sure that Keyboard-interactive authentication is enabled for the user(s) that we want to be able to log in this way:
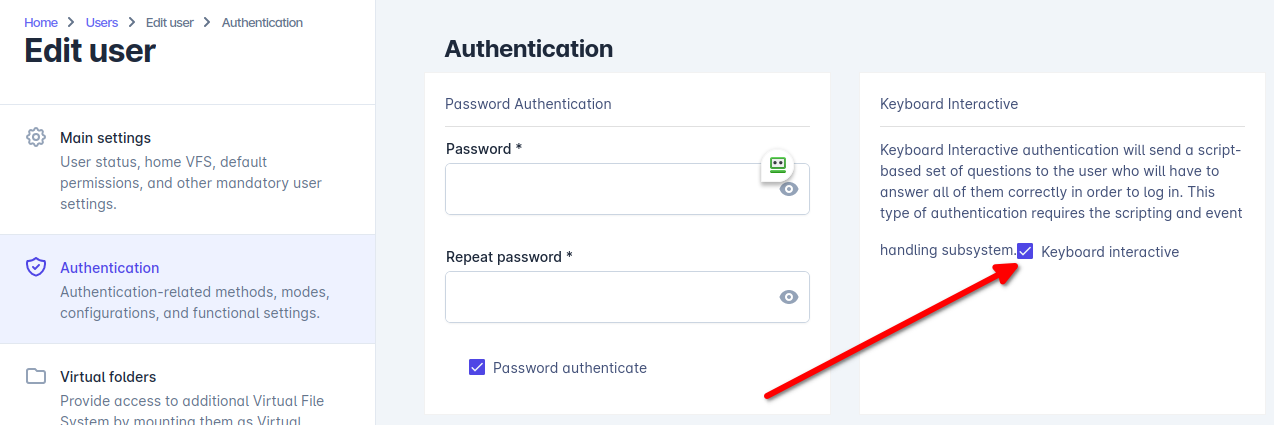
IMPORTANT: if this is the very first user you enable Keyboard-Interactive authentication for, at this point you will have to restart your Virtual Site, for the system service to activate KIA in its global authentication loop; a restart won't be needed for any other user, only for the first one.
And that's pretty much it. Next time the user tries to authenticate and attempts keyboard-interactive authentication, this is what happens:

Questions answered correctly, user logged in. Yay!
How to use the SFTP Virtual File System (VFS)
Syncplify Server!, through its virtual file system (VFS) data storage layer, can store your SFTP server's data into various storage back-ends. This article explains how to use the SFTP VFS type that stores your server's data into another SFTP server behind it.
For all intents and purposes, this is an easy and powerful way to use your Syncplify Server! as an SFTP reverse-proxy.

Configuring this type of virtual file system (VFS) is very easy, all you have to do is create a VFS of type SFTP and then specify a fully-qualified standard sftp:// protocol URL as its Target, as shown in the screenshot here below:

You can then use this as a user's Home-VFS, or as the Target for any Virtual Folder. When a client connects to your Syncplify Server! in DMZ, and this VFS is selected, all data will be transparently stored on the internal (back-end) SFTP server, provided it's running and accepting incoming connections from your DMZ server.
How to use the S3 Virtual File System (VFS)
Syncplify Server!, through its virtual file system (VFS) data storage layer, can store your SFTP server's data into various storage back-ends. This article explains how to use the S3 VFS type that stores your server's data into an Amazon (AWS) S3 object storage bucket.
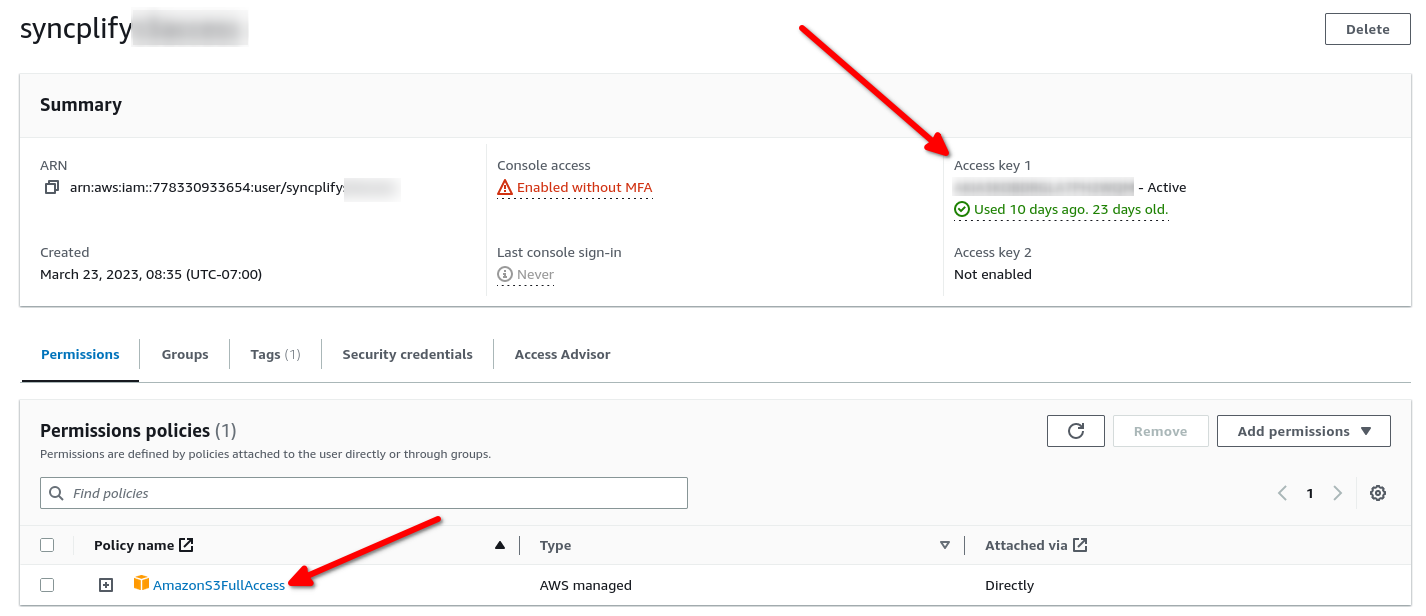
First of all you'll need an AWS IAM user account to access the S3 bucket. Head over to the IAM section of your AWS Console, and create one:
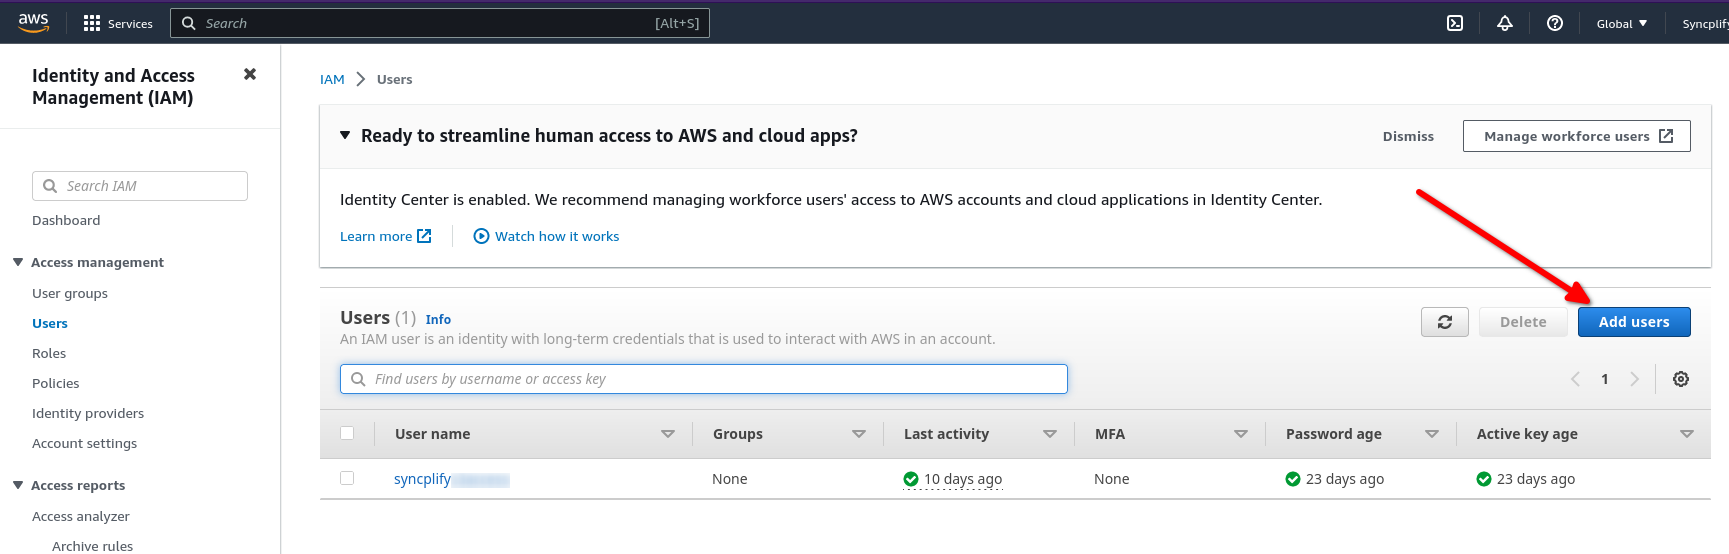
Make sure the newly created AWS user has at least one Access Key, and that it has the desired permissions to access your S3 buckets. In this picture we show an account that has full access, but for safety reasons you should always only grant the minimum set of permissions your workloads require.
At this point you are ready to create your S3 bucket(s):
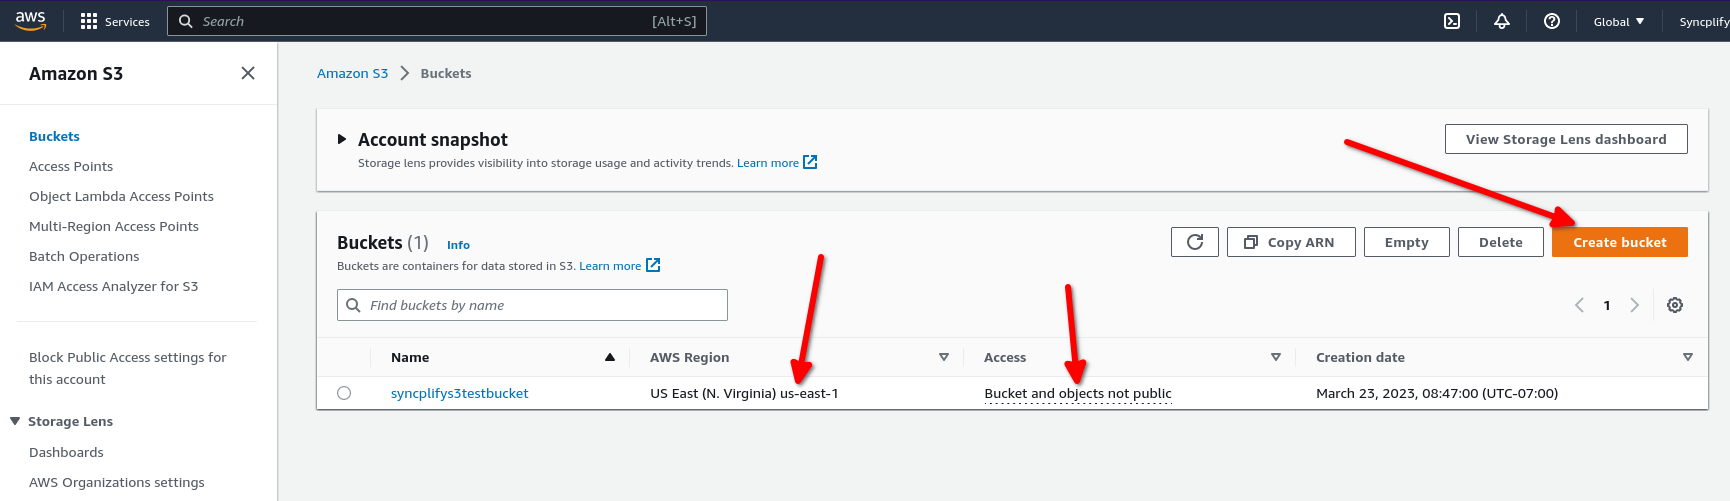
Please make sure you deploy your S3 bucket in the AWS region you need it to be in, and make sure your security policies comply with the security requirements of your company/entity (typically you do not want your bucket to be publicly accessible, you probably want it to be accessible only by using the Access Key you created for the user profile above).
Now that everything is ready on the AWS side of the house, let's see how easy it is to create a Virtual File System (VFS) in Syncplify Server! v8 that uses your S3 bucket to store your SFTP server's data:

Make sure your S3 URL includes your bucket name and region, if the region is missing us-east-1 will be assumed. Then input your access_key and access_secret as your Target Payload (in JSON format). No worries, Syncplify Server! uses strong encryption to store all secrets in its internal database. That's all there is to it. You can now assign this VFS to any User account in your Syncplify Server!, and its data will be stored in your S3 bucket.
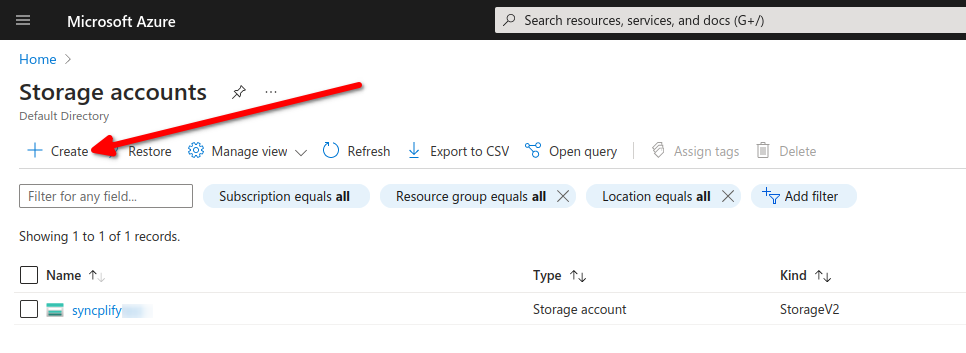
How to use the Azure blob storage Virtual File System (VFS)
Syncplify Server!, through its virtual file system (VFS) data storage layer, can store your SFTP server's data into various storage back-ends. This article explains how to use the Azure (blob storage) VFS type that stores your server's data into an Microsoft Azure blob storage container.
First of all you'll need to create an Azure Storage Account (unless you already have one). Please, make sure this account features and security settings meet your requirements.
Inside of your storage account, create the container(s) you need. For security reasons, we recommend you to make sure that they're not publicly accessible, access should be restricted to your storage account and access key.
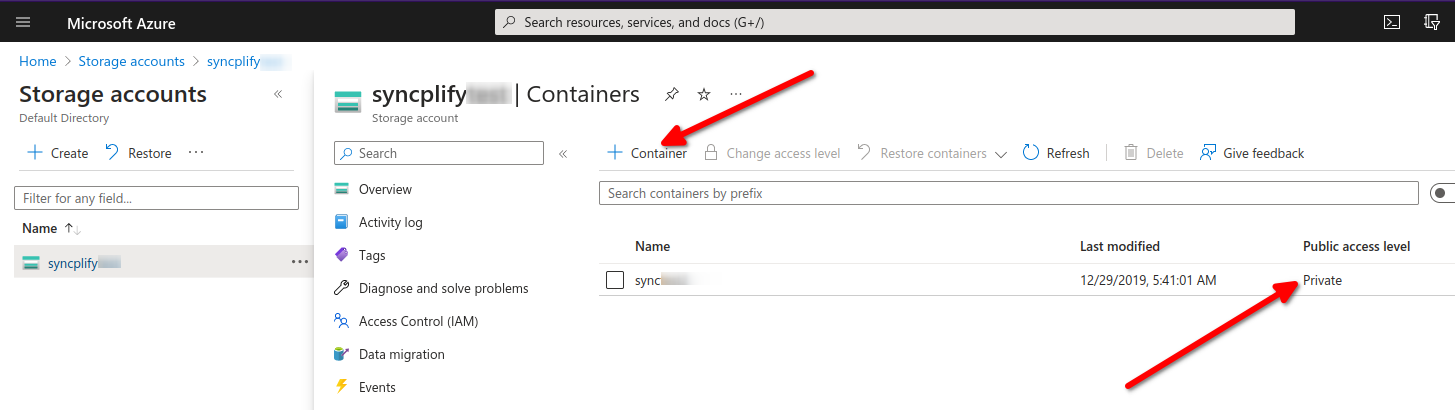
Now you're ready to create your Azure Virtual File System (VFS) in your Syncplify Server!:

Specify your Azure blob storage URL as shown above, and then use your storage account name, and its associated account key (in JSON) format to authenticate/authorize access from your VFS to your Azure blob storage. That's all there is to it.
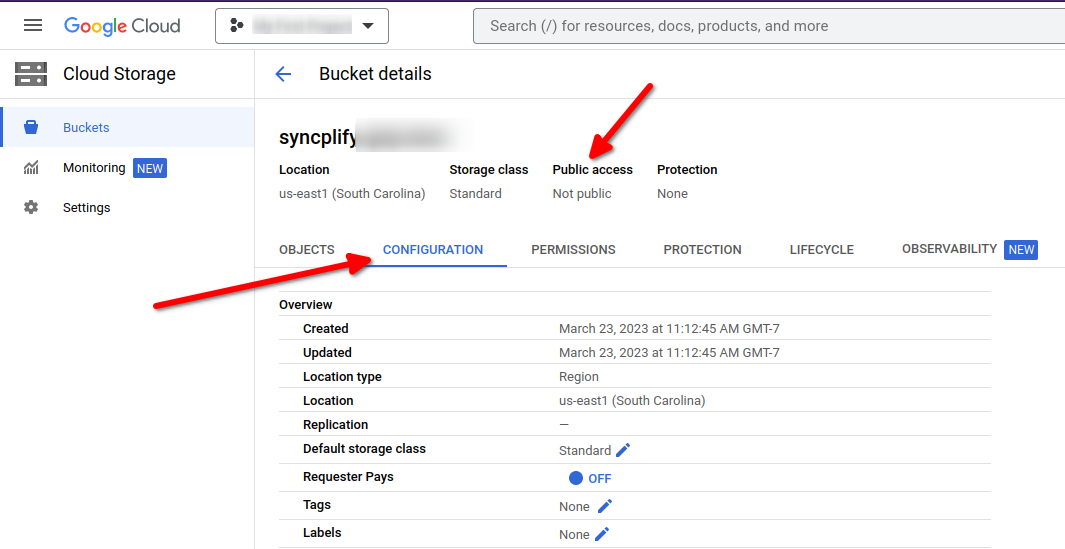
How to use the s3 Virtual File System (VFS)
Syncplify Server!, through its virtual file system (VFS) data storage layer, can store your SFTP server's data into various storage back-ends. This article explains how to use the GCP VFS type that stores your server's data into a Google Cloud Platform object storage bucket.
First of all you'll need to create a bucket in one of your Google Cloud projects. Please, make sure the security policies for this bucket meet your requirements (the settings shown below are for exemplary purposes only, you are responsible for deploying settings that meet your requirements):
Now create a service account to access this storage bucket; make sure you create an access key in that service account, and download the access key in JSON format:

Now you have everything you need to configure your GCP (object storage) Virtual File System (VFS) in your Syncplify Server! v8:

Make sure you specify the full bucket URL (including the gs:// protocol prefix) and then select the storage account key file (in JSON format) from your disk to be uploaded and used to access this particular Google Cloud object storage. And that's all there is to it: your VFS is ready to be used by any of your Syncplify Server! v8 user profiles.
How does the block-list (Protector!) work?
One of the most popular and widely appreciated features of Syncplify Server! has always been its powerful and automatic block-list (formerly known as blacklist). Starting from v4 (and subsequent versions) Syncplify Server! brought that concept to an even higher level with its Syncplify Protector!™ technology.
Protector! is a leap forward. It’s still fully automatic, but its controls are an order of magnitude more accurate and integrated much deeper in the protocols handler themselves. If used to its full potential, Protector! can be very harsh, therefore we felt the need to let our users configure its “sensitivity”. It is possible to set Protector! to either one of the following 4 “aggressiveness thresholds”:
Indulgent: when set to “indulgent”, Protector! will only detect authentication/authorization level violations, but will not consider a connect-disconnect sequence as a violation (thus it’s compatible with external “heartbeat” network and host monitors) – regardless, we still recommend the use of our safe-list for this purpose, and to set Protector! to indulgent only when Syncplify Server! is run in totally isolated networks not connected to the Internet.
Normal: this setting will tell Protector! to behave similarly to the previous block-list (as seen in the old v1-v3), only with a much higher degree of accuracy. This is the default setting.
Strict: this is a harsher setting, ideal when a server is open to external users that don’t belong to your organization, and whose client software you have no control on. The “strict” setting, in fact, will treat all protocol level errors as violations, and trigger the strike-count for the block-list. Requesting the download of a non-existent file, or the list of a directory without permissions, all these occurrences (and the like) will increase the strike-count, and eventually kick the connection and block-list the remote IP.
Paranoid: similar to “strict” but… more. When Protector! is configured in “paranoid” mode, even just disconnecting without sending the “BYE” command will be considered a violation, and trigger the strike-count increase. So, we recommend to use this mode only when you have full control over the client’s behavior and you know for sure that the client is going to honor the protocol 100%, because in “paranoid” mode anything less than absolute perfection is a violation, and will eventually get you block-listed.
Block-list, allow-list, and safe-list
Up to the old version 3.x, Syncplify.me Server! featured a black-list and a white-list. The black-list is where all “bad guys” would end up if they tried attacking the server (DoS, DDoS, password harvesting, …) while the white-list was used for a much more restrictive purpose. In fact – when enabled – the white-list would allow clients to connect only if their IP address was in the white-list. Enabling the white-list, practically, means permanently black-listing anyone who is not on in the white-list.
Although the black/white concept was good enough for most installations, we figured that we could make it even more flexible. That’s why, starting from version 4.0 and all subsequent versions, Syncplify Server! introduced a third list, called safe-list. Here’s how the 3 lists work:
Block-list: formerly known as blacklist, any IP address (e.g.: 192.168.1.35) or network (e.g.: 10.23.5.0/255.255.255.0) listed in the black-list will be rejected
Allow-list: formerly known as whitelist, if this list is not empty, then only the IP addresses and networks in this list will be allowed to connect, and anyone else’s connection attempt will be rejected
It is important to understand that allow-listing an IP address does not prevent it from being block-listed, see the safe-list here below for that
Safe-list: IP addresses and networks listed in the safe-list will never be blacklisted, even if they perform actions that may be interpreted as attacks, for example, if they connect and disconnect without attempting authentication (typical behavior of a load balancer)
Clever use of the 3 above lists guarantees enough flexibility to satisfy a much wider variety of situations than any previous version of Syncplify Server!
Authenticating users via PKI
We have already talked about the SSH Server Key, which is used to verify the server’s identity and to negotiate the security (hmac/encryption) parameters. In this article, instead, we want to explain how to use PKI to authenticate users in Syncplify Server!
First of all, it is important to understand that – unlike Server Keys (or Host Keys) – these user-specific key pairs are not used for encryption, but only and exclusively to authenticate users, thus verifying their identity and decide whether to let them log into the server or not.
Authenticating users via PKI certainly grants a much higher degree of security than simply using a password, and is, therefore, a highly recommended authentication method.
Method #1: user-generated key pair (recommended)
To ensure the highest degree of protection for the user, and prevent the potential loss of the private key, it is highly recommended that the user generates the RSA key pair (both private and public key) and then sends only the public key to the server operator.
This can be done, for example, with the following shell command on a Linux client:
ssh-keygen -t rsa -b 4096Or, in Windows, it’s easily doable using the excellent PuTTYgen tool, as shown in the images here below:
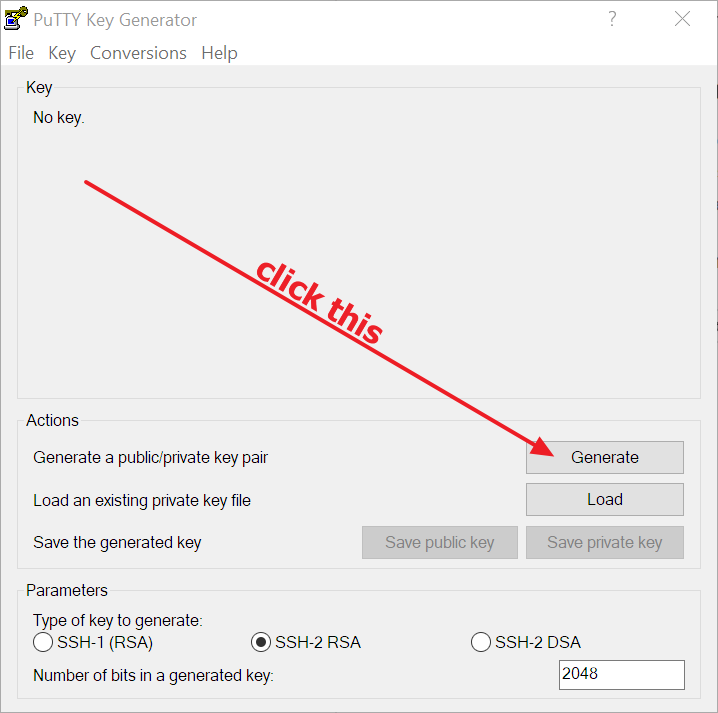
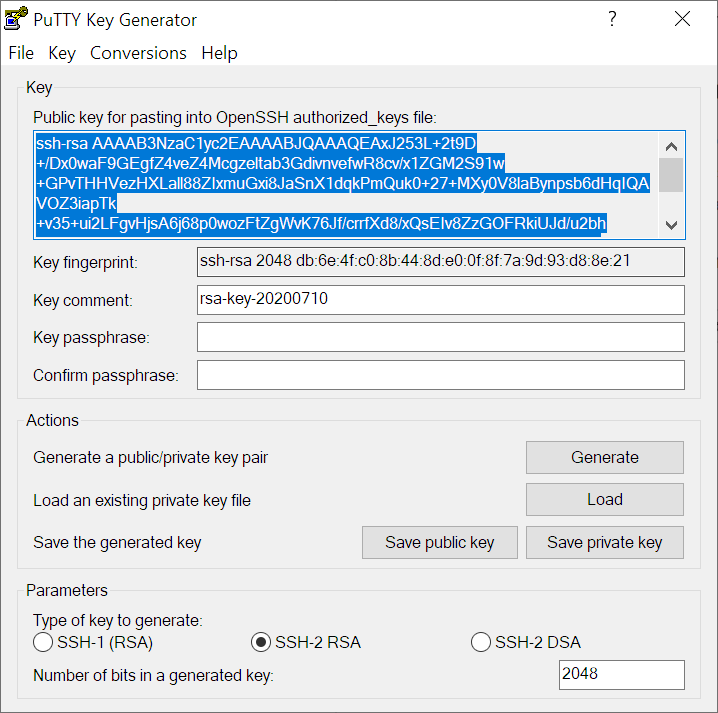
Regardless of the OS (Linux or Windows) the user needs to save both public and private keys after they are generated, and:
- retain the private key (will be used in the SSH/SFTP client to connect to the server)
- send the public key to the Syncplify Server!’s administrator
Once the Syncplify Server! administrator receives the user’s public key, he/she will have to import it into the authorized keys for that specific user, and enable PKI authentication for that user profile, as shown in the pictures here below:
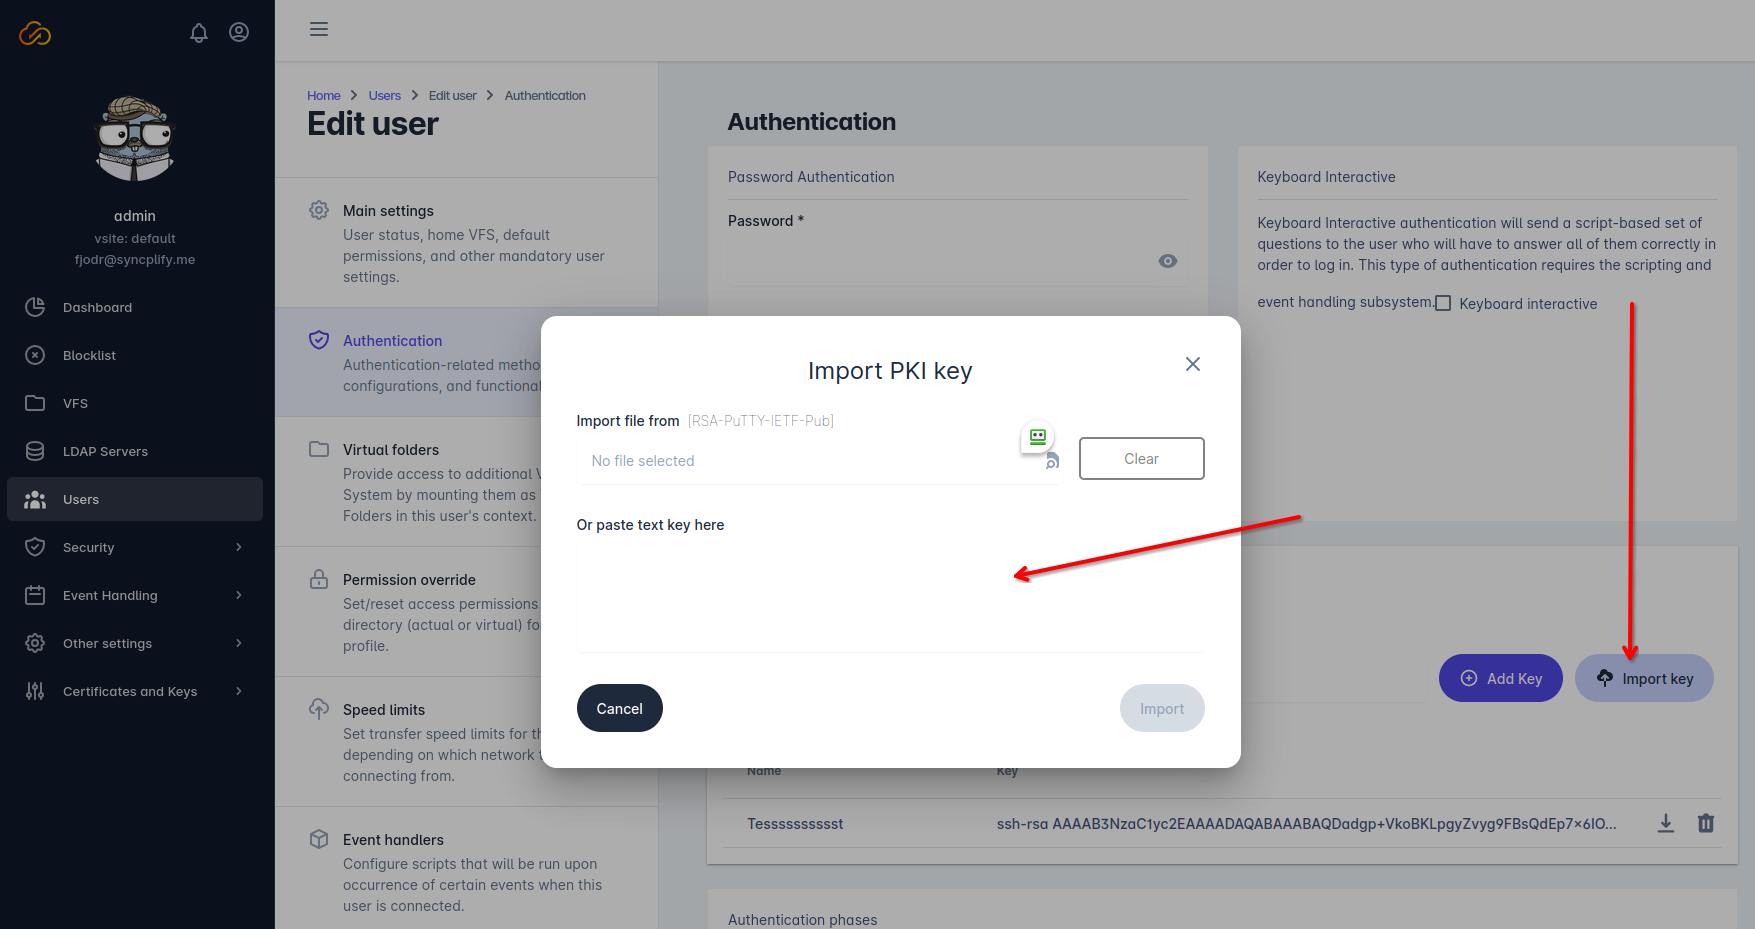
After importing the user’s public key, the Syncplify Server!’s administrator will simply save the user profile, and that’s it: the user can now authenticate and log in using his own self-generated key pair.
Method #2: server-generated key pair (not recommended)
Alternatively the Syncplify Server!’s administrator can generate the key pair and send it to the user, while Syncplify Server! only retains (stores in its configuration database) only the public key. This method is not recommended because it implies the private key being sent over the network, which might be unsafe, but it’s much easier than the previous method, and it can actually be suitable and safe in closed environments (like when the key pair is given to an internal user or an employee) in a safe way.
In this case, the Syncplify Server!’s administrator will still need to enable PKI authentication for the specific user profile:
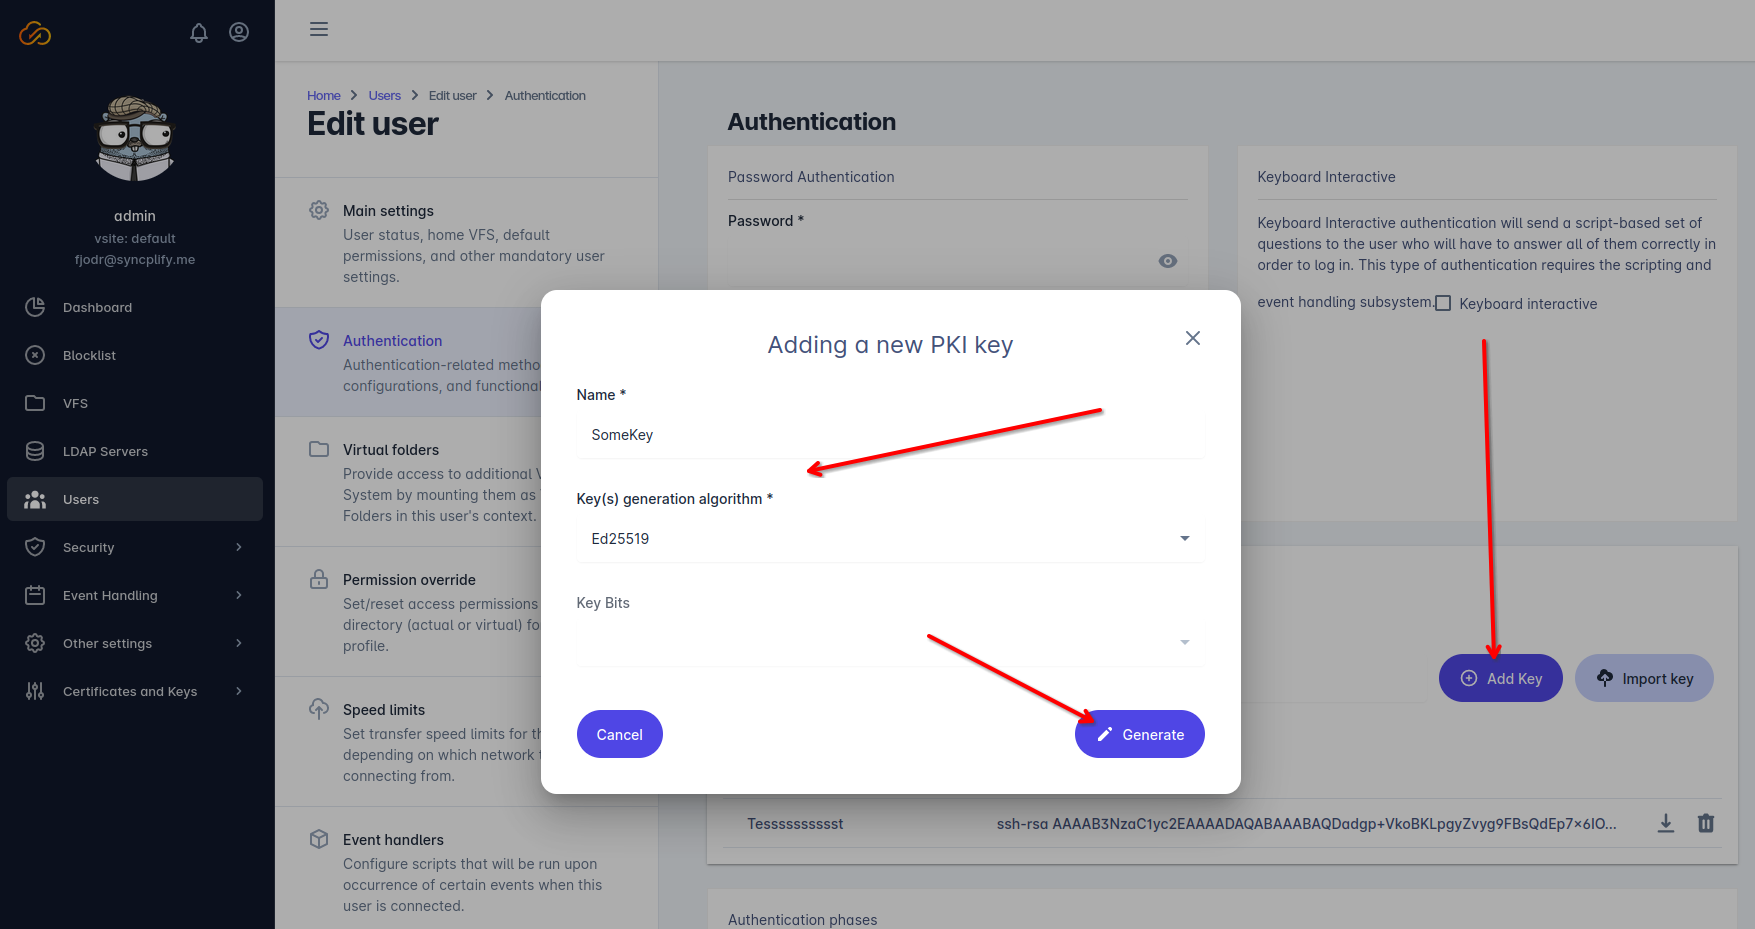
Once done, the Syncplify Server!’s administrator will simply need to save the user profile, and send/give the generated PPK file to the user.
Customizing SFTP and FTP(E/S) greetings and banners
Some of the concepts explained in this article require that you're running a version of Syncplify Server! greater than or equal to 6.2.5
Syncplify Server! allows customizing greetings and banners (for those protocol handlers that support such feature) with variable fields that are automatically processed by the software when a client connects. Here’s a basic example of what you can write:
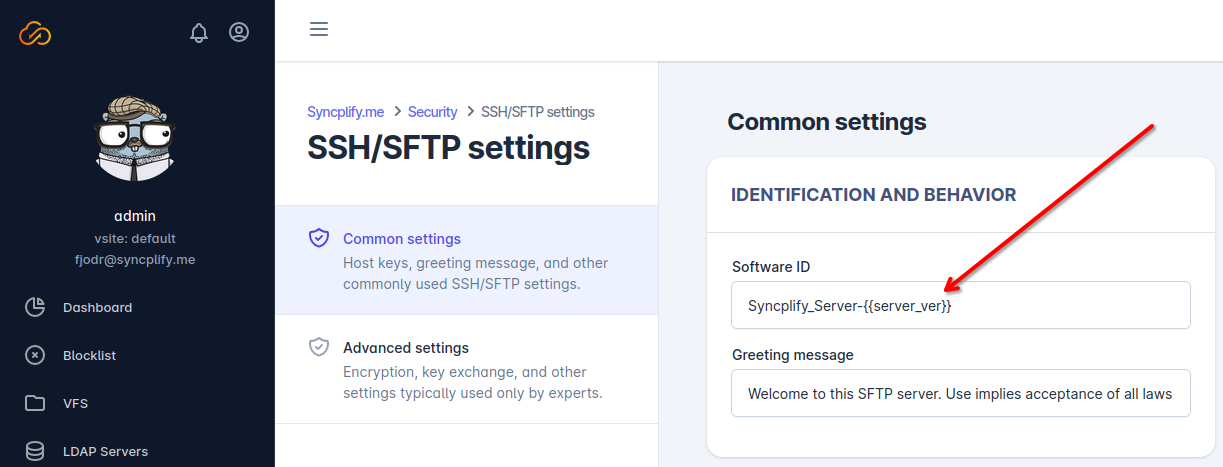
The variables you can use are well documented in this section of the software manual.
See the field between double curly brackets? That's a variable, and when a client connects, Syncplify Server! will process the above greeting message, and send it to the client fully expanded. Here below you can see what the server sent FileZilla Client upon connection:
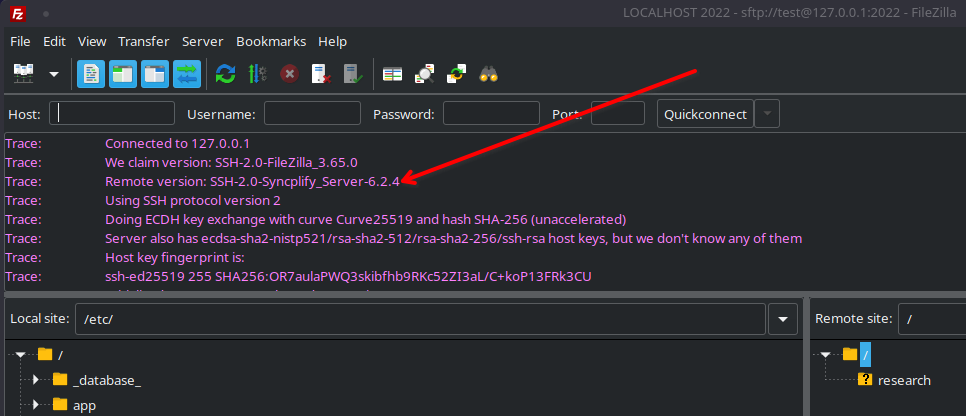
How to override permissions on subfolders inside the user’s Home VFS
As of version 5.0 (and subsequent versions) Syncplify Server! allows overriding permissions on sub-folders that are physically contained inside a user’s Home VFS. So we're talking about actual folders here, not virtual folders as virtual folders already come with their own set of permissions.
Let’s say, for example, that the actual directory structure on the disk is the one you see in the picture here below:

And let's say you want to apply different permissions to the various sub-directories under that root... Well, now with Syncplify Server! you can do so very easily:
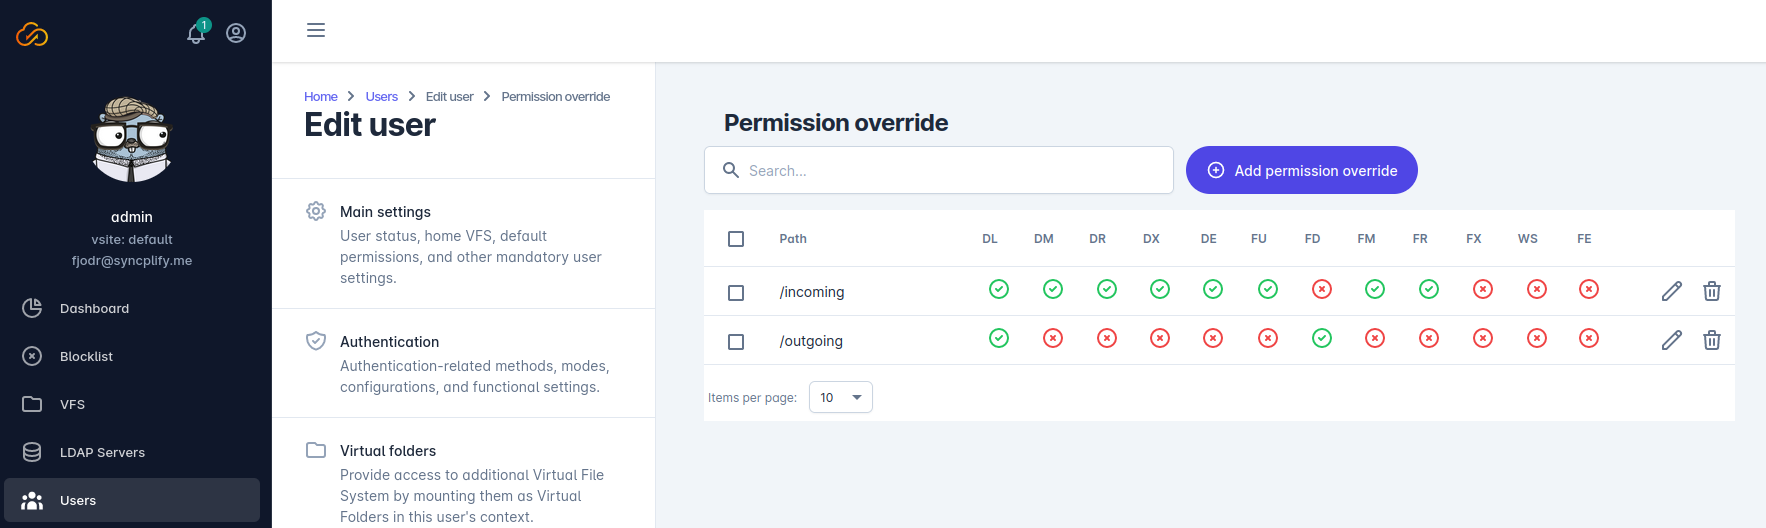
All physical paths configured under the "permission override" section must be POSIX and root-based, meaning they begin with a forward-slash, they use forward-slashes as path separators, and they are relative to the directory (or whatever target) pointed to by the user's home-VFS (which is, in fact, the "root" for each individual user account).
Yet another way Syncplify Server! makes an SFTP server administrator’s life easier.
FATAL ERROR: Connection reset by peer (could not connect to server)
It may happen that a client that has always been able to connect to Syncplify Server! without any issues, suddenly can't connect and displays a message similar to this one:
FATAL ERROR: Connection reset by peer (could not connect to server)
Depending on the client software the failure message may vary, but its meaning is always the same: the client cannot connect to the server.
When that happens, the most likely causes are:
- the client software has violated the protocol or the permissions (for example it has tried to upload a file to a folder where uploads are forbidden) multiple times, and has been block-listed - in this case, locate your client IP address in the block-list, and remove it
- you may have added at least 1 IP address or network to your allow-list, but now you're trying to connect from an IP address that's not allow-listed; please keep in mind that the allow-list, when used, is restrictive; learn more about the allow-list (and other lists)
- if you're running an old version of Syncplify Server! (v1-v5) your server may have detected changes in your hardware, virtual hardware, or operating system, that may have led to an invalidation of the license - licenses that revert back to FREE edition cause the server to only accept a single client connection at a time - if that happens submit a ticket here (top right corner) and we'll help you reset your license
- client and server may have been unable to negotiate a common set of encryption/MAC/key-exchange algorithms; in this case it's strongly recommended to configure the client to use the same strong algorithms available on the server, weakening the server by adding weak algorithms to it is never a good idea
Virtual File Systems (VFS) with quotas
The Virtual File System (VFS) introduced in Syncplify Server! v4.0 (and available in all subsequent versions) comes with a long-awaited feature: quota management.
IMPORTANT: Syncplify Server! v4/v5 expressed their quotas in KB, while starting from Syncplify Server! v6 quotas are expressed in bytes.
Now, the problem with quota management is that calculating the current size of a folder (along with its sub-folders) can be very time-consuming if the folder contains millions and millions of files. So if we were to re-evaluate the size to enforce quota restrictions at every operation it could totally kill the performances. A balanced solution is to have a Quota TTL, which is the Time-To-Live (TTL) of the quota cache, expressed in seconds. Basically, when Syncplify Server! calculates the current size of a folder structure, it will consider such result valid for that many seconds, without re-evaluating it too often.
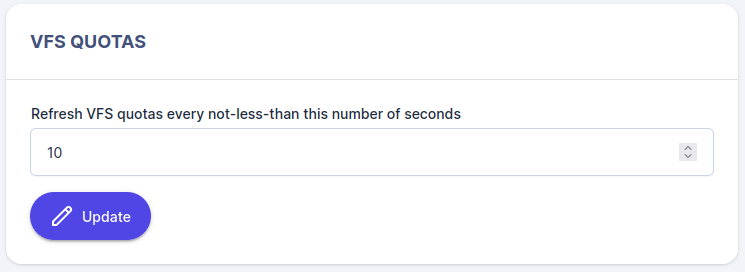
We also support two kinds of quota:
- Soft Quota: if the soft quota is exceeded during a file transfer, the file that’s currently being transferred will be allowed to finish uploading, and will be kept; the next file upload will be denied
- Hard Quota: when this value is reached, any ongoing upload will be forcefully terminated and the partially uploaded file will be deleted; the next upload will be denied only if the soft quota has been exceeded
You may set limits for soft quota, hard quota, or both. If you don’t want a quota (soft or hard) to be enforced by a certain VFS, then leave its value to 0 (zero).
Solved: insecure FTP data connection (TLS session resumption)
If you are running any version of Syncplify.me Server! prior to 5.1.17, and using the FTPS or FTPES protocol, your client software may start complaining about an "insecure data connection" or lack of "TLS session resumption".
You may see an error message similar to the one here below:
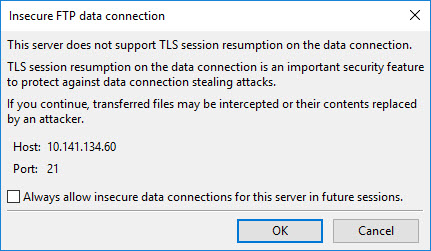
There's an easy solution to that: upgrade to the most recent version of Syncplify Server!
Thank you!
Parametric home directories (VFS)
Another highly requested feature that Syncplify.me Server! offers in all editions is parametric home directories.
Some of our customers, in fact, need to isolate every user in their own directory under a general “container”, the directory name being the same as the user’s username. They also requested that if a particular user’s home directory does not exist, it is automatically created when the user logs in.
Let's say you have two (or more) users, and you want to achieve a directory layout like this:
C:\SFTPData
+----------\user_one
+----------\user_twoThis is very easy to do with just one VFS in Syncplify Server!. First of all, you have to create a VFS with a parametric target, let’s call it “ParamVFS” and point it to C:\SFTPData\{{username}}:
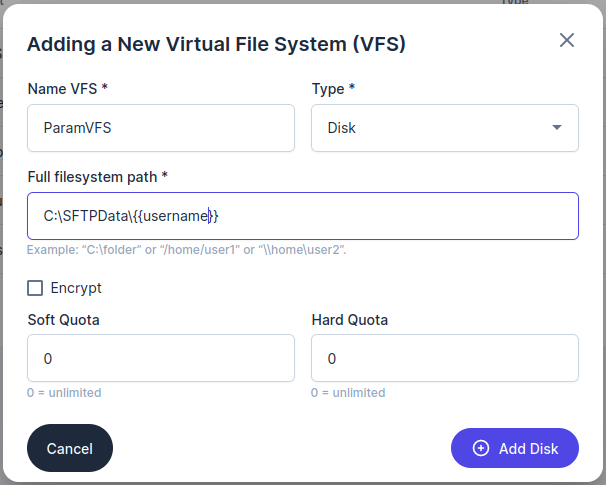
Then, when we create our user profiles for user_one and user_two, choose the “ParamVFS” VFS as their home folder:
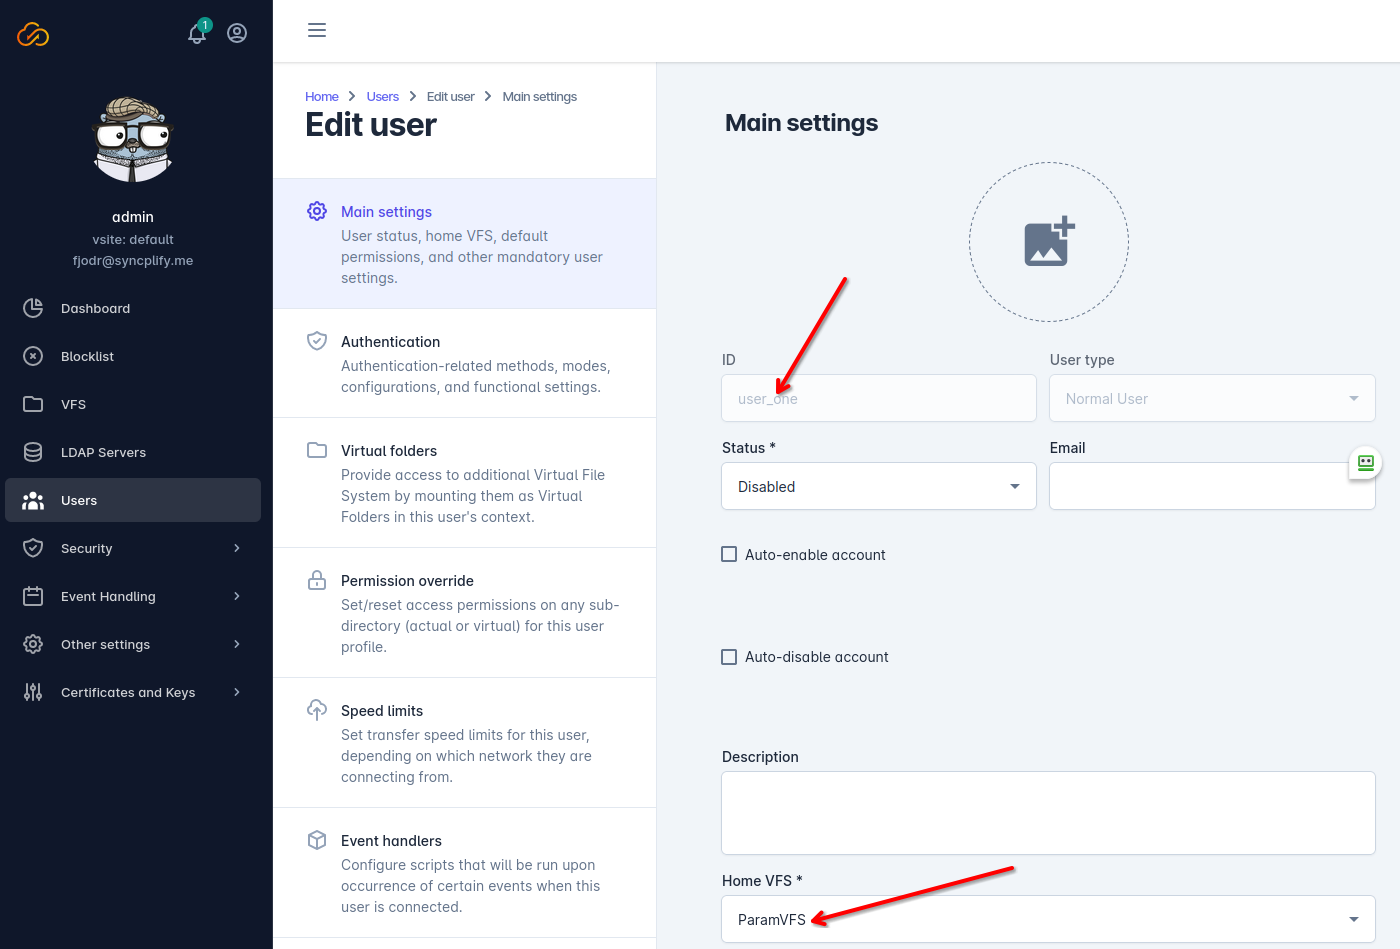
Now the home directory for user user_one will be “C:\SFTPData\user_one“, and the home directory for user user_two will be “C:\SFTPData\user_two“.
Each directory will be automatically created the first (or next) time each user logs in.
Aside from the {{username}} parameter, there are other parameters you can use in your parametric VFS, namely:
- {{user_home}}: the LDAP (or Active Directory) "home" for this user (if defined, not to be taken for granted)
- {{user_desc}}: the content of the "description" field in the User's configuration
- {{today}}: the current date in YYYYMMDD format
- {{today_utc}}: the current date in YYYYMMDD format in the UTC (universal) timezone
- {{sess_custdata}}: the content of the session's custom data (applicable only to the editions of our software that feature scripting and event-handling, as this is configurable only via scripting)
As of version 6, we adopted the double-curly-bracket notation for all our parametric VFS variable names (ex: {{username}}). The old notation with square brackets and percent signs (ex: [%USERNAME%]) is still supported, but this notation will be dropped in the future, so please make sure you update all your configurations accordingly.
Cannot connect: "unexpected message type 30 (expected one of [34])" reason found in log file
Some clients cannot connect to your Syncplify Server! version 6.x, and when you analyze the worker process (the virtual site's) log file you see the following message in it:
ssh: unexpected message type 30 (expected one of [34])
Why does this happen?
The message "type 30" is a pre-RFC4419 group exchange message, and support for the "type 30" message has been removed from OpenSSH release 6.1 and later. To prevent potential vulnerabilities and in an always-ongoing effort to keep our custoemrs and users as safe as possible, we removed it too from our Syncplify Server! software. When this default message in the Diffie-Hellman group exchange algorithm policy is used during SSH key exchange, it generates and logs the above error message, and the key-exchange attempt is aborted by the server.
The solution is to upgrade or reconfigure the client software so that it sends the new and correct message type 34 to request the usage of any diffie-hellman-group-exchange key exchange algorithm.
How to backup your Syncplify Server!'s database
Note: this article only applies to Syncplify Server! v6.x and above. If you're looking for a way to backup your old (v4/v5) database you should look at this article instead.
Syncplify Server! v8 offer several ways to perform a backup of its configuration database (which is always part of a good disaster recovery strategy). This article explains three ways to accomplish this task.
Method #1: from the SuperAdmin UI
The easiest way to backup your entire configuration database is to use the Backup page in the SuperAdmin UI:

Method #2: via REST API
Of course, using a web UI is not very suitable for automation... so, if you want to automate your backups (and you're familiar with REST API) the same function is documented, in standard OpenAPI documentation format, here: https://ss6openapi.syncplify.com/
Method #3: via command line
For those who prefer the old-school command line to a more modern REST API approach, we have also included such capability in the Web/REST service main executable:

Simply open a terminal (or command prompt in Windows), change directory into the directory where Syncplify Server! is installed, and type the following command.
For Windows:
.\ss-webrest.exe backup -d "C:\directory\where\you\want\your\backup"For Linux:
./ss-webrest backup -d /directory/where/you/want/your/backupMethod #4: via command line (but in SyngoDB's native low-level format)
This one is a little bit more laborious, but sometimes it's the only way to acquire a database that contains erroneous data and configurations that make it non-understandable to Syncplify Server!'s system service. This method should always work, even in the worst case scenario.
- Download this on your server: https://download.syncplify.me/ss6dump.zip (on all nodes if it's an HA deployment)
- Put it in its own directory anywhere on the C:\ or root partition (create one if you need, example: C:\ss6dump)
- Run it "as administrator" (under Windows) or via sudo (under Linux)
- It will create a "dump" folder under the folder where the executable is located
- You can then zip up the content of that "dump" folder and attach it to your customer support ticket to Syncplify
Unsupported public key authentication algorithm SshRsa (ssh-rsa)? Here's how to fix it.
An important research paper published in 2023 by Keegan Ryan, Kaiwen He, George A. Sullivan, and Nadia Heninger mathematically demonstrated another weakness in RSA keys, which are commonly used as host keys for SSH/SFTP servers or to authenticate SSH users via PKI.
For such reason, starting from Syncplify Server! v6.2.26 the ssh-rsa algorithm is no longer among the default active ones. Please understand that we have done so to protect our customers and users and ensure that we can keep the reputation we earned in the last decade as the only enterprise-grade SSH/SFTP server on the market that's never been hacked.
Yet, more often than we thought, we receive emails and support tickets informing us that some SSH/SFTP clients attempting to connect to our server software are receiving an error message like this: "Unsupported public key authentication algorithm SshRsa (ssh-rsa)". So, what to do about it?
Well, there are two roads you can follow, one that is formally and actually correct and ensures your server's safety and security, and one that works but weakens the overall safety and security of your server for every one of your users. Let's explore them both.
The correct way to fix this
The only correct way to fix this is to ditch RSA keys completely. They should appear absolutely nowhere in your server's configuration, no RSA host key, no RSA keys to authenticate your users, and no ssh-rsa host-key or PKI algorithm enabled. Then configure all of your clients to use alternative algorithms (Ed25519 is strongly recommended) when they connect to your server. Yes, it's a hassle and it requires a lot of reconfigurations of a lot of moving parts, but no effort is too big compared to the cost (legal, monetary, and material) of being hacked.
The quick-and-dirty (and insecure) way to fix this
You can, of course, keep your RSA keys (host key and user keys) and enable the ssh-rsa algorithm in your server as shown in the screenshot here below:
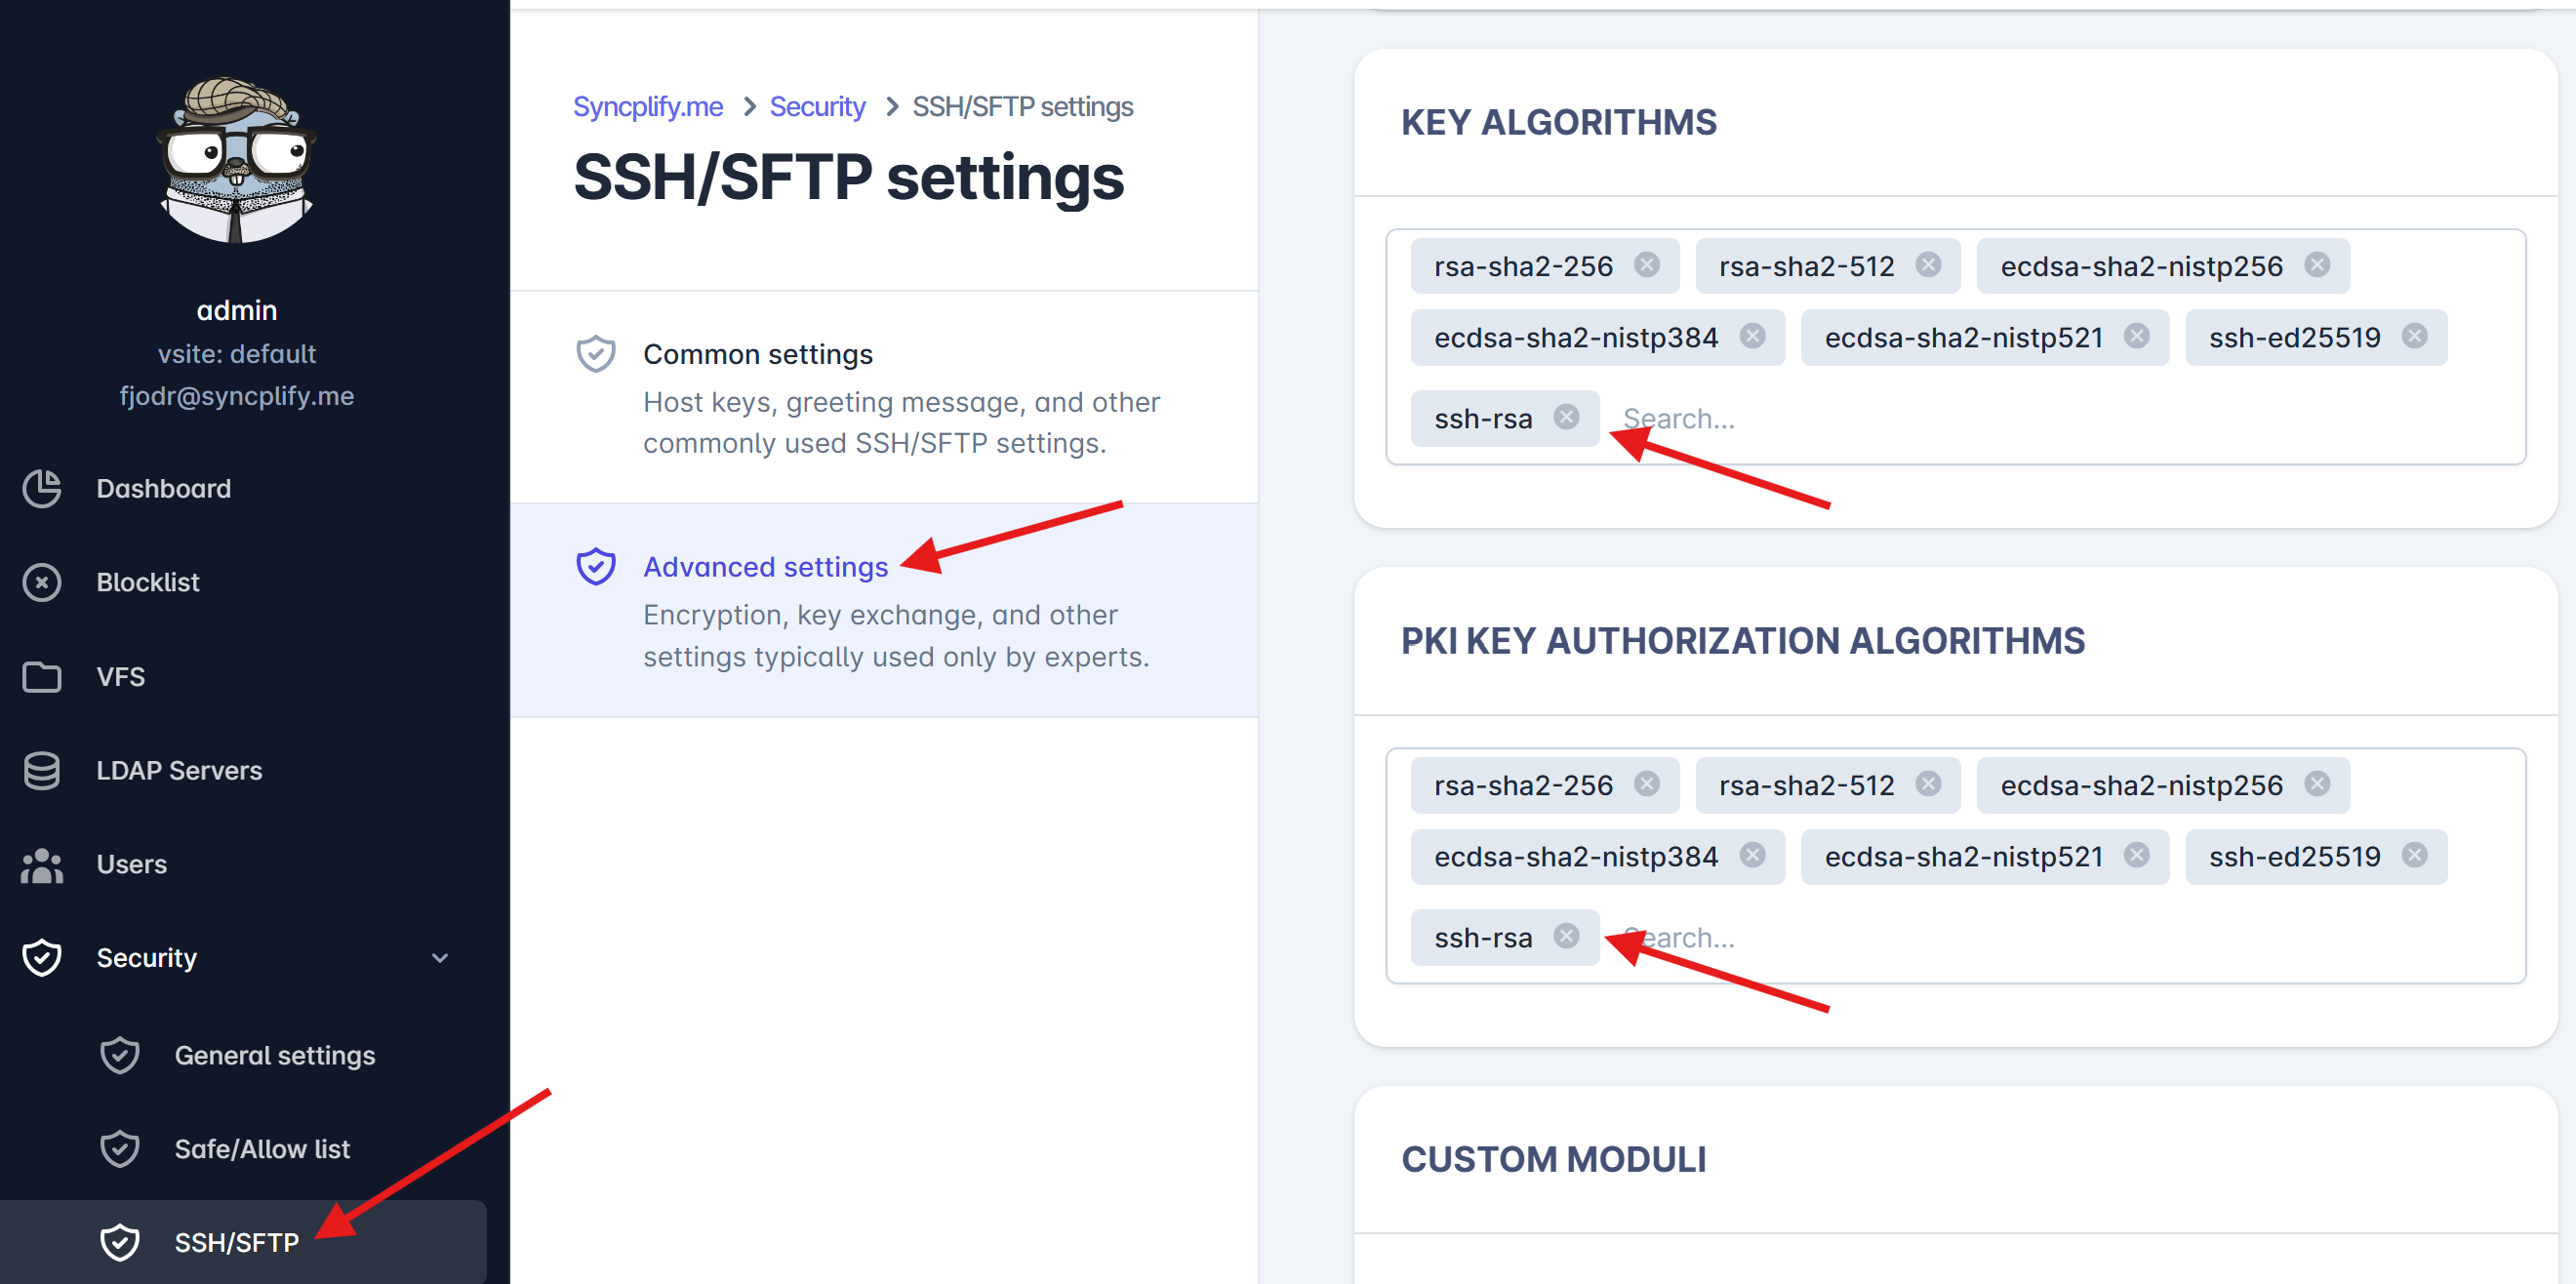
Please keep in mind that any change to the security algorithms of your SSH/SFTP server will only take effect after you restart your Virtual Site from the SuperAdmin UI.
WARNING: While we offer this option for your convenience, it’s important to understand that it does not provide the same level of security as our recommended approach. Syncplify cannot be held responsible for any security breaches that may occur as a result of using this option. We strongly advise selecting the secure option to protect your system, users and data.
How to import many users at once from a CSV file
IMPORTANT: this feature requires Syncplify Server! version 6.2.50 or greater. It was not present in versions prior to 6.2.50 so if you attempt to use this feature in older versions it won't work.
Sometimes, to ease transition from other SFTP servers, it may be useful to have the ability to import user profiles, along with their home VFSs, in bulk from a comma-separated value (CSV) file.
The importusers command does exactly that. Let's see its inline help first, to familiarize ourselves with how it works:

Things to notice:
- It is a command built into the ss6-webrest executable
- It can take various options at command-line:
--csvis mandatory, this is the path to the CSV file containing info on the user profiles to be imported--vsiteis also mandatory, it's the ID (not the friendly name) of the virtual site you wish to import users into--makevfsis boolean and optional, if present the VFS field in the CSV file is expected to be an absolute directory path and a VFS for that path will be created and assigned to the user as its Home-VFS--dryrunis boolean and optional, if present no changes will be made to your Syncplify Server! and the importusers command will only evaluate whether or not the import operation would be successful
Now let's explore the format of the CSV data that is expected by the importusers command. It obviously depends on whether or not the --makevfs parameter is present.
If the --makevfs parameter is present, the CSV must contain data like this:
oneuser,"some password","/home/oneuser","ssh2_scp,ssh2_sftp,ftps,ftpes,https,https_sharing","dirList"
anotheruser,"some other password","/home/differenthome","ssh2_shell,ssh2_scp,ssh2_sftp","dirList,dirMake,dirRename,fileGet,filePut,fileModify,fileRename"
third_user,"different password","/home/oneuser","https,https_sharing","dirList,dirMake,dirRename,dirDelete,dirEditMetadata,fileGet,filePut,fileModify,symlink,fileRename,fileDelete,fileEditMetadata"
test,test123,"/home/oneuser","ssh2_sftp,ftps,ftpes,https,https_sharing","dirList,dirMake,filePut,fileModify"Whereas if the --makevfs parameter is not present, the CSV must contain data like this:
oneuser,"some password",2iSpTdEgRGPuYh0MVx2uWr5zxR4,"ssh2_scp,ssh2_sftp,ftps,ftpes,https,https_sharing","dirList"
anotheruser,"some other password",2l42WNHRjDtQUx8HdhGV5Jwq5j0,"ssh2_shell,ssh2_scp,ssh2_sftp","dirList,dirMake,dirRename,fileGet,filePut,fileModify,fileRename"
third_user,"different password",2mDUX9qjygr3dOOzBx4S6kwLcah,"https,https_sharing","dirList,dirMake,dirRename,dirDelete,dirEditMetadata,fileGet,filePut,fileModify,symlink,fileRename,fileDelete,fileEditMetadata"
test,test123,2mDUa8AaNKnmebSKy1ziUMyns0d,"ssh2_sftp,ftps,ftpes,https,https_sharing","dirList,dirMake,filePut,fileModify"As you can see the only difference is that when --makevfs is present the 3rd field of each record in the CSV is expected to be a fully-qualified and absolute path to a local storage location available in your OS, whereas when --makevfs is absent the import process expects you to provide the ID of an existing VFS already configured in your Syncplify Server!
All other typical CSV format requirements remain in place, like, for example, the need to double-quote strings that contain spaces, wherever they might be.
So, what is the accepted content for each field in each record (line) of the CSV? Here you go:
- Username: all lowercase and absolutely no spaces
- Password: free text (within double-quotes only if it contains spaces)
- VFS ID or Absolute Path: depending on the presence of
--makevfsas explained above - Allowed subsystems: a double-quoted string containing a comma-delimited list of the following valid values:
ssh2_shell,ssh2_command,ssh2_scp,ssh2_sftp,ftp,ftps,ftpes,https,https_sharing - Permissions: a double-quoted string containing a comma-delimited list of the following valid values:
dirList,dirMake,dirRename,dirDelete,dirEditMetadata,fileGet,filePut,fileModify,symlink,fileRename,fileDelete,fileEditMetadata
Here's the typical output of a dry run:

And here's the typical output of an actual import operation:

Limitations
The current version of the importusers command has several limitations and makes several assumptions, namely:
- It can only import "Normal" users, which are users authenticated locally by Syncplify Server!, it cannot import "LDAP" users
- It can only import users that use Password authentication (it can't import PKI auth configurations nor key-pairs)
- It can associate users to any VFS type (Disk, S3, Azure, etc...) if the VFS ID is provided, but when using
--makevfsit can only create Disk-type VFSs - It can only import the following 5 details for each user: username, password, VFS, subsystems, and permissions
- It needs to be run as Administrator (in Windows) or as root/sudo in Linux
Scripting
This section is dedicated to the usage of SyncJS (Syncplify's very own flavor of JavaScript) to customize the behavior of your Syncplify Server!
How to email a list of uploaded files
As of version 6.0, all Syncplify software products have converged onto using SyncJS (our very own flavor of extended JavaScript) as the unified scripting language on all platforms. This means that the old scripts you've been using in previous versions of the software no longer apply. Here's how to achieve the task in the subject via SyncJS.
The foundational concepts are the same. First of all, you need a script that adds each uploaded file name to the Session's "custom data" memory container:
{
Session.AddCustomData(CtxRelPath());
}The script above needs to be associated to the AfterFileUpload event handler.
Then you need a second script to send out the actual emails:
{
var files = Session.GetAllCustomData();
if (files.length > 0) {
var body = "The following files were uploaded:\n\n" + files.join("\n");
SendMail("sender@example.com", "recipient@example.com", "List of uploaded files", body, "");
}
}This second script needs to be triggered by the OnConnectionClose event handler.
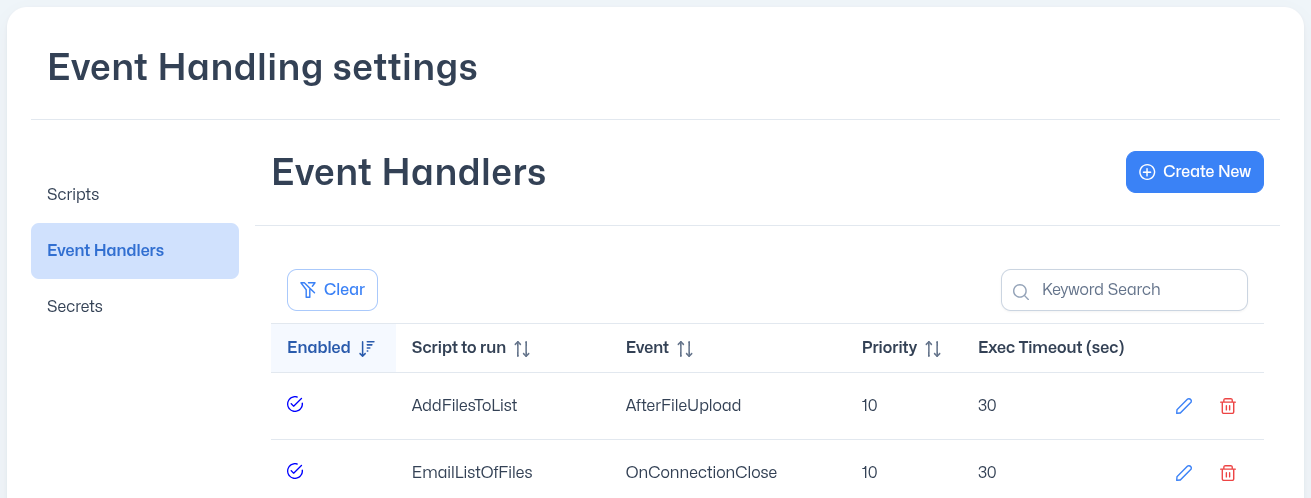
Please note that, just like with previous versions of our software, you may receive more than 1 mail. This happens when your client software (FileZilla, WinSCP, ...) performs multiple concurrent connections to the server to upload multiple files at once. Each connection is one Session, and each Session has its own custom data and events.
VFS.ImportFile and VFS.ExportFile
This article presumes the use of features only available in the Ultimate edition of Syncplify Server!, such as at-rest encryption for the virtual file systems (VFS).
As you surely already know, when you use an encrypted VFS all files that any user uploads into such VFS will be encrypted at-rest (on your server’s hard drive).
But what if you need to copy/move those files – as they are uploaded – out of the VFS for further processing? Obviously, if you use the CopyFile/MoveFile functions each file will be copied/moved “as is”, in its encrypted form, and other software products won’t be able to read and process it.
Therefore a method to export files from an encrypted VFS to a different and unencrypted location was needed. To do so, you can use the new function ExportFile which is part of the VFS object namespace. When using functions in this namespace we recommend to always verify that VFS is not nil, as this object is not always defined in every execution context. See the script below for example:
{
var vfs = Session.GetCurrentVFS();
if (vfs != null) {
vfs.ExportFile(Session.GetAbsPath(), "/some/directory");
}
}By the same token the VFS namespace also provides an ImportFile method to import a plain/unencrypted file from your system's file system into an at-rest encrypted VFS managed by Syncplify Server!
Preventing upload of EXE files
Some SFTP servers feature a simple “extension exclusion list” so that administrators can specify certain file extensions that the server should not let users upload. But that’s a pretty weak defense, as a clever attacker could always upload an EXE with a fake extension and then rename it or otherwise find alternative ways to run it on the server, thus compromising its security.
Syncplify Server!’s scriptable nature, though, allows you to do a lot more than just disallow certain file extensions. Here’s a sample script that can be attached to the “AfterFileUpload” event handler, to identify EXE files that have been uploaded with fake extensions and delete them right away.
{
var FirstBytes = FileReadAsHex(Session.GetAbsPath(), 0, 2);
var PEBytes := FileReadAsHex(Session.GetAbsPath(), 256, 4);
if ((FirstBytes == '4D5A') && (PEBytes == '50450000')) {
// It's an EXE, delete it!
Log('Identified '+Session.GetAbsPath()+' as an EXE file, deleting it.');
if DelFile(Session.GetAbsPath()) {
Log('Deleted: '+Session.GetAbsPath());
} else {
Log('Failed to delete: '+Session.GetAbsPath());
}
}
}The above script is provided as a mere example to identify Windows EXE files. But it could be easily modified in order to identify other file types.
All Windows EXEs, in fact, have stable distinguishing features in their binary code, and more precisely: the first 2 bytes (in hex) will always be 4D5A, and the 4 bytes at offset 256 (0x100) will always be 50450000. So if a file has those byte sequences in those exact locations, it’s safe to say it’s a Windows EXE.
Do you need to identify ZIP files instead? The first 4 bytes are always 04034B50.
And so on… many file types can be identified by specific “signatures” in their binary code, that one can easily read using Syncplify Server!’s powerful scripting capabilities.
Alternative method
Starting with version 6, Syncplify Server! has also added a handy FileType function to its scripting engine. This function automatically identifies the MIME-Type of hundreds of file types by reading only the first 261 (at most) bytes from the file itself.
The above script could then be rewritten like this:
{
if (FileType(Session.GetAbsPath()) == "application/x-msdownload") {
// It's a Windows EXE, delete it!
Log('Identified '+Session.GetAbsPath()+' as an EXE file, deleting it.');
if DelFile(Session.GetAbsPath()) {
Log('Deleted: '+Session.GetAbsPath());
} else {
Log('Failed to delete: '+Session.GetAbsPath());
}
}
}How to download a "publicly shared" (WebClient!) file via PowerShell
Foreword: we need to bear in mind that Syncplify Server! is, at its core, a security software, therefore even when you use its WebClient! to create a "publicly shared object" (a shared object that's not password-protected), downloading such object is not as simple as pasting its URI into a plain Invoke-WebRequest in your PowerShell, there's a lot more to it than that.
You have to account for the security measures Syncplify Server! employs, so all these operations must be indirect. First you have to invoke the URI of the shared object, read the JWT from there, then perform a POST request with that token to a specific URL built according to the documentation here: https://openapi.syncplify.com/v6/webclient/#post-/shr/down/-path-
The give you a jump-start, here's a ready-made script for you to customize with your own URLs:
$response = Invoke-WebRequest -Uri "https://webclient.example.com:6444/api/v1/share/2retezypuhQdpEXRD5fNguyMbgI"
$jsonObject = $response.Content | ConvertFrom-Json
$token = $jsonObject.token
$headers = @{
"Authorization" = "Bearer $token"
}
Invoke-WebRequest -Uri "https://webclient.example.com:6444/api/v1/shr/down/test.txt" -Method Post -Headers $headers -Outfile ./test.txtThis script will download the shared file named "test.txt" from a shared object with ID "2retezypuhQdpEXRD5fNguyMbgI", (which must not be password-protected) to a local file also named "test.txt".
For the Linux users among you, here's the same script trancoded to bash (also works in zsh, and should work in any other POSIX shell) using curl and jq:
#!/bin/bash
# Fetch the JSON response and extract the token
token=$(curl -s "https://webclient.example.com:6444/api/v1/share/2retezypuhQdpEXRD5fNguyMbgI" | jq -r '.token')
# Download the file using the Bearer token for authentication
curl -X POST \
-H "Authorization: Bearer $token" \
"https://webclient.example.com:6444/api/v1/shr/down/test.txt" \
-o ./test.txtEnjoy!
Getting started with the REST API
There's no better way to automate Syncplify Server! management and configuration tasks than by scripting against our comprehensive REST API.
This article assumes basic familiarity with scripting concepts (bash, zsh, fish, PowerShell, or languages like Python). No advanced expertise is required – just the ability to execute API calls and handle responses.
We've invested significant effort in creating detailed OpenAPI v3 documentation for every REST endpoint. This specification is:
- Available in the official manual
- Accessible through web-based documentation UIs
- Downloadable as raw JSON files for integration with API tools like Postman, Insomnia, or Bruno
Key Security Consideration: As enterprise security software, Syncplify Server! intentionally avoids long-lived API keys. Instead, our authentication flow requires:
- Initial login API call to obtain a time-limited JWT
- Use of this session token for subsequent API calls
- Automatic token expiration for enhanced security
Below is a practical bash example (requires curl and jq, assumes local Syncplify Server! installation at 127.0.0.1:6443):
#!/bin/bash
# Fetch the JSON response to the /login API and extract the token
token=$(curl --request GET --url https://127.0.0.1:6443/api/v1/sa/login --header 'authorization: Basic XXXXXXXX' | jq -r '.token')
# Call any other REST API using the authorization token you received upon login
# Example: list all virtual sites
curl --request GET \
--url https://127.0.0.1:6443/api/v1/sa/vsites \
--header "Authorization: Bearer $token"
# Example: modify some aspects of the SuperAdmin global configuration
curl --request PATCH \
--url https://127.0.0.1:6443/api/v1/sa/globalconfig \
--header "Aauthorization: Bearer $token" \
--header 'Content-Type: application/json' \
--data '{
"jwtLifeSpan": 30,
"metricsAllowList": [
"192.168.10.0/32"
]
}'
#At the end of your session, do not forget to logout
curl --request GET \
--url https://127.0.0.1:6443/api/v1/sa/logout \
--header "Authorization: Bearer $token"The script here above:
- Performs the login as SuperAdmin, receiving a short-lived JWT (token) that authorizes only SuperAdmin-related API calls
- Calls an API (GET) to receive the list and details of all virtual sites
- Calls another API (PATCH) to modify a few minor aspects of the SuperAdmin UI configuration
- Calls the logout API to invalidate the temporary JWT, from this point on every API call done using this JWT (even valid ones) will be rejected as unauthorized
Here's a PowerShell version of the exact same script (with the exact same assumptions as above):
# Login and get token (note case-insensitive headers in PowerShell)
$loginResponse = Invoke-RestMethod -Uri "https://127.0.0.1:6443/api/v1/sa/login" `
-Method Get `
-Headers @{ 'authorization' = 'Basic XXXXXXXX' }
$token = $loginResponse.token
# List all virtual sites
$vSites = Invoke-RestMethod -Uri "https://127.0.0.1:6443/api/v1/sa/vsites" `
-Method Get `
-Headers @{ Authorization = "Bearer $token" }
$vSites | Format-Table # Display results in table format
# Modify global configuration (note typo in original header name)
$body = @{
jwtLifeSpan = 30
metricsAllowList = @('192.168.10.0/32')
} | ConvertTo-Json
Invoke-RestMethod -Uri "https://127.0.0.1:6443/api/v1/sa/globalconfig" `
-Method Patch `
-Headers @{
# Original script had typo: 'Aauthorization' instead of 'Authorization'
'Authorization' = "Bearer $token"
'Content-Type' = 'application/json'
} `
-Body $body
# Logout to end session
Invoke-RestMethod -Uri "https://127.0.0.1:6443/api/v1/sa/logout" `
-Method Get `
-Headers @{ Authorization = "Bearer $token" }If your server is running on a self-signed certificate, you may also want to consider the following:
# For self-signed certificates (PowerShell 7+):
$ProgressPreference = 'SilentlyContinue' # Suppress progress noise
# Add -SkipCertificateCheck to ALL Invoke-RestMethod calls
Invoke-RestMethod ... -SkipCertificateCheckPlease note: all of the example code above shows you how to use REST APIs in the SuperAdmin category, exclusively to perform SuperAdmin actions and tasks. To perform Admin tasks, the logic is exactly the same but you will have to login using the Admin login API to obtain an Admin JWT instead.
This is the Admin login API called from a bash script:
#!/bin/bash
# Fetch the JSON response to the Admin API /login endpoint and extract the token
token=$(curl --request GET --url https://127.0.0.1:6443/api/v1/adm/login --header 'authorization: Basic XXXXXXXX' | jq -r '.token')And its PowerShell equivalent:
# Admin login API, and acquisition of the Admin JWT token from the response
$loginResponse = Invoke-RestMethod -Uri "https://127.0.0.1:6443/api/v1/adm/login" `
-Method Get `
-Headers @{ 'authorization' = 'Basic XXXXXXXX' }
$token = $loginResponse.tokenWe hope that this brief introduction will help you get started using our REST API more quickly and painlessly.
Miscellaneous
Additional and miscellaneous information, often requested by users and customers, but that wouldn't fit in any specific knowledge base category.
No, we are not affected by Log4j vulnerability (CVE-2021-44228)
No Syncplify software uses (nor has ever used) anything written in Java. Furthermore, and more specifically, no Syncplify software uses (nor has ever used) Log4j. Therefore, none of our software is affected by (nor it has ever been) any Log4j bug or vulnerability.
How Syncplify.me Server! prevents SSHPsycho attacks
According to the SANS ISC nearly 80% of all SSH-based brute force attacks are caused by SSHPsycho or one of its variants. This seems to be confirmed by the LongTail honeypot real-time report provided by the Marist College. So, yes, SSHPsycho is a big deal, and it’s a problem. And traditional blacklisting mechanisms (simply banning certain “well known” IP addresses and networks) have proved to be inefficient against it.
"LongTail shows that Cisco and Level 3’s recent announcement about blocking sshPsycho’s 4 class C IP ranges (also known as “Group 93” and the “Hee Thai Campaign”) has done nothing to stop their brutal attacks. [Source: SANS ISC]"
Syncplify.me Server!’s intelligent and automatic blacklist (called “Protector“), though, shows to be extremely effective at preventing such type of attack. Its real-time dynamic attack pattern identification and prevention technology can quickly recognize SSHPsycho attacks (and the like) and proactively stop them as soon as they begin. Even at its “Normal” sensitivity threshold, Protector already identifies and blocks all types of SSHPsycho attacks, in most cases before they even get to try the password authentication.
Of course, not even Protector can keep you safe if you have a user whose username is “test” and its password is “123456”, so it’s strongly recommended to read the LongTail report and avoid using the most common username/password combinations that would make your SSH/SFTP server inherently vulnerable, not only to SSHPsycho but pretty much to any known and unknown attack. But again, Syncplify.me Server! helps you by enforcing password complexity rules that prevent users from using passwords that would be too easy to guess.
W3C log file format and UTC timestamps
Every once in a while we receive a support request from some customers asking us how to “fix” the timestamp in the log files because it’s few hours ahead/behind.
The thing is that such timestamp is not ahead nor behind: it’s always in UTC (Coordinated Universal Time), and that is not our arbitrary choice; in fact, the W3C Extended Log File Format official working document clearly states that the timestamp must refer to the GMT time zone without daylight savings bias, which is – indeed – called UTC for brevity.
For such reason, all existing log analysis software products are designed to take that into account and adapt the generated reports to the current time zone of the machine that runs the analysis.
There are tens of log analysis software titles out there, but since sometimes our users ask us for a recommendation, here’s two among our favorites:
- Sawmill
- SmarterStats
Both of them are very high-quality products, and have been tested and confirmed to work flawlessly with the log files products by Syncplify.me Server!
Firewalls and FTP external IP address for PASV
Most firewalls (we’d say all the ones we know) have NAT/PAT capabilities, and many are able to perform a protocol-level inspection when the connection is not encrypted. SSH (and SFTP) are always encrypted, but FTP can be either encrypted or not; yet, theoretically, protocol inspection should only prevent protocol-related attacks, not modify client requests or server responses.
Yet, one customer with a perfectly configured instance of Syncplify Server! reported experiencing a weird behavior: FTPS/FTPES (encrypted) sessions were working perfectly, while plain FTP sessions were dropped upon every attempt to open a data connection to transfer files.
Now, theoretically, this doesn’t make any sense, as the core engine for the FTP protocol is the same, and the TLS channel is layered on top of (or, more precisely, encapsulates) it. The only possible explanation was that something between the client and the server was actively modifying the protocol, and could obviously do so only when the FTP connection was performed in clear, with no TLS encryption.
In this particular case, a SonicWall firewall was rewriting Syncplify Server!’s response to the PASV command in order to modify the IP address and Port for the next incoming (requested) passive data connection.
Now, Syncplify Server! – as most FTP/S servers – allows the server’s administrator to configure an “external IP for PASV connections” to be used specifically when running our server behind NAT/PAT. This allows the server to tell the client to which public IP:Port it should connect to initiate the data transfer connection. If the firewall rewrites such information and re-routes the data connection towards a different IP or Port, then Syncplify Server! would not accept the new incoming data connection request, because it is – de facto – tampered or spoofed.
If you have a firewall that acts like this (more like a reverse proxy, rather than just a simple firewall) removing the “external IP for PASV connections” from Syncplify Server!’s configuration may fix the issue, as it did in our example case. But please keep in mind that such a configuration setting is there for a reason, and if your firewall is behaving transparently it is necessary to use it when behind NAT/PAT.
Where do I download the old v4/v5/v6/v7 installers?
In case you need an installer for an older version of our software, this is the page where you find direct download links to the latest version ever released for the past three major versions.
V7 Downloads:
- version 7.1.3 installer (Windows)
- version 7.1.3 installer archive (Linux, x86_64)
- version 7.1.3 installer archive (Linux, ARM)
V6 Downloads:
- version 6.2.60 installer (Windows)
- version 6.2.60 installer archive (Linux, x86_64)
- version 6.2.60 installer archive (Linux, ARM)
WARNING: versions 4 and 5 are now discontinued and retired, so please be aware that downloading the following installers comes with no guarantee of support or fitness-for-purpose of any kind. Syncplify, Inc. is also not liable for any malfunction or damages these versions of the software may cause, for any reason, to the maximum extent permitted by law. If you continue, you take full responsibility, and do so at your own risk.
V5 Download: version 5.1.30 installer
V4 Download: version 4.2.5 installer
Why PGP is an extremely bad choice for a file server's at-rest encryption, and how to do it right
Pretty Good Privacy (PGP and all of its variants) is a well-known encryption program that provides cryptographic privacy and authentication for data communication. While PGP is excellent for securing emails and their attachments, using it for at-rest file encryption on a file server is not advisable. This article explains why PGP is unsuitable for this purpose and why a streaming encryption method is a better alternative.
Limitations of PGP for At-Rest File Encryption
Performance Overhead
PGP is designed for encrypting and decrypting individual files (like an email attachment, for example) or messages. When used for at-rest encryption on a file server, it introduces significant performance overhead. Each file must be encrypted and decrypted in its entirety, which can be time-consuming and resource-intensive, especially for large files or a high volume of files.
Scalability Issues
File servers often handle large amounts of data and numerous files. PGP's approach of encrypting files individually does not scale well in such environments. The process of encrypting and decrypting each file separately can lead to bottlenecks, reducing the overall efficiency of the file server.
Complex Key Management
PGP relies on a system of public and private keys for encryption and decryption. Managing these keys for a large number of files on a file server can become complex and cumbersome. Ensuring that the correct keys are used and securely stored adds an additional layer of complexity.
Lack of Real-Time Encryption
PGP does not support real-time encryption and decryption. Files must be fully written to disk before they can be encrypted and fully read before they can be decrypted. This lack of real-time processing can lead to security vulnerabilities, as files are temporarily stored in an unencrypted state.
Not Post-Quantum Secure
PGP relies on cryptographic algorithms like RSA and DSA, which are not considered secure against potential quantum computing attacks. Quantum computers could potentially break these algorithms, rendering the encrypted data vulnerable. In contrast, other encryption methods, such as AES-256 GCM, are considered resistant to quantum crypto-analytic attacks.
The Need for Streaming Encryption
Real-Time Encryption and Decryption
Streaming encryption methods allow for real-time encryption and decryption of data as it is written to or read from storage. This ensures that data is never stored in an unencrypted state, significantly enhancing security.
Improved Performance
Streaming encryption is designed to handle data in a continuous flow, which reduces the performance overhead associated with encrypting and decrypting entire files. This approach is more efficient and better suited for environments with high data throughput.
Scalability
Streaming encryption methods are inherently more scalable than PGP. They can handle large volumes of data and numerous files without the performance bottlenecks associated with PGP. This makes them ideal for use on file servers that need to manage extensive data storage.
Simplified Key Management
Many streaming encryption solutions use symmetric key encryption, which simplifies key management. A single key can be used to encrypt and decrypt data streams, reducing the complexity of managing multiple keys for individual files.
Conclusion
While PGP is a robust tool for securing individual files and communications, it is not suitable for at-rest file encryption on a file server. The performance overhead, scalability issues, complex key management, and lack of real-time encryption make it an impractical choice. Instead, streaming encryption methods provide real-time encryption and decryption, improved performance, scalability, and simplified key management, making them the ideal solution for securing data on a file server.
How Syncplify Server! does it 🎗️
At-rest encryption for a file server, and more specifically for an SFTP/FTP(E/S) server, is typically an Enterprise need; for such reason the Ultimate edition of Syncplify Server! has built-in top-notch at-rest streaming encryption at VFS level. This uses the AES-256 algorithm (which is found to be post-quantum secure, unlike PGP) in GCM mode, which has also the added benefit of being "authenticated encryption" meaning it gives you the absolute certainty your data streams cannot be tampered with during the reading or writing operations.
Timeout logging into the SuperAdmin or Admin UI? This is how you may fix it.
Are you experiencing a timeout while attempting to log into the SuperAdmin or Admin UI? If your software ran for too long without a valid license, or was repeatedly started stopped hundreds or even thousands of times without ever clearing the notifications, that might be the culprit. Notifications stack up, and then the clean-then-load process that occurs at login may take too long to complete, causing a timeout.
But fear not! As of v6.2.49 there is an extremely easy solution to that.
Simply open a terminal or command prompt (do it "as Administrator" if you are on Windows), then change directory to the folder where Syncplify Server! is installed and type the following command:
On Windows (as Administrator)
.\ss6-webrest.exe dbcmd --clearallnotificationsOn Linux
sudo ./ss6-webrest dbcmd --clearallnotificationsAfter that, if the excessive number of pending un-acked notifications was the culprit, you should be able to log in without further issues.
Understanding FTP and Its Variants
FTP (File Transfer Protocol) is a standard network protocol used for transferring files between a client and server on a computer network. As a junior system administrator, it's crucial to understand the different variants of FTP and their implications for security and network configuration.
Plain FTP
Plain FTP is the original, unencrypted version of the protocol. It typically operates on port 21 for control connections and port 20 for data transfers. However, it's important to note that plain FTP is inherently insecure, as it transmits data and login credentials in clear text.
Implicit FTPS
Implicit FTPS is an early attempt to secure FTP connections using SSL/TLS. It uses port 990 for control connections and assumes that the connection should be encrypted from the start. While more secure than plain FTP, it's considered deprecated and may not be supported by all modern FTP clients.
Explicit FTPS (aka FTPES)
Explicit FTPS (also known as FTPES) is the current standard for secure FTP transfers. It uses the same port as plain FTP (21) but allows the client to request encryption during the authorization phase (using the AUTH command). This method is more flexible and widely supported by all modern FTP clients.
Active vs. Passive FTP
Understanding the difference between active and passive FTP is crucial for proper network configuration.
Active FTP (PORT)
In active mode, the client opens a port and waits for the server to connect back to it. This can cause issues with firewalls and NAT (Network Address Translation) devices.
Passive FTP (PASV)
Passive mode allows the client to initiate both connections to the server, which is generally more firewall-friendly.
Pro Tip: Always use passive FTP unless both client and server are on the same physical LAN. Active FTP often fails when routing is involved due to firewall and NAT complications.
Security Considerations
When setting up an FTP server, consider the following:
- Use FTPES whenever possible for enhanced security.
- Configure your firewall to allow passive FTP connections by forwarding all ports in your server's "passive port range".
- Regularly update your FTP server software.
Remember, while FTP is a powerful tool for file transfer, some of its limitations may make it unsuitable for transmitting data securely and efficiently. Unless a protocol of the FTP family is your only options, SFTP - which is a subsystem of SSH-2, and not at all related to FTP(E/S) - is almost always your best option.
SFTP and SCP: Secure File Transfer Protocols
SFTP (SSH File Transfer Protocol) and SCP (Secure Copy Protocol) are both secure file transfer protocols that operate as subsystems of SSH-2 (Secure Shell version 2). These protocols provide encrypted and authenticated methods for transferring files between systems.
SFTP (SSH File Transfer Protocol)
SFTP is a robust and versatile protocol that offers secure file transfer capabilities:
- It operates over an encrypted SSH connection, typically on port 22.
- SFTP provides strong encryption and authentication to protect against various attacks.
- It supports a wide range of file operations, including uploading, downloading, and remote file manipulation.
Key Features:
- Encryption of data during transit.
- Simplified use with a single port connection.
- Support for advanced features that most other file-transfer protocols don't have.
SCP (Secure Copy Protocol)
SCP is another secure file transfer protocol that, like SFTP, operates as an SSH-2 subsystem:
- It is designed specifically for securely copying files between hosts on a network.
- SCP uses the same authentication and security mechanisms as SSH.
Comparison to SFTP:
- SCP is simple to use in scripts, but lacks many of SFTP's advanced features.
- SFTP offers more functionality, including the ability to resume interrupted transfers and perform remote file system operations.
Poison pill: in order to fill the functionality gap between SFTP and SCP, some SCP clients attempt to use a parallel SSH-2 Shell to perform some of the operations the SCP protocol lacks, but in doing so they create a potential side-channel for attacks. If all you need are secure file-transfers, and SCP is requesting to perform Shell operations, the safest choice is to drop SCP altogether and switch to SFTP. Do not allow Shell just because SCP may ask for it, unless you know exactly how to keep it safe.
SSH-2 Subsystems
It's important to note that SFTP and SCP are not the only subsystems of SSH-2. The SSH-2 protocol is a versatile framework that supports various subsystems:
- File Transfer: SFTP and SCP.
- Remote Command Execution: Allows running individual commands on the remote system.
- Shell Access: Provides a full interactive shell session on the remote machine.
This flexibility makes SSH-2 a powerful tool for secure remote system management and file transfer, but - as all powerful tools - it requires careful configuration from a knowledgeable administrator.
Security Considerations
Both SFTP and SCP offer significant security advantages over traditional, unencrypted file-transfer protocols:
- They use strong encryption to protect data in transit.
- They provide authentication mechanisms to verify the identity of both the client and server.
- They ensure data integrity, preventing unauthorized modifications during transfer.
Choosing Between SFTP and SCP
When deciding between SFTP and SCP, consider:
- Functionality: SFTP offers more advanced file management features.
- Compatibility: SCP might be the only choice in old/legacy environments where SFTP support is limited or absent.
- Fitness: In most modern scenarios, SFTP is the preferred choice due to its broader feature set and widespread support.