Scripting
This section is dedicated to the usage of SyncJS (Syncplify's very own flavor of JavaScript) to customize the behavior of your Syncplify Server!
- How to email a list of uploaded files
- VFS.ImportFile and VFS.ExportFile
- Preventing upload of EXE files
- How to download a "publicly shared" (WebClient!) file via PowerShell
- Getting started with the REST API
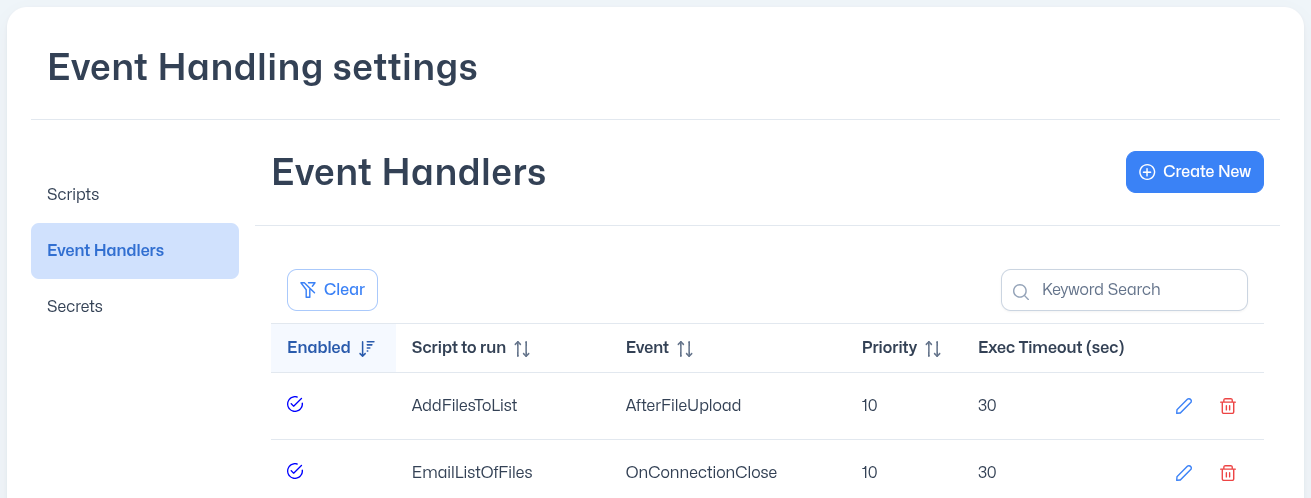
How to email a list of uploaded files
As of version 6.0, all Syncplify software products have converged onto using SyncJS (our very own flavor of extended JavaScript) as the unified scripting language on all platforms. This means that the old scripts you've been using in previous versions of the software no longer apply. Here's how to achieve the task in the subject via SyncJS.
The foundational concepts are the same. First of all, you need a script that adds each uploaded file name to the Session's "custom data" memory container:
{
    Session.AddCustomData(CtxRelPath());
}
The script above needs to be associated to the AfterFileUpload event handler.
Then you need a second script to send out the actual emails:
{
    var files = Session.GetAllCustomData();
    if (files.length > 0) {
        var body = "The following files were uploaded:\n\n" + files.join("\n");
        SendMail("sender@example.com", "recipient@example.com", "List of uploaded files", body, "");
    }
}
This second script needs to be triggered by the OnConnectionClose event handler.
Please note that, just like with previous versions of our software, you may receive more than 1 mail. This happens when your client software (FileZilla, WinSCP, ...) performs multiple concurrent connections to the server to upload multiple files at once. Each connection is one Session, and each Session has its own custom data and events.
VFS.ImportFile and VFS.ExportFile
This article presumes the use of features only available in the Ultimate edition of Syncplify Server!, such as at-rest encryption for the virtual file systems (VFS).
As you surely already know, when you use an encrypted VFS all files that any user uploads into such VFS will be encrypted at-rest (on your server’s hard drive).
But what if you need to copy/move those files – as they are uploaded – out of the VFS for further processing? Obviously, if you use the CopyFile/MoveFile functions each file will be copied/moved “as is”, in its encrypted form, and other software products won’t be able to read and process it.
Therefore a method to export files from an encrypted VFS to a different and unencrypted location was needed. To do so, you can use the new function ExportFile which is part of the VFS object namespace. When using functions in this namespace we recommend to always verify that VFS is not nil, as this object is not always defined in every execution context. See the script below for example:
{
  var vfs = Session.GetCurrentVFS();
  if (vfs != null) {
    vfs.ExportFile(Session.GetAbsPath(), "/some/directory");
  }
}
By the same token the VFS namespace also provides an ImportFile method to import a plain/unencrypted file from your system's file system into an at-rest encrypted VFS managed by Syncplify Server!
Preventing upload of EXE files
Some SFTP servers feature a simple “extension exclusion list” so that administrators can specify certain file extensions that the server should not let users upload. But that’s a pretty weak defense, as a clever attacker could always upload an EXE with a fake extension and then rename it or otherwise find alternative ways to run it on the server, thus compromising its security.
Syncplify Server!’s scriptable nature, though, allows you to do a lot more than just disallow certain file extensions. Here’s a sample script that can be attached to the “AfterFileUpload” event handler, to identify EXE files that have been uploaded with fake extensions and delete them right away.
{
  var FirstBytes = FileReadAsHex(Session.GetAbsPath(), 0, 2);
  var PEBytes := FileReadAsHex(Session.GetAbsPath(), 256, 4);
  if ((FirstBytes == '4D5A') && (PEBytes == '50450000')) {
    // It's an EXE, delete it!
    Log('Identified '+Session.GetAbsPath()+' as an EXE file, deleting it.');
    if DelFile(Session.GetAbsPath()) {
      Log('Deleted: '+Session.GetAbsPath());
    } else {
      Log('Failed to delete: '+Session.GetAbsPath());
    }
  }
}
The above script is provided as a mere example to identify Windows EXE files. But it could be easily modified in order to identify other file types.
All Windows EXEs, in fact, have stable distinguishing features in their binary code, and more precisely: the first 2 bytes (in hex) will always be 4D5A, and the 4 bytes at offset 256 (0x100) will always be 50450000. So if a file has those byte sequences in those exact locations, it’s safe to say it’s a Windows EXE.
Do you need to identify ZIP files instead? The first 4 bytes are always 04034B50.
And so on… many file types can be identified by specific “signatures” in their binary code, that one can easily read using Syncplify Server!’s powerful scripting capabilities.
Alternative method
Starting with version 6, Syncplify Server! has also added a handy FileType function to its scripting engine. This function automatically identifies the MIME-Type of hundreds of file types by reading only the first 261 (at most) bytes from the file itself.
The above script could then be rewritten like this:
{
  if (FileType(Session.GetAbsPath()) == "application/x-msdownload") {
    // It's a Windows EXE, delete it!
    Log('Identified '+Session.GetAbsPath()+' as an EXE file, deleting it.');
    if DelFile(Session.GetAbsPath()) {
      Log('Deleted: '+Session.GetAbsPath());
    } else {
      Log('Failed to delete: '+Session.GetAbsPath());
    }
  }
}
How to download a "publicly shared" (WebClient!) file via PowerShell
Foreword: we need to bear in mind that Syncplify Server! is, at its core, a security software, therefore even when you use its WebClient! to create a "publicly shared object" (a shared object that's not password-protected), downloading such object is not as simple as pasting its URI into a plain Invoke-WebRequest in your PowerShell, there's a lot more to it than that.
You have to account for the security measures Syncplify Server! employs, so all these operations must be indirect. First you have to invoke the URI of the shared object, read the JWT from there, then perform a POST request with that token to a specific URL built according to the documentation here: https://openapi.syncplify.com/v6/webclient/#post-/shr/down/-path-
The give you a jump-start, here's a ready-made script for you to customize with your own URLs:
$response = Invoke-WebRequest -Uri "https://webclient.example.com:6444/api/v1/share/2retezypuhQdpEXRD5fNguyMbgI"
$jsonObject = $response.Content | ConvertFrom-Json
$token = $jsonObject.token
$headers = @{
    "Authorization" = "Bearer $token"
}
Invoke-WebRequest -Uri "https://webclient.example.com:6444/api/v1/shr/down/test.txt" -Method Post -Headers $headers -Outfile ./test.txt
This script will download the shared file named "test.txt" from a shared object with ID "2retezypuhQdpEXRD5fNguyMbgI", (which must not be password-protected) to a local file also named "test.txt".
For the Linux users among you, here's the same script trancoded to bash (also works in zsh, and should work in any other POSIX shell) using curl and jq:
#!/bin/bash

# Fetch the JSON response and extract the token
token=$(curl -s "https://webclient.example.com:6444/api/v1/share/2retezypuhQdpEXRD5fNguyMbgI" | jq -r '.token')

# Download the file using the Bearer token for authentication
curl -X POST \
     -H "Authorization: Bearer $token" \
     "https://webclient.example.com:6444/api/v1/shr/down/test.txt" \
     -o ./test.txt
Enjoy!
Getting started with the REST API
There's no better way to automate Syncplify Server! management and configuration tasks than by scripting against our comprehensive REST API.
This article assumes basic familiarity with scripting concepts (bash, zsh, fish, PowerShell, or languages like Python). No advanced expertise is required – just the ability to execute API calls and handle responses.
We've invested significant effort in creating detailed OpenAPI v3 documentation for every REST endpoint. This specification is:
- Available in the official manual
- Accessible through web-based documentation UIs
- Downloadable as raw JSON files for integration with API tools like Postman, Insomnia, or Bruno
Key Security Consideration: As enterprise security software, Syncplify Server! intentionally avoids long-lived API keys. Instead, our authentication flow requires:
- Initial login API call to obtain a time-limited JWT
- Use of this session token for subsequent API calls
- Automatic token expiration for enhanced security
Below is a practical bash example (requires curl and jq, assumes local Syncplify Server! installation at 127.0.0.1:6443):
#!/bin/bash

# Fetch the JSON response to the /login API and extract the token
token=$(curl --request GET --url https://127.0.0.1:6443/api/v1/sa/login --header 'authorization: Basic XXXXXXXX' | jq -r '.token')

# Call any other REST API using the authorization token you received upon login

# Example: list all virtual sites
curl --request GET \
  --url https://127.0.0.1:6443/api/v1/sa/vsites \
  --header "Authorization: Bearer $token"

# Example: modify some aspects of the SuperAdmin global configuration
curl --request PATCH \
  --url https://127.0.0.1:6443/api/v1/sa/globalconfig \
  --header "Aauthorization: Bearer $token" \
  --header 'Content-Type: application/json' \
  --data '{
  "jwtLifeSpan": 30,
  "metricsAllowList": [
    "192.168.10.0/32"
  ]
}'

#At the end of your session, do not forget to logout
curl --request GET \
  --url https://127.0.0.1:6443/api/v1/sa/logout \
  --header "Authorization: Bearer $token"
The script here above:
- Performs the login as SuperAdmin, receiving a short-lived JWT (token) that authorizes only SuperAdmin-related API calls
- Calls an API (GET) to receive the list and details of all virtual sites
- Calls another API (PATCH) to modify a few minor aspects of the SuperAdmin UI configuration
- Calls the logout API to invalidate the temporary JWT, from this point on every API call done using this JWT (even valid ones) will be rejected as unauthorized
Here's a PowerShell version of the exact same script (with the exact same assumptions as above):
# Login and get token (note case-insensitive headers in PowerShell)
$loginResponse = Invoke-RestMethod -Uri "https://127.0.0.1:6443/api/v1/sa/login" `
    -Method Get `
    -Headers @{ 'authorization' = 'Basic XXXXXXXX' }

$token = $loginResponse.token

# List all virtual sites
$vSites = Invoke-RestMethod -Uri "https://127.0.0.1:6443/api/v1/sa/vsites" `
    -Method Get `
    -Headers @{ Authorization = "Bearer $token" }

$vSites | Format-Table  # Display results in table format

# Modify global configuration (note typo in original header name)
$body = @{
    jwtLifeSpan = 30
    metricsAllowList = @('192.168.10.0/32')
} | ConvertTo-Json

Invoke-RestMethod -Uri "https://127.0.0.1:6443/api/v1/sa/globalconfig" `
    -Method Patch `
    -Headers @{
        # Original script had typo: 'Aauthorization' instead of 'Authorization'
        'Authorization' = "Bearer $token"
        'Content-Type' = 'application/json'
    } `
    -Body $body

# Logout to end session
Invoke-RestMethod -Uri "https://127.0.0.1:6443/api/v1/sa/logout" `
    -Method Get `
    -Headers @{ Authorization = "Bearer $token" }
If your server is running on a self-signed certificate, you may also want to consider the following:
# For self-signed certificates (PowerShell 7+):
$ProgressPreference = 'SilentlyContinue'  # Suppress progress noise

# Add -SkipCertificateCheck to ALL Invoke-RestMethod calls
Invoke-RestMethod ... -SkipCertificateCheck
Please note: all of the example code above shows you how to use REST APIs in the SuperAdmin category, exclusively to perform SuperAdmin actions and tasks. To perform Admin tasks, the logic is exactly the same but you will have to login using the Admin login API to obtain an Admin JWT instead.
This is the Admin login API called from a bash script:
#!/bin/bash

# Fetch the JSON response to the Admin API /login endpoint and extract the token
token=$(curl --request GET --url https://127.0.0.1:6443/api/v1/adm/login --header 'authorization: Basic XXXXXXXX' | jq -r '.token')
And its PowerShell equivalent:
# Admin login API, and acquisition of the Admin JWT token from the response
$loginResponse = Invoke-RestMethod -Uri "https://127.0.0.1:6443/api/v1/adm/login" `
    -Method Get `
    -Headers @{ 'authorization' = 'Basic XXXXXXXX' }

$token = $loginResponse.token
We hope that this brief introduction will help you get started using our REST API more quickly and painlessly.