Operation
This section covers various topics related to the day-to-day operation of your Syncplify Server!
- Where is the manual?
- Using network shares (UNC paths) with Syncplify Server! V6+ on Windows
- Using network shares (UNC paths) with Syncplify Server! V6+ on Linux
- How to backup your Syncplify.me Server! v4/v5
- Insecure warning in your browser? It might be OK...
- Virtual File System (VFS) Encryption
- Overriding permissions on folders/directories
- How to change a SuperAdmin password
- How to reset the SuperAdmin (SA) password in v4/v5
- How to disable 2FA for a SuperAdmin account
- How to auto-fix problems with the Web/REST system service
- True 2FA/MFA over SSH2/SFTP via keyboard-interactive authentication and Google Authenticator
- How to use the SFTP Virtual File System (VFS)
- How to use the S3 Virtual File System (VFS)
- How to use the Azure blob storage Virtual File System (VFS)
- How to use the s3 Virtual File System (VFS)
- How does the block-list (Protector!) work?
- Block-list, allow-list, and safe-list
- Authenticating users via PKI
- Customizing SFTP and FTP(E/S) greetings and banners
- How to override permissions on subfolders inside the user’s Home VFS
- FATAL ERROR: Connection reset by peer (could not connect to server)
- Virtual File Systems (VFS) with quotas
- Solved: insecure FTP data connection (TLS session resumption)
- Parametric home directories (VFS)
- Cannot connect: "unexpected message type 30 (expected one of [34])" reason found in log file
- How to backup your Syncplify Server!'s database
- Unsupported public key authentication algorithm SshRsa (ssh-rsa)? Here's how to fix it.
- How to import many users at once from a CSV file
Where is the manual?
This knowledge base covers some common topics in a broader way than a manual ever could, but it's limited to those topics, and it doesn't have the full coverage that a true manual has.
You can find the full Syncplify Server! Manual here.
We strongly advise and recommend that you thoroughly study it. It will save you hours on day-to-day operation, and you won't have to wait for our support staff to respond to your assistance request, because you'll have the knowledge, the power, and the ability to manage your server effectively and independently.
Using network shares (UNC paths) with Syncplify Server! V6+ on Windows
Windows does not allow system services running as SYSTEM (or LocalSystem) to access UNC paths. This is a design choice by Microsoft, so every system service of every vendor (not just Syncplify) is subject to it.
So what can you do when you need your system service to access those "network shares"? For example you may want to place your users home-VFSs on a different storage (this is practically mandatory in high-availability environments).
The correct and secure way to do it (according to Microsoft's Best Practices) is the following:
Step #1 - Create a Windows or Active Directory "service account"
A service account is just a user account which will be used to run your system service. This particular account will have to be given permissions onto the following directories/folders:
C:\ProgramData\Syncplify\ServerV6(and all sub-dirs) - be wary that "ProgramData" is typically hidden in Windows, but it's there even if you don't see it- All of the directories, folders, and UNC (network) paths where you intend to point your VFSs to
To avoid unattended-operation complications, it's best to set this account to never expire and to never have to change its own password. An Administrator should take care of that, from time to time, according to corporate policies.

Step #2 - Grant the proper storage permissions to the service account
As already described above, this newly created service account will need to be granted access permissions to the folders and network paths listed above:

Step #3 - Run your virtual site's "worker" service impersonated with the above service account
Open Windows' SCM (Service Control Manager) and locate the "worker" (wrk) service for the virtual site you need to be able to access UNC paths:

Double click on it, and set it to run "as" the impersonation account you previously created:

Do not forget to restart the virtual site's system service for these changes to take effect
Once restarted, if you did everything correctly, the virtual site will now be able to access its users' home-VFSs located on the remote UNC paths (network shares) the service account has access to.
Using network shares (UNC paths) with Syncplify Server! V6+ on Linux
Since the Linux version of Syncplify Server! is implemented as a systemd service, this knowledge base article assumes a basic familiarity with the Linux operating system and with its systemd subsystem.
All of the operations below are assumes to be performed as root or via sudo.
First of all you need to prepare, ahead of time, a file containing the credentials that will be needed to access the SMB/CIFS shared path. For the sake of this tutorial we will save these credentials in the /etc/.smbcreds file, which will have this format and contents (but with your own credentials, of course):
username=username_to_access_smb_share
password=password_to_access_smb_shareNext, you have to create a directory that will be used as local "mount point? for the remote SMB/CIFS share when it's mounted on system boot. For the sake of this example let's call it sftpdata:
mkdir /sftpdataNow you will have to create two files in systemd's configurations directory. It doesn't matter how you call these files, as long as they have the same name, and the exact extensions shown here below:
File: /etc/systemd/system/smbsftpdata.mount
[Mount]
What=//10.0.5.23/your/remote/share
Where=/sftpdata
Options=credentials=/etc/.smbcreds,noperm,vers=2.1,_netdev
Type=cifsFile: /etc/systemd/system/smbsftpdata.automount
[Unit]
Requires=remote-fs-pre.target
After=remote-fs-pre.target
[Install]
WantedBy=remote-fs.targetThe last step is to enable the automount in systemd, so that next time the OS boots this shared path will be automatically mounted in your system:
systemctl enable smbsftpdata.automountDone! Now reboot your operating system, and after the reboot systemd services (including Syncplify Server!) will have access to your remote SMB/CIFS shared folder contents via the local mount point /sftpdata.
How to backup your Syncplify.me Server! v4/v5
This article refers to old/discontinued versions of our software.
Backing up your Syncplify.me Server! v4 or v5 is a very simple process, it basically consists of just 1 simple step shown below. But please read the whole article, as there are some important notes for those who are running very old version 4's.
Running a very old v4?
If you are running a version prior to v4.2.5 your software does not have a backup function. In order to enable such function, please make sure that you’re running v4.2.5.
How to take a backup
Backups can only be taken locally, on the same machine/VM where Syncplify.me Server! is installed, by pasting a very special URL into your browser (any browser except Internet Explorer).
Provided you're using the standard port our software comes pre-configured with, if you're running v4 this is your special URL to produce a backup file:
https://127.0.0.1:4443/dobk?dest=C:\SMSBackup&file=BK$datetimeWhile if you're running v5 this is the special URL you need:
https://127.0.0.1:5443/dobk?dest=C:\SMSBackup&file=BK$datetimeOf course if you're running our Web/REST interfaces on ports other than 4443 (for v4) or 5443 (for v5) you'll have to edit the special URLs here above, and specify the actual port you're using.
Once you paste the special URL into a local browser on the server, you'll see a small OK message. At that point you will find a zip archive containing the current full backup of your Syncplify.me Server! software in the following folder: C:\SMSBackup
Insecure warning in your browser? It might be OK...
After installing Syncplify Server! you will be able to manage it securely via web interface over HTTPS.
Now, a very common choice is to use a self-signed certificate, because it saves money and if you know what you’re doing it doesn’t compromise security. This is, in fact, the most common choice among our users (according to our surveys).
But if you use a self-signed certificate, your browser will warn you that your connection may not be private or secure. That’s because self-signed certificates are often used for man-in-the-middle (MitM) attacks. But this is not the case, of course, if you can verify that this particular self-signed certificate was created by you and for you.
To get rid of this annoying message, you basically have 2 options:
- Spend some money to buy a trusted X.509 (SSL/TLS) certificate from a Certification Authority like DigiCert, Comodo, Thawte, and the like. It goes without saying that this is the recommended choice, as it takes advantage of the inherent trust chain provided by the Certification Authority.
- Verify and accept the self-signed certificate you have just created and add it to the trusted keychain of your browser. In this case, you are advised to always verify the certificate’s fingerprint to make sure it’s really the one you created yourself, and that you’re not a victim of a Man-in-the-Middle (MitM) attack.
If you have chosen option #2, here’s how you do it in Chrome:

This is how you do it in Firefox:

And this is how you do it in the new Chrome-based Microsoft Edge (the old Edge is very similar though):

If you're using a self-signed certificate (or if you're accessing the management UI via its IP address instead of host name) it's totally normal for this to happen, and you can safely go ahead and skip the browser warning. Once you do that, you will be able to securely access Syncplify.me Server!’s a web management interface.
We purposely don’t show any screenshot taken with Internet Explorer, as its JavaScript support (depending on the browser version) is generally too buggy, and we do not support its use in conjunction with our software.
Virtual File System (VFS) Encryption
You may have notices that, depending on the Syncplify Server! edition you're running, you may be able to enable Encryption when you create a new Virtual File System (VFS).
This means that whatever you upload to that VFS will automatically be stored in an encrypted form on the server's storage, and it will be automatically decrypted when downloaded again by a client.
Note: this has nothing to do with encryption over the network, which is always on, and is guaranteed by the file transfer protocols you're using - this article refers to what's known in the industry as "at-rest encryption".
An encrypted VFS transparently encrypts and decrypts data on-the-fly during the interaction with the server machine/VM's storage medium, making sure that the files at-rest on the server-side are always encrypted. This way you can run your server externally, and still always be sure that whoever operates the server for you doesn’t have access to your files/backups. This is also a requirement in some cases when your company has to comply with the PCI/DSS or HIPAA regulations.
As long as an encrypted VFS is accessed via a secure file transfer client using a legitimate user account, a VFS will show us just like any other folder, and files in it can be downloaded in clear by the legitimate user.
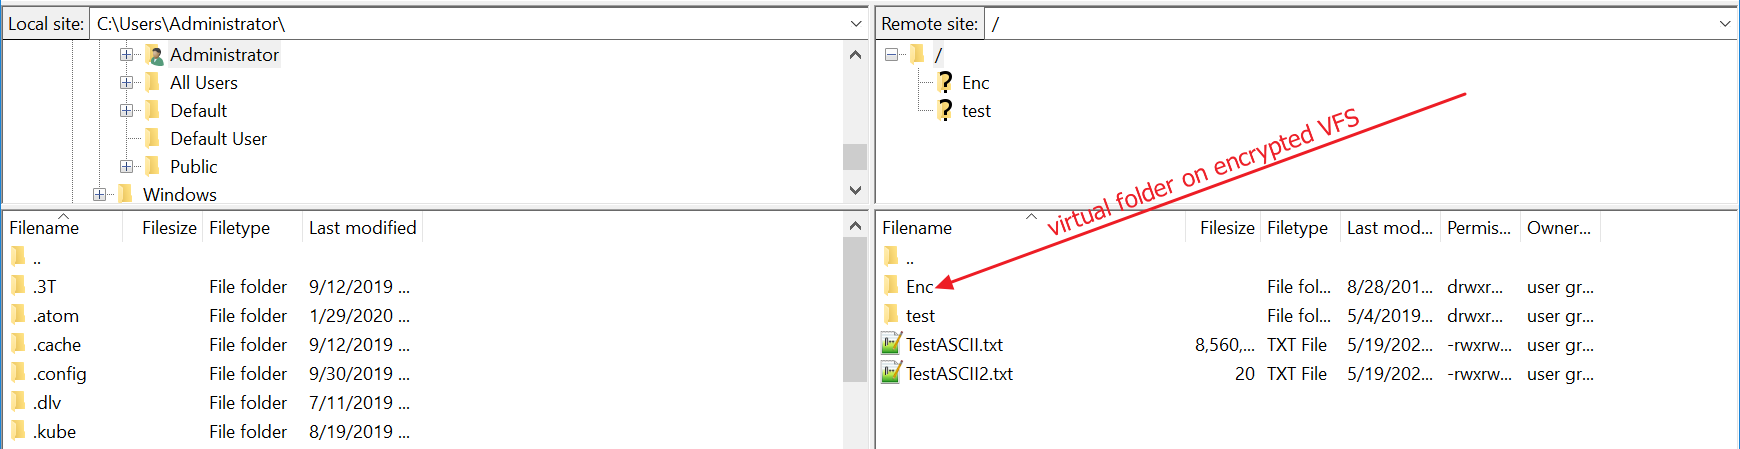
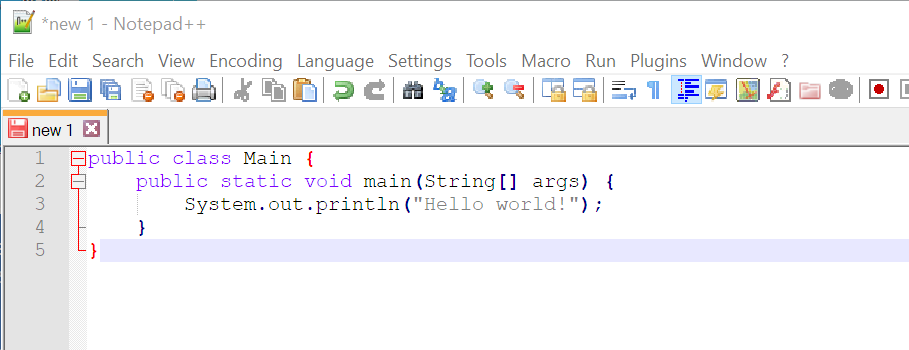
But let's say you have a text file on your client computer for example, and you want to upload it to a remote Syncplify Server! into an encrypted VFS...
The file on your client will look something like this:
Yet, once uploaded to the remote Syncplify Server!, should someone had raw direct access to the server's storage, all they would see is this:
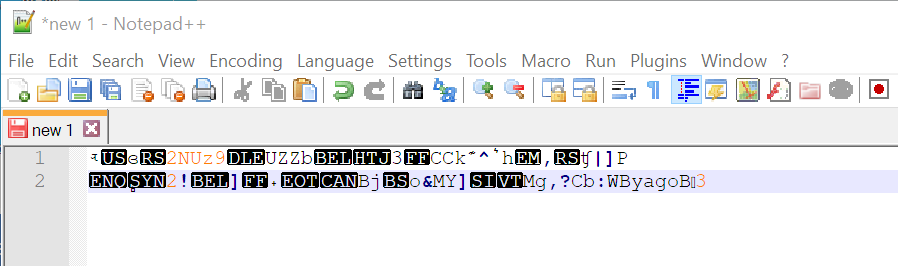
Feel free to run your SFTP server in the cloud, or host it in any other insecure place, or delegate its management to an untrusted third party... whoever might have physical access to it, still won’t be able to acquire your files, as they’re all encrypted “at-rest” on the server’s disk drive (or any other storage medium).
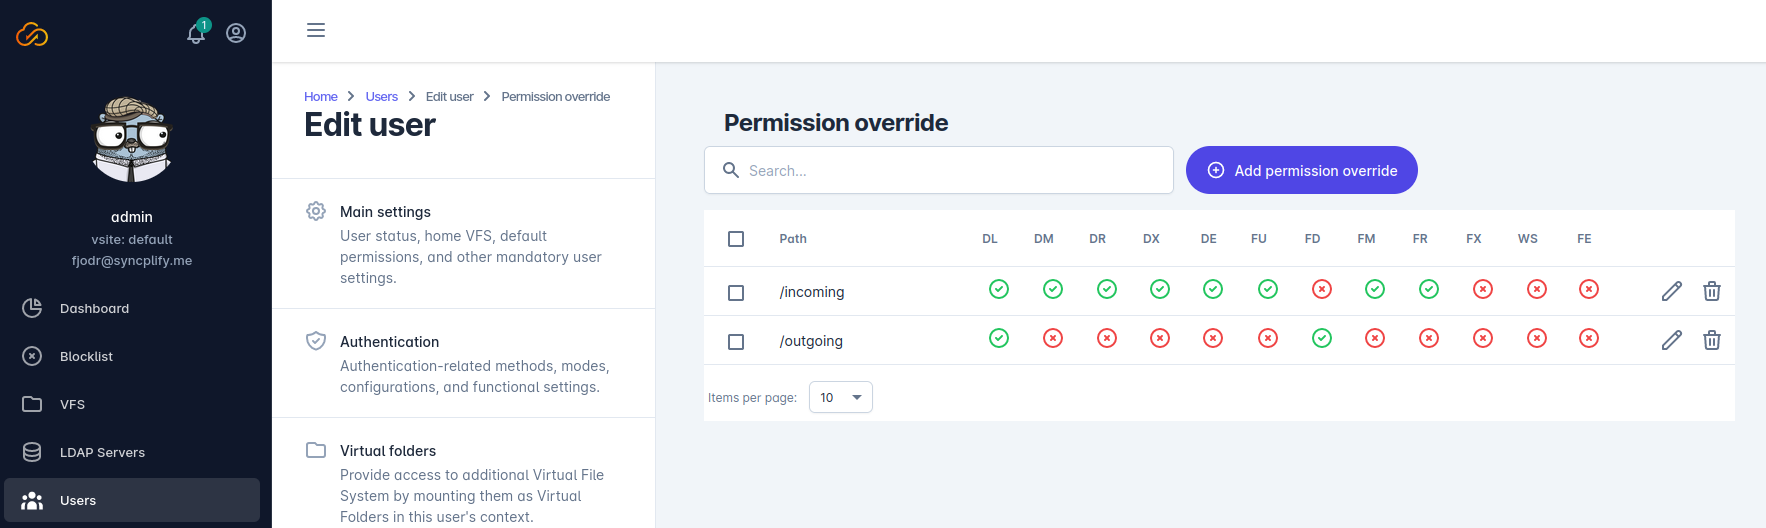
Overriding permissions on folders/directories
Syncplify Server! gives you the ability to override permissions on sub-folders that are physically contained inside a user’s Home VFS.
Let’s say, for example, that the actual directory structure on the disk is the one you see in the picture here below, and that the user's Home VFS is of type "Disk" and points to C:\SFTPRoot:

When an SFTP client connects, under the root the user will see the incoming and outgoing folders, and by default they will have the same permissions as the root folder that contains them.
But what if you wanted, for example, to restrict the incoming folder to only uploads, and the outgoing folders to only downloads? What if you wanted to change (override) the user's permissions on them on a per-directory basis?
You can use the Permission Override tab inside the User profile to do so:
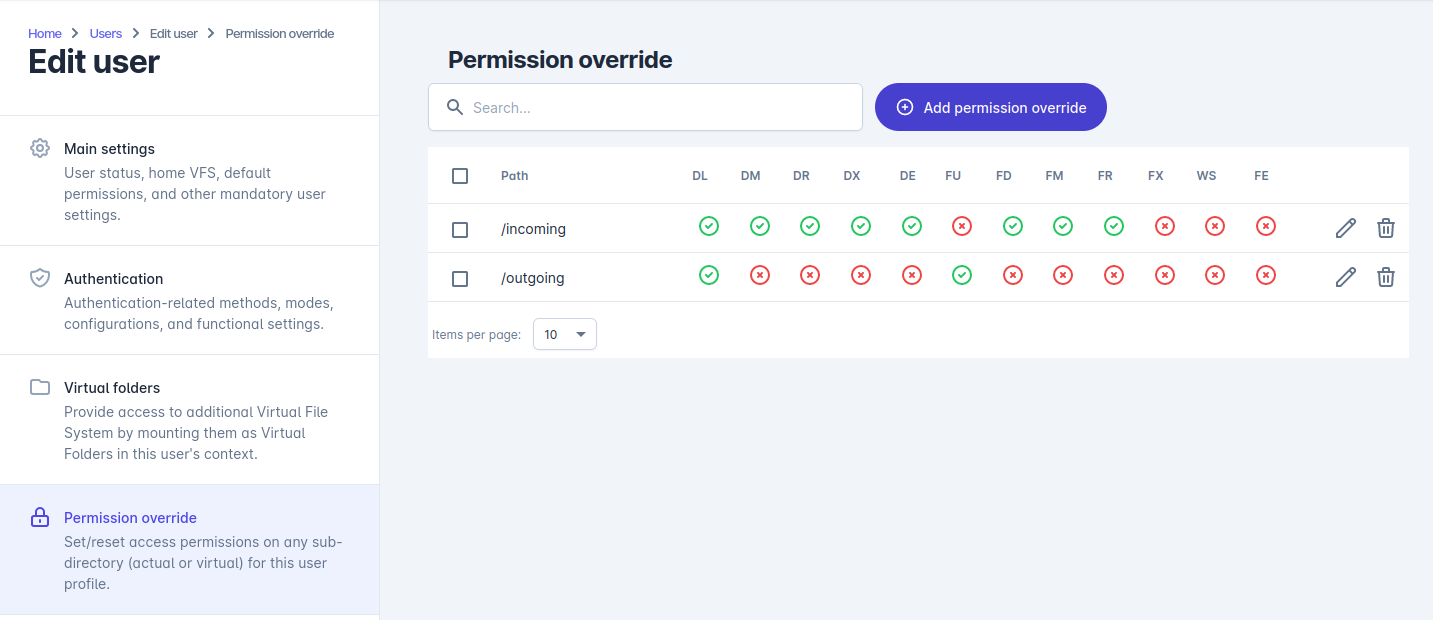
Simply specify all paths using their root-based format (assuming the User's Home VFS as the root) and specify whichever permissions you want the server to apply to them.
How to change a SuperAdmin password
As of version 6.0, Syncplify Server! supports multiple SuperAdmin accounts, and there are three ways to change or reset a SuperAdmin account's password.
Method #1: change your own password
The preferred way to reset or change a SuperAdmin account's password is to log in as such SuperAdmin, edit your own profile, and change your own password.
Method #2: change another SuperAdmin's password
Log in with one SuperAdmin account, go to the SuperAdmins section of the UI, select the SuperAdmin account whose password you want to change, and edit that account. Set the new password and save it.
Method #3: via command-line interface (CLI)
What if you only have one SuperAdmin account and you forgot its password? We still got you covered. You can open a terminal shell (cmd.exe, PowerShell, bash, zsh, ...), then change directory to the folder where the Syncplify Server! executables are located (C:\Program Files\Syncplify Server! on Windows, or /opt/Syncplify/Server/bin on Linux) and type in the following command.
On Windows:
.\ss-webrest.exe sapassreset -s your_superadmin_account -p your_new_passwordOn Linux:
./ss-webrest sapassreset -s your_superadmin_account -p your_new_passwordThank you! :)
How to reset the SuperAdmin (SA) password in v4/v5
This article refers to older versions (v4/v5) of our software. The procedure for Syncplify Server! v6 can be found here.
If you happen to forget - or simply want to change - the SuperAdmin (SA) password of your Syncplify.me Server! v4/v5 you can reset it by following the procedure here below:
First of all, you have to make sure that the Syncplify.me Server! Web/REST Service is in the "running" state. Once you’ve made sure of that, please run Syncplify's Configuration Wizard. There’s a link in the Start menu to run it.
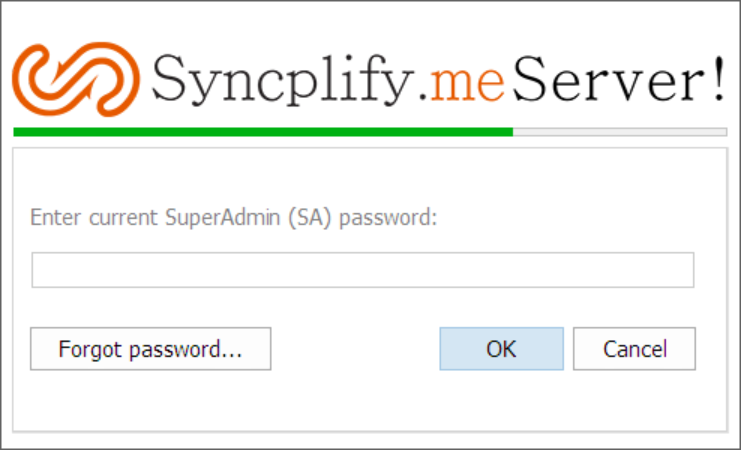
Once the HTTP/REST Configuration Wizard is run, you will see a “Forgot Password” button. Click it!
When you click the “Forgot Password” button, you’ll be given a long identification code (also known as OTPRC) that you need to send to us in order to receive your unique one-time SA password reset code.
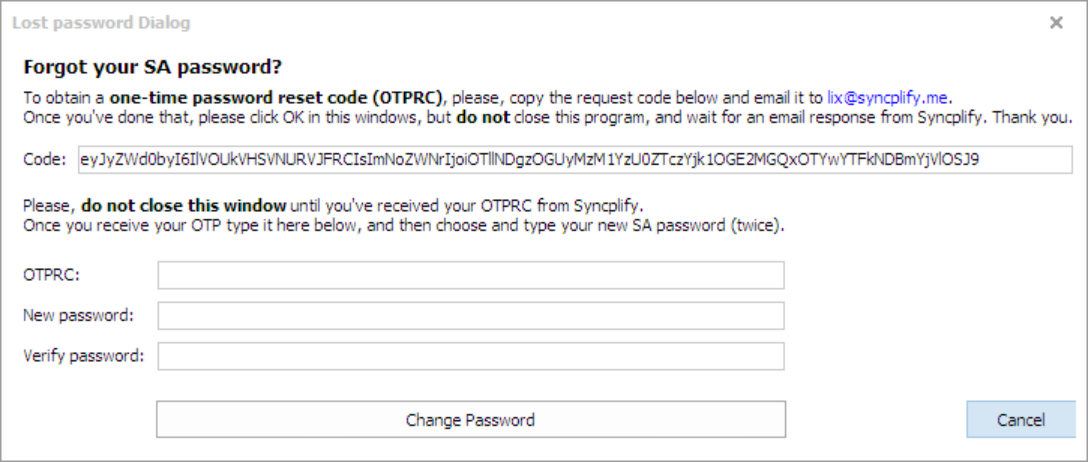
At this point, it’s important that you DO NOT CLOSE the Configuration Wizard.
Wait until someone from Syncplify technical support sends you a “reset code”. When you receive such “reset code” you can use it as a temporary (one-time) password to log in as SA.
Once logged in, follow the entire Wizard to reconfigure your HTTP/REST service, you’ll notice that one of the steps will ask you to set (in this case reset) your SA password. Set your new SA password to anything you like and complete the Wizard.
How to disable 2FA for a SuperAdmin account
As of version 6.0, Syncplify Server! supports multiple SuperAdmin accounts, and it also supports 2FA for these accounts via Google Authenticator. But what if you have enabled 2FA on your SuperAdmin, and your out-of-band device (phone, tablet) where your Google Authenticator runs becomes unusable? No worries, we got you covered.
Method #1: have another SuperAdmin disable it for you
The easiest and cleanest way to disable 2FA for a SuperAdmin account is to have a different SuperAdmin account edit it and simply switch 2FA off. After all this is one of the reasons why (as of version 6.0) we added the ability to have multiple SuperAdmins.
Method #2: disable a SuperAdmin's 2FA from the command-line
If you are an administrator/sudoer of the operating system where our software is installed, and you have console/terminal access to it, you can in fact disable 2FA for a SuperAdmin account via command line.
Open a terminal shell (cmd.exe, PowerShell, bash, zsh, ...), then change directory to the folder where the Syncplify Server! executables are located (C:\Program Files\Syncplify Serever! on Windows, or /opt/Syncplify/ServerV6/bin on Linux) and type in the following command.
On Windows (as Administrator):
.\ss6-webrest.exe disable2fa -s your_superadmin_accountOn Linux:
sudo ./ss6-webrest disable2fa -s your_superadmin_accountThank you! :)
How to auto-fix problems with the Web/REST system service
Bad things happen: you let the certificate expire, you configure the wrong binding, or simply you cut yourself out by applying the wrong security or CORS settings... and you can no longer access the SuperAdmin/Admin UIs. What now? Do you have to uninstall and reinstall everything?
No, don't worry, we got you covered.
In Windows, simply open a CMD or PowerShell as Administrator, change directory to where Syncplify Server! is installed, and type:
.\ss-webrest.exe repairhttpIn Linux, the equivalent command to be issued in a terminal is:
sudo .\ss-webrest repairhttpThis will reconfigure the HTTPS stack used by the Web/REST service itself, performing a "best effort" to repair whatever is affecting it, allowing it then to be at least restarted, so that it can be then manually reconfigured by a SuperAdmin.
Up to v6.1.3 the repairhttp command would do the following:
- disable your Web/REST service advanced security settings
- disable your Web/REST service CORS settings
As of v6.1.4 and all later minor and major version releases, the same command also does the following:
- reset the binding IP to an empty string (which means: bind to all IP addresses available on the local machine/VM)
- reset the binding port to the default 6443
- make sure at least 1 valid (though self-signed) X.509 certificate is available to perform a TLS connection (the browser may complain it's insecure, but at least you got access again, and you can change it again if you want to)
The purpose of this command is only to get you back into your SuperAdmin and Admin UIs if you've "configured yourself in a corner", after this command is executed you will have to restart the ss-webrest system service, log into the SuperAdmin UI, and reconfigure your "globalconfig" settings according to your actual needs.
True 2FA/MFA over SSH2/SFTP via keyboard-interactive authentication and Google Authenticator
The technique explained in this article requires WebClient, as well as scripting and event-handling capabilities. Therefore, it can only be employed by customers who are running the Professional, Professional+WebClient, or Ultimate editions of our software. Furthermore, it requires a scripting function that is only available in Syncplify Server! v6.0.22+.
Every good system administrator knows that the SSH2 protocol (and, therefore, all of its subsystems, including SFTP) feature its own flavor of multi-phase authentication. But this is not what we're trying to accomplish with the technique explained in this knowledge base article.
What we're going to see is how to implement true 2FA/MFA via Google Authenticator (the same you use to log into the web UIs) by taking advantage of SSH2's keyboard-interactive authentication, and a little bit of scripting and event handling.
Before we begin we need to make sure the user(s) that we want to go through this type of 2FA/MFA have actually enrolled into Google Authenticator's 2FA via their WebClient!
First of all we need to write a script to add the questions we want the user to be asked next time they try to log in. There are three possible types of questions, the example script here below shows them all:
{
// ask for user's password
Session.AddQuestionPassword(0, "Password:");
// then ask for [Google/Microsoft/...] Authenticator's current OTP
Session.AddQuestionTOTP(1, "Authentication OTP:")
// Finally ask a question with a pre-fixed answer
Session.AddQuestion(2, "Your age:", 42, true);
}Now we need to associate the above script to a very specific event handler: OnAuthInteractiveSetQuestions.

We also have to make sure that Keyboard-interactive authentication is enabled for the user(s) that we want to be able to log in this way:
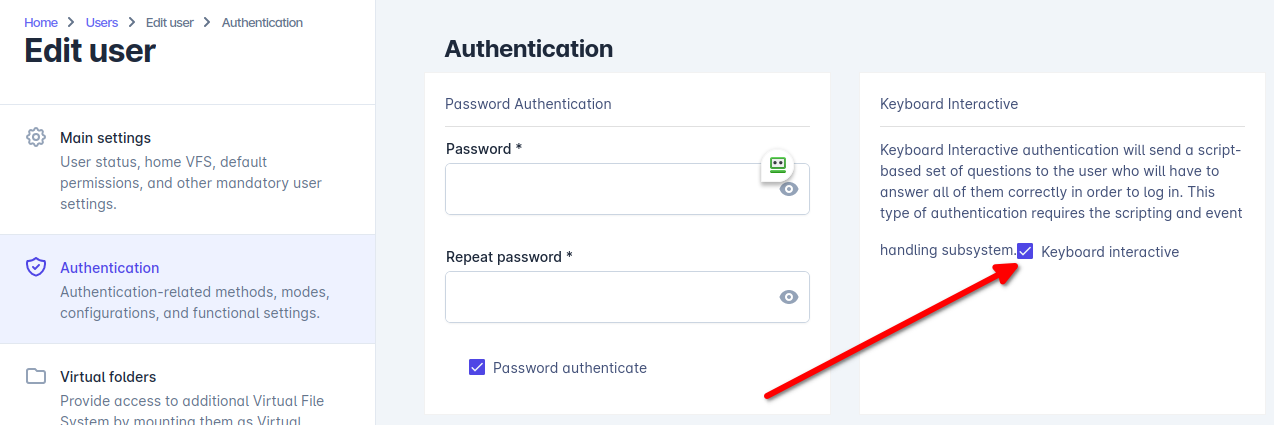
IMPORTANT: if this is the very first user you enable Keyboard-Interactive authentication for, at this point you will have to restart your Virtual Site, for the system service to activate KIA in its global authentication loop; a restart won't be needed for any other user, only for the first one.
And that's pretty much it. Next time the user tries to authenticate and attempts keyboard-interactive authentication, this is what happens:

Questions answered correctly, user logged in. Yay!
How to use the SFTP Virtual File System (VFS)
Syncplify Server!, through its virtual file system (VFS) data storage layer, can store your SFTP server's data into various storage back-ends. This article explains how to use the SFTP VFS type that stores your server's data into another SFTP server behind it.
For all intents and purposes, this is an easy and powerful way to use your Syncplify Server! as an SFTP reverse-proxy.

Configuring this type of virtual file system (VFS) is very easy, all you have to do is create a VFS of type SFTP and then specify a fully-qualified standard sftp:// protocol URL as its Target, as shown in the screenshot here below:

You can then use this as a user's Home-VFS, or as the Target for any Virtual Folder. When a client connects to your Syncplify Server! in DMZ, and this VFS is selected, all data will be transparently stored on the internal (back-end) SFTP server, provided it's running and accepting incoming connections from your DMZ server.
How to use the S3 Virtual File System (VFS)
Syncplify Server!, through its virtual file system (VFS) data storage layer, can store your SFTP server's data into various storage back-ends. This article explains how to use the S3 VFS type that stores your server's data into an Amazon (AWS) S3 object storage bucket.
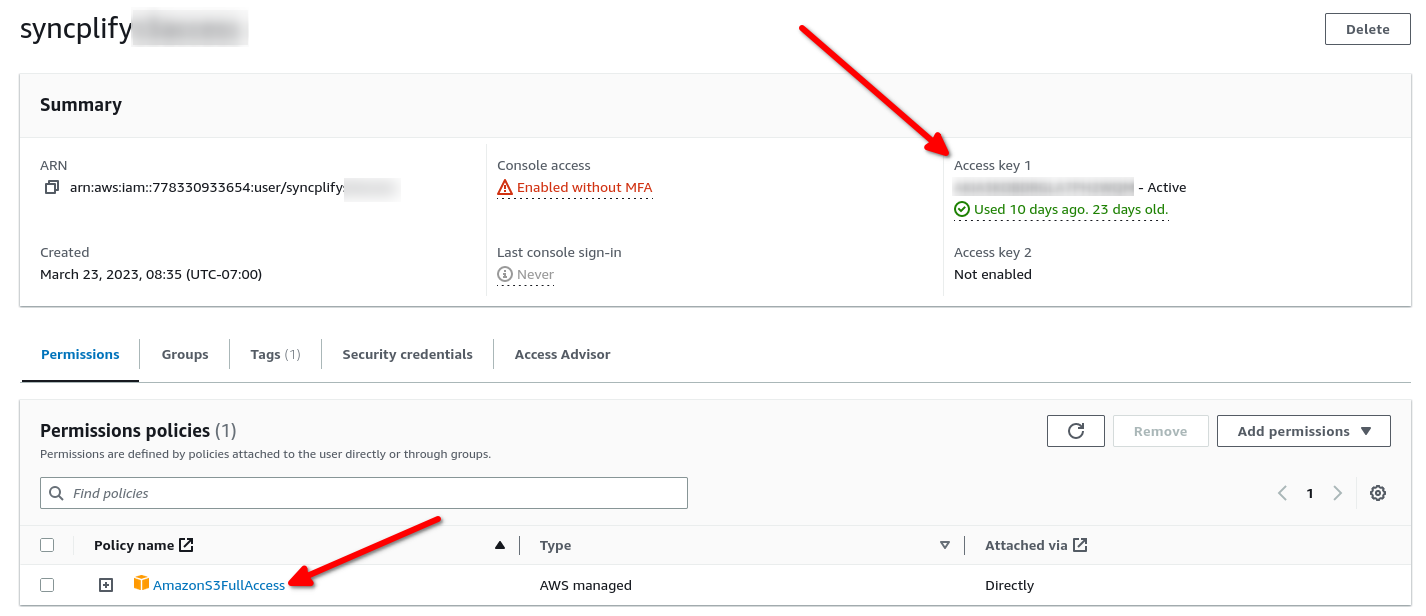
First of all you'll need an AWS IAM user account to access the S3 bucket. Head over to the IAM section of your AWS Console, and create one:
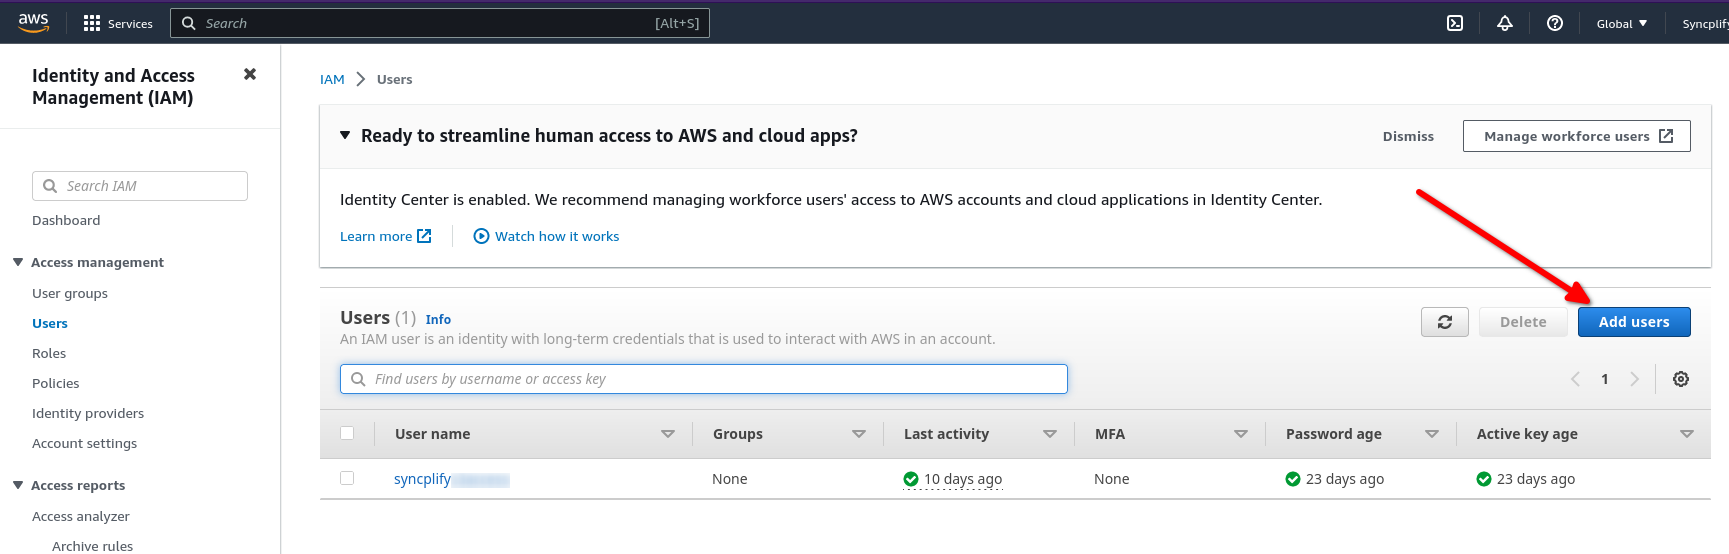
Make sure the newly created AWS user has at least one Access Key, and that it has the desired permissions to access your S3 buckets. In this picture we show an account that has full access, but for safety reasons you should always only grant the minimum set of permissions your workloads require.
At this point you are ready to create your S3 bucket(s):
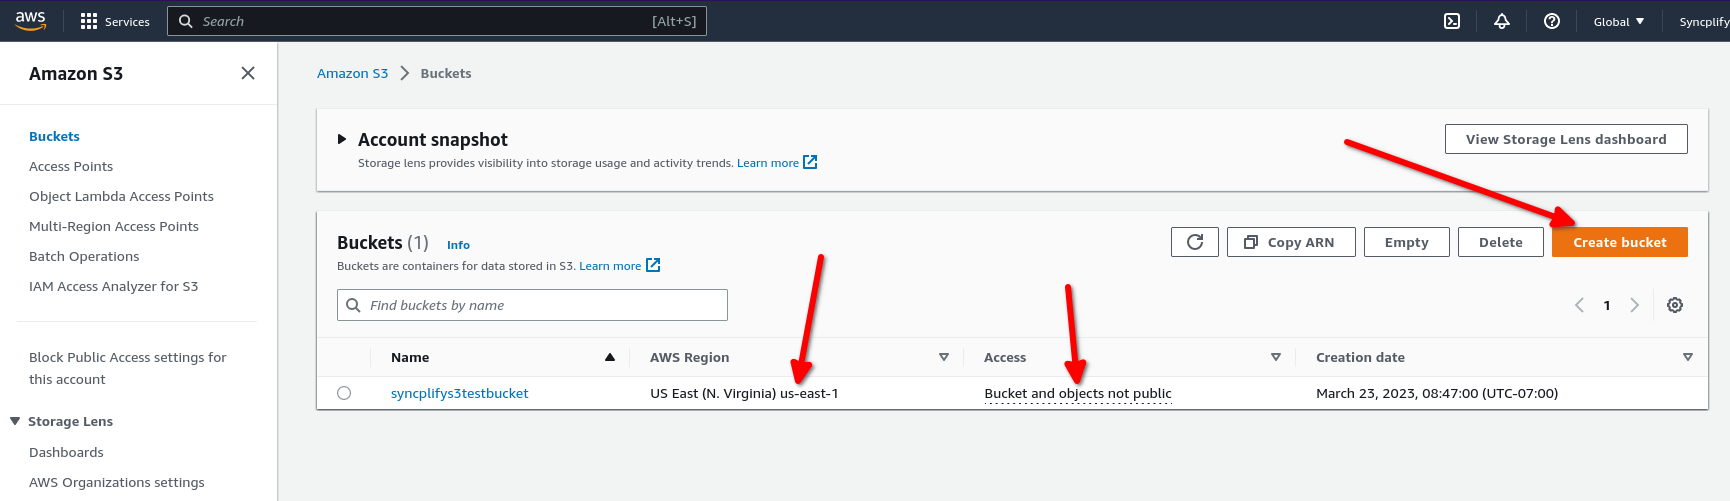
Please make sure you deploy your S3 bucket in the AWS region you need it to be in, and make sure your security policies comply with the security requirements of your company/entity (typically you do not want your bucket to be publicly accessible, you probably want it to be accessible only by using the Access Key you created for the user profile above).
Now that everything is ready on the AWS side of the house, let's see how easy it is to create a Virtual File System (VFS) in Syncplify Server! v8 that uses your S3 bucket to store your SFTP server's data:

Make sure your S3 URL includes your bucket name and region, if the region is missing us-east-1 will be assumed. Then input your access_key and access_secret as your Target Payload (in JSON format). No worries, Syncplify Server! uses strong encryption to store all secrets in its internal database. That's all there is to it. You can now assign this VFS to any User account in your Syncplify Server!, and its data will be stored in your S3 bucket.
How to use the Azure blob storage Virtual File System (VFS)
Syncplify Server!, through its virtual file system (VFS) data storage layer, can store your SFTP server's data into various storage back-ends. This article explains how to use the Azure (blob storage) VFS type that stores your server's data into an Microsoft Azure blob storage container.
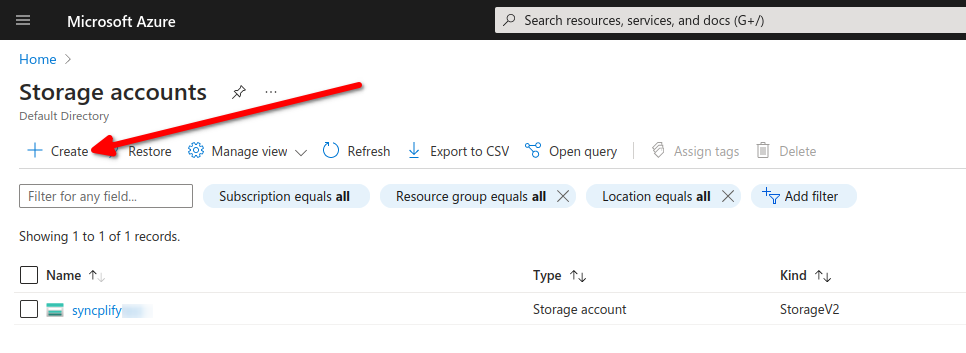
First of all you'll need to create an Azure Storage Account (unless you already have one). Please, make sure this account features and security settings meet your requirements.
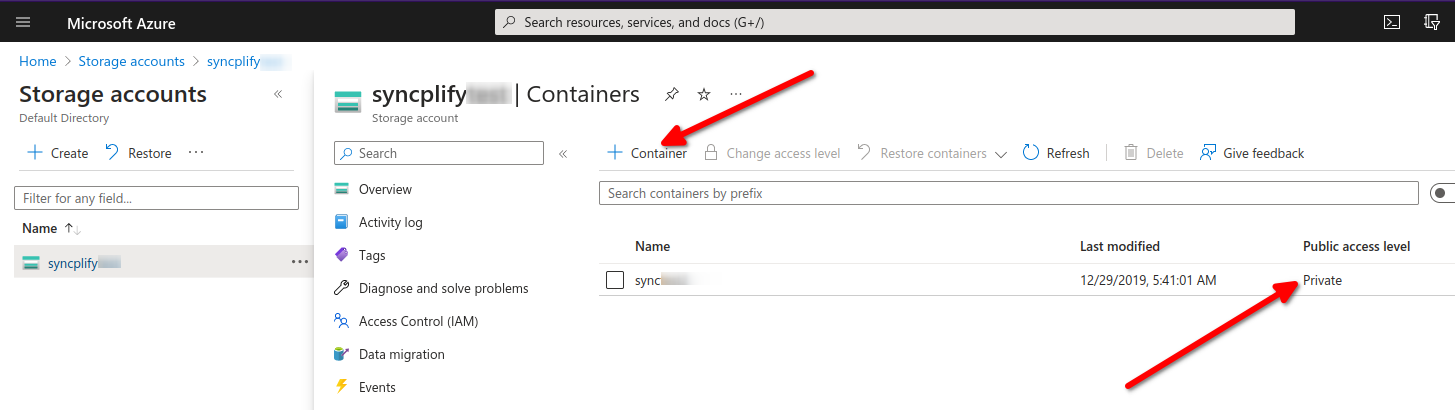
Inside of your storage account, create the container(s) you need. For security reasons, we recommend you to make sure that they're not publicly accessible, access should be restricted to your storage account and access key.
Now you're ready to create your Azure Virtual File System (VFS) in your Syncplify Server!:

Specify your Azure blob storage URL as shown above, and then use your storage account name, and its associated account key (in JSON) format to authenticate/authorize access from your VFS to your Azure blob storage. That's all there is to it.
How to use the s3 Virtual File System (VFS)
Syncplify Server!, through its virtual file system (VFS) data storage layer, can store your SFTP server's data into various storage back-ends. This article explains how to use the GCP VFS type that stores your server's data into a Google Cloud Platform object storage bucket.
First of all you'll need to create a bucket in one of your Google Cloud projects. Please, make sure the security policies for this bucket meet your requirements (the settings shown below are for exemplary purposes only, you are responsible for deploying settings that meet your requirements):
Now create a service account to access this storage bucket; make sure you create an access key in that service account, and download the access key in JSON format:

Now you have everything you need to configure your GCP (object storage) Virtual File System (VFS) in your Syncplify Server! v8:

Make sure you specify the full bucket URL (including the gs:// protocol prefix) and then select the storage account key file (in JSON format) from your disk to be uploaded and used to access this particular Google Cloud object storage. And that's all there is to it: your VFS is ready to be used by any of your Syncplify Server! v8 user profiles.
How does the block-list (Protector!) work?
One of the most popular and widely appreciated features of Syncplify Server! has always been its powerful and automatic block-list (formerly known as blacklist). Starting from v4 (and subsequent versions) Syncplify Server! brought that concept to an even higher level with its Syncplify Protector!™ technology.
Protector! is a leap forward. It’s still fully automatic, but its controls are an order of magnitude more accurate and integrated much deeper in the protocols handler themselves. If used to its full potential, Protector! can be very harsh, therefore we felt the need to let our users configure its “sensitivity”. It is possible to set Protector! to either one of the following 4 “aggressiveness thresholds”:
Indulgent: when set to “indulgent”, Protector! will only detect authentication/authorization level violations, but will not consider a connect-disconnect sequence as a violation (thus it’s compatible with external “heartbeat” network and host monitors) – regardless, we still recommend the use of our safe-list for this purpose, and to set Protector! to indulgent only when Syncplify Server! is run in totally isolated networks not connected to the Internet.
Normal: this setting will tell Protector! to behave similarly to the previous block-list (as seen in the old v1-v3), only with a much higher degree of accuracy. This is the default setting.
Strict: this is a harsher setting, ideal when a server is open to external users that don’t belong to your organization, and whose client software you have no control on. The “strict” setting, in fact, will treat all protocol level errors as violations, and trigger the strike-count for the block-list. Requesting the download of a non-existent file, or the list of a directory without permissions, all these occurrences (and the like) will increase the strike-count, and eventually kick the connection and block-list the remote IP.
Paranoid: similar to “strict” but… more. When Protector! is configured in “paranoid” mode, even just disconnecting without sending the “BYE” command will be considered a violation, and trigger the strike-count increase. So, we recommend to use this mode only when you have full control over the client’s behavior and you know for sure that the client is going to honor the protocol 100%, because in “paranoid” mode anything less than absolute perfection is a violation, and will eventually get you block-listed.
Block-list, allow-list, and safe-list
Up to the old version 3.x, Syncplify.me Server! featured a black-list and a white-list. The black-list is where all “bad guys” would end up if they tried attacking the server (DoS, DDoS, password harvesting, …) while the white-list was used for a much more restrictive purpose. In fact – when enabled – the white-list would allow clients to connect only if their IP address was in the white-list. Enabling the white-list, practically, means permanently black-listing anyone who is not on in the white-list.
Although the black/white concept was good enough for most installations, we figured that we could make it even more flexible. That’s why, starting from version 4.0 and all subsequent versions, Syncplify Server! introduced a third list, called safe-list. Here’s how the 3 lists work:
Block-list: formerly known as blacklist, any IP address (e.g.: 192.168.1.35) or network (e.g.: 10.23.5.0/255.255.255.0) listed in the black-list will be rejected
Allow-list: formerly known as whitelist, if this list is not empty, then only the IP addresses and networks in this list will be allowed to connect, and anyone else’s connection attempt will be rejected
It is important to understand that allow-listing an IP address does not prevent it from being block-listed, see the safe-list here below for that
Safe-list: IP addresses and networks listed in the safe-list will never be blacklisted, even if they perform actions that may be interpreted as attacks, for example, if they connect and disconnect without attempting authentication (typical behavior of a load balancer)
Clever use of the 3 above lists guarantees enough flexibility to satisfy a much wider variety of situations than any previous version of Syncplify Server!
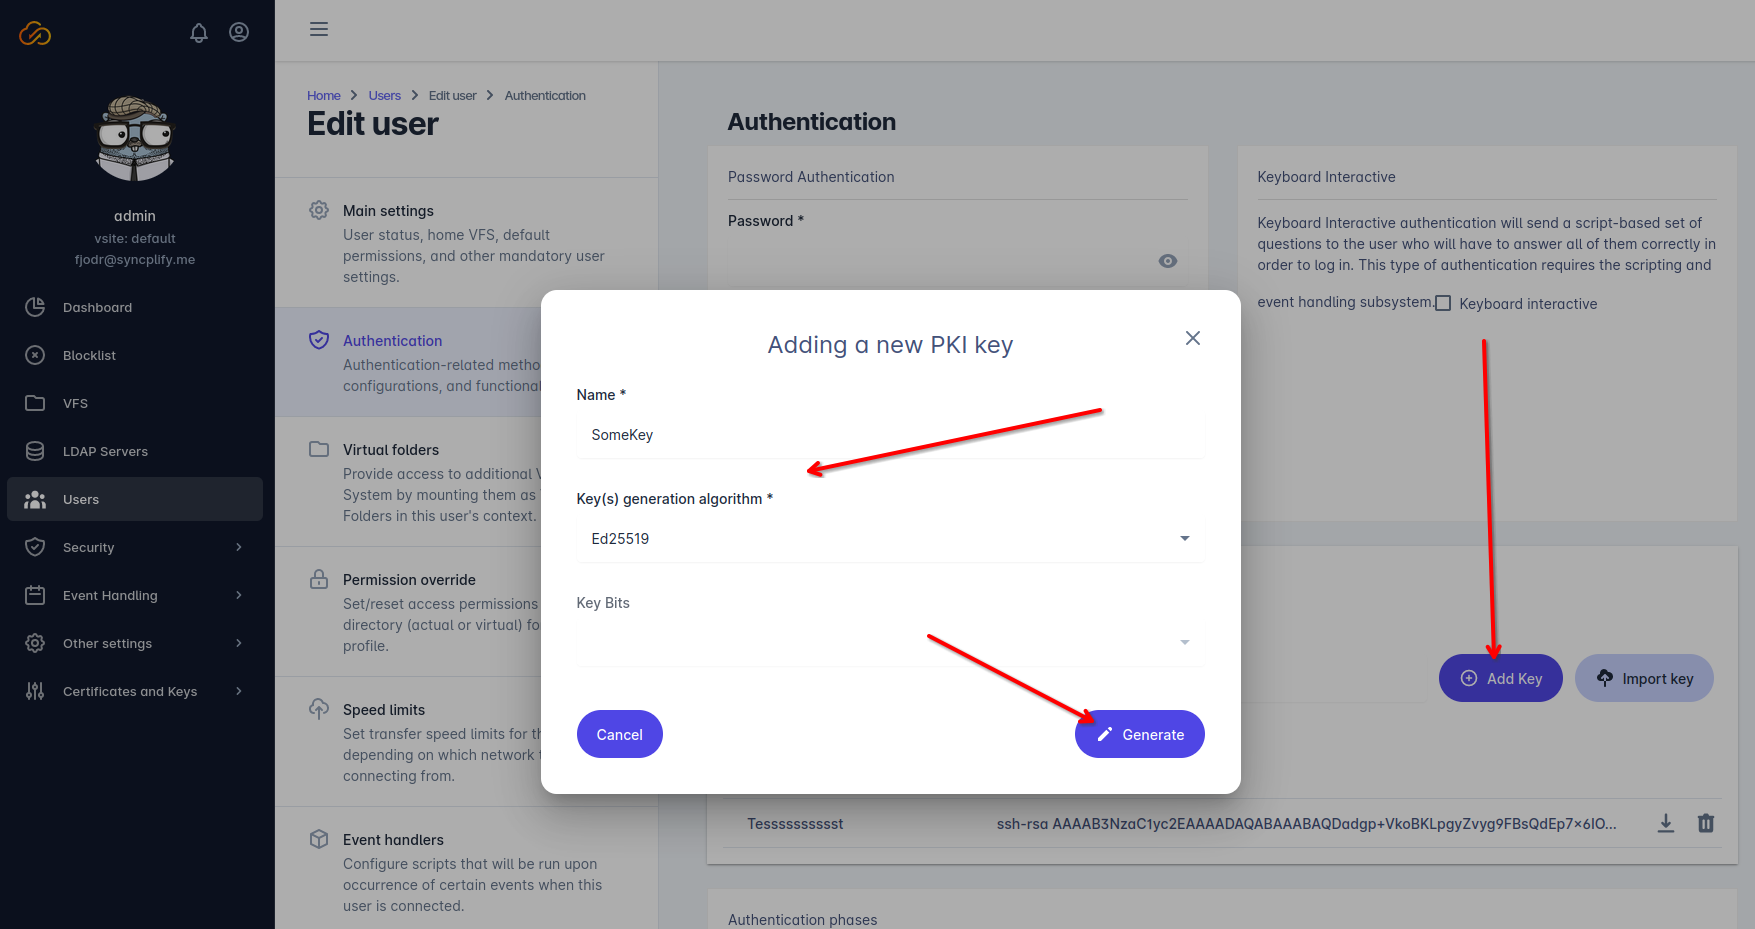
Authenticating users via PKI
We have already talked about the SSH Server Key, which is used to verify the server’s identity and to negotiate the security (hmac/encryption) parameters. In this article, instead, we want to explain how to use PKI to authenticate users in Syncplify Server!
First of all, it is important to understand that – unlike Server Keys (or Host Keys) – these user-specific key pairs are not used for encryption, but only and exclusively to authenticate users, thus verifying their identity and decide whether to let them log into the server or not.
Authenticating users via PKI certainly grants a much higher degree of security than simply using a password, and is, therefore, a highly recommended authentication method.
Method #1: user-generated key pair (recommended)
To ensure the highest degree of protection for the user, and prevent the potential loss of the private key, it is highly recommended that the user generates the RSA key pair (both private and public key) and then sends only the public key to the server operator.
This can be done, for example, with the following shell command on a Linux client:
ssh-keygen -t rsa -b 4096Or, in Windows, it’s easily doable using the excellent PuTTYgen tool, as shown in the images here below:
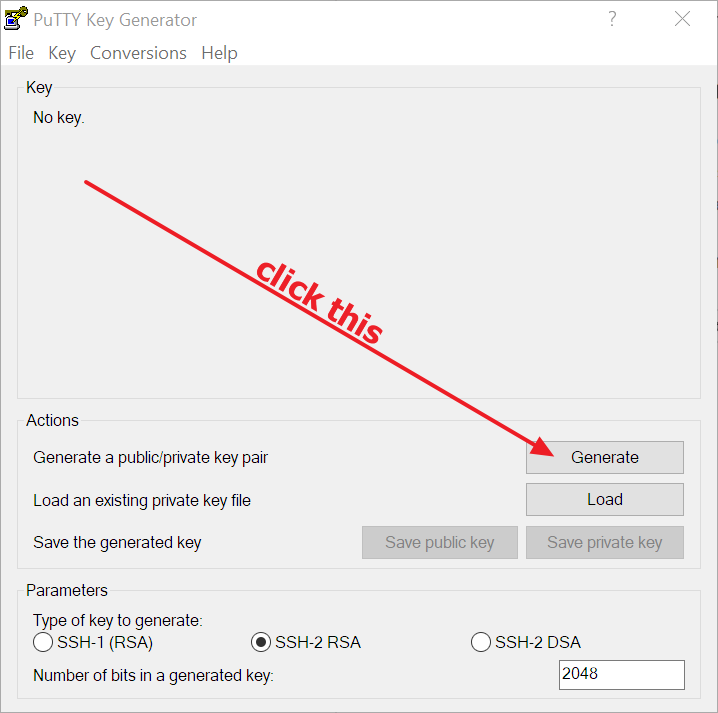
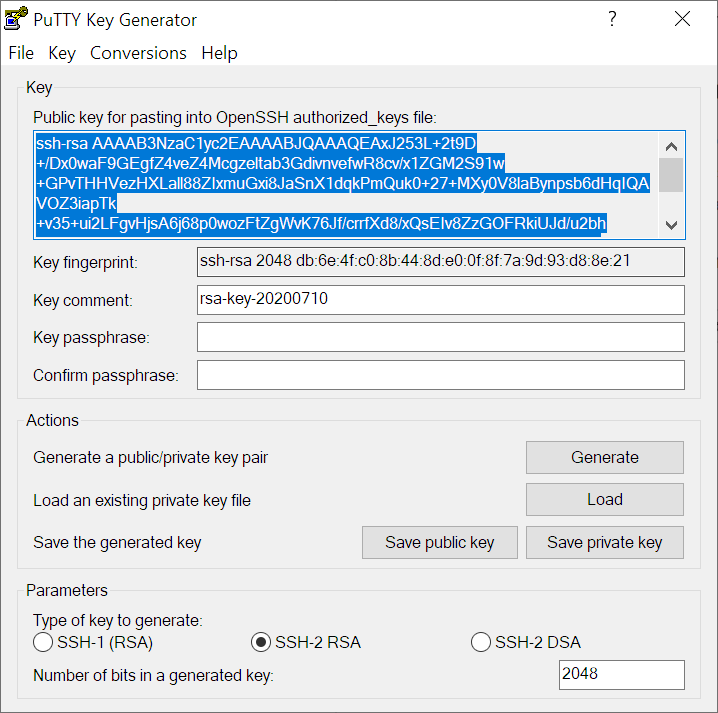
Regardless of the OS (Linux or Windows) the user needs to save both public and private keys after they are generated, and:
- retain the private key (will be used in the SSH/SFTP client to connect to the server)
- send the public key to the Syncplify Server!’s administrator
Once the Syncplify Server! administrator receives the user’s public key, he/she will have to import it into the authorized keys for that specific user, and enable PKI authentication for that user profile, as shown in the pictures here below:
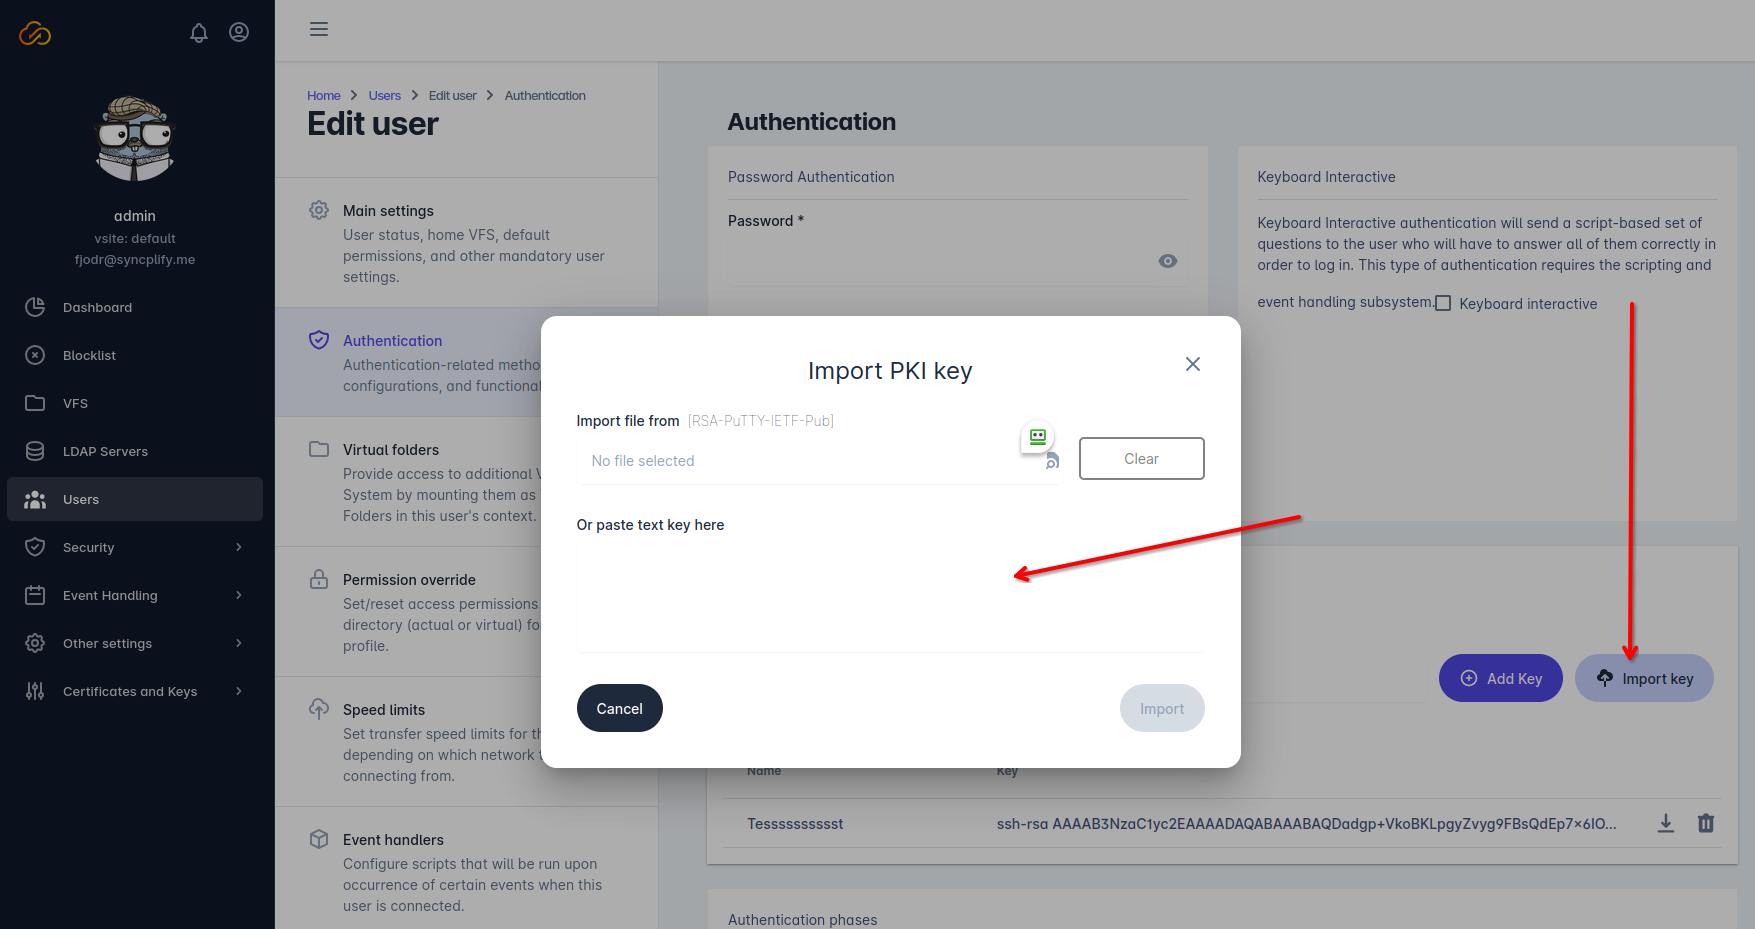
After importing the user’s public key, the Syncplify Server!’s administrator will simply save the user profile, and that’s it: the user can now authenticate and log in using his own self-generated key pair.
Method #2: server-generated key pair (not recommended)
Alternatively the Syncplify Server!’s administrator can generate the key pair and send it to the user, while Syncplify Server! only retains (stores in its configuration database) only the public key. This method is not recommended because it implies the private key being sent over the network, which might be unsafe, but it’s much easier than the previous method, and it can actually be suitable and safe in closed environments (like when the key pair is given to an internal user or an employee) in a safe way.
In this case, the Syncplify Server!’s administrator will still need to enable PKI authentication for the specific user profile:
Once done, the Syncplify Server!’s administrator will simply need to save the user profile, and send/give the generated PPK file to the user.
Customizing SFTP and FTP(E/S) greetings and banners
Some of the concepts explained in this article require that you're running a version of Syncplify Server! greater than or equal to 6.2.5
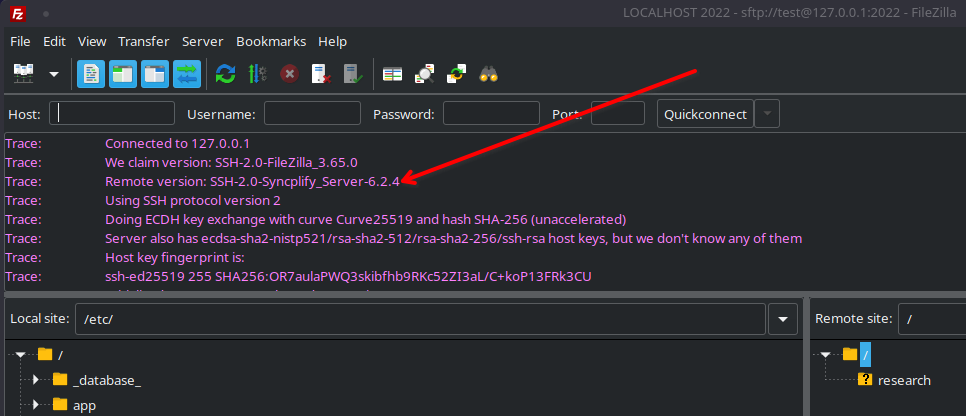
Syncplify Server! allows customizing greetings and banners (for those protocol handlers that support such feature) with variable fields that are automatically processed by the software when a client connects. Here’s a basic example of what you can write:
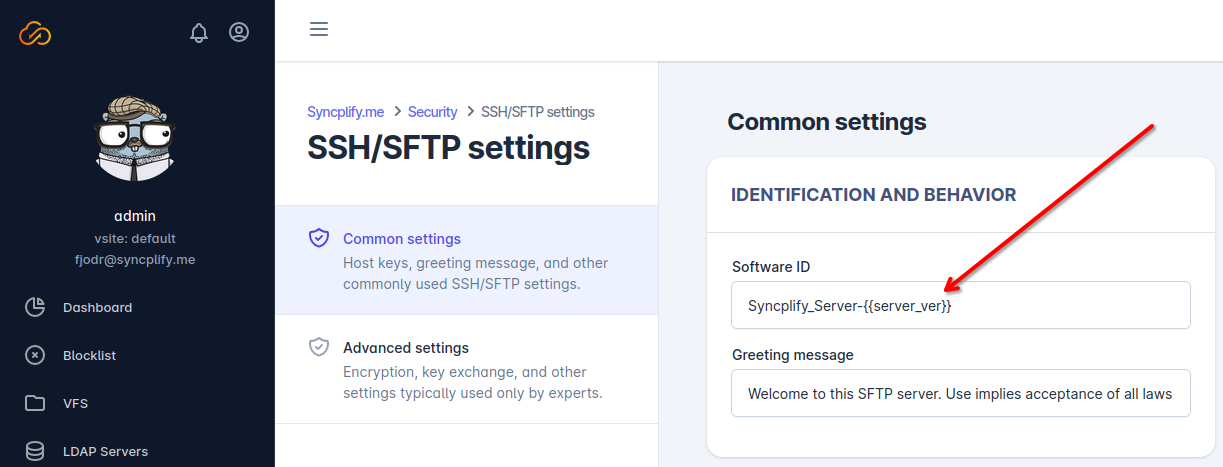
The variables you can use are well documented in this section of the software manual.
See the field between double curly brackets? That's a variable, and when a client connects, Syncplify Server! will process the above greeting message, and send it to the client fully expanded. Here below you can see what the server sent FileZilla Client upon connection:
How to override permissions on subfolders inside the user’s Home VFS
As of version 5.0 (and subsequent versions) Syncplify Server! allows overriding permissions on sub-folders that are physically contained inside a user’s Home VFS. So we're talking about actual folders here, not virtual folders as virtual folders already come with their own set of permissions.
Let’s say, for example, that the actual directory structure on the disk is the one you see in the picture here below:

And let's say you want to apply different permissions to the various sub-directories under that root... Well, now with Syncplify Server! you can do so very easily:
All physical paths configured under the "permission override" section must be POSIX and root-based, meaning they begin with a forward-slash, they use forward-slashes as path separators, and they are relative to the directory (or whatever target) pointed to by the user's home-VFS (which is, in fact, the "root" for each individual user account).
Yet another way Syncplify Server! makes an SFTP server administrator’s life easier.
FATAL ERROR: Connection reset by peer (could not connect to server)
It may happen that a client that has always been able to connect to Syncplify Server! without any issues, suddenly can't connect and displays a message similar to this one:
FATAL ERROR: Connection reset by peer (could not connect to server)
Depending on the client software the failure message may vary, but its meaning is always the same: the client cannot connect to the server.
When that happens, the most likely causes are:
- the client software has violated the protocol or the permissions (for example it has tried to upload a file to a folder where uploads are forbidden) multiple times, and has been block-listed - in this case, locate your client IP address in the block-list, and remove it
- you may have added at least 1 IP address or network to your allow-list, but now you're trying to connect from an IP address that's not allow-listed; please keep in mind that the allow-list, when used, is restrictive; learn more about the allow-list (and other lists)
- if you're running an old version of Syncplify Server! (v1-v5) your server may have detected changes in your hardware, virtual hardware, or operating system, that may have led to an invalidation of the license - licenses that revert back to FREE edition cause the server to only accept a single client connection at a time - if that happens submit a ticket here (top right corner) and we'll help you reset your license
- client and server may have been unable to negotiate a common set of encryption/MAC/key-exchange algorithms; in this case it's strongly recommended to configure the client to use the same strong algorithms available on the server, weakening the server by adding weak algorithms to it is never a good idea
Virtual File Systems (VFS) with quotas
The Virtual File System (VFS) introduced in Syncplify Server! v4.0 (and available in all subsequent versions) comes with a long-awaited feature: quota management.
IMPORTANT: Syncplify Server! v4/v5 expressed their quotas in KB, while starting from Syncplify Server! v6 quotas are expressed in bytes.
Now, the problem with quota management is that calculating the current size of a folder (along with its sub-folders) can be very time-consuming if the folder contains millions and millions of files. So if we were to re-evaluate the size to enforce quota restrictions at every operation it could totally kill the performances. A balanced solution is to have a Quota TTL, which is the Time-To-Live (TTL) of the quota cache, expressed in seconds. Basically, when Syncplify Server! calculates the current size of a folder structure, it will consider such result valid for that many seconds, without re-evaluating it too often.
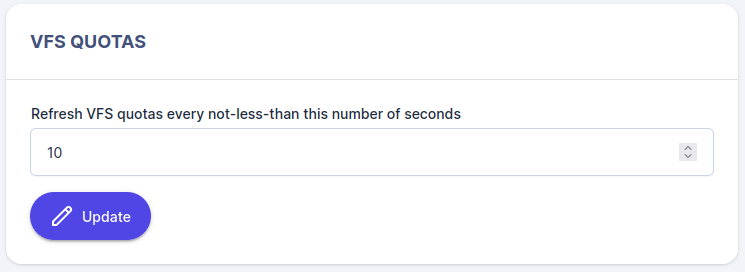
We also support two kinds of quota:
- Soft Quota: if the soft quota is exceeded during a file transfer, the file that’s currently being transferred will be allowed to finish uploading, and will be kept; the next file upload will be denied
- Hard Quota: when this value is reached, any ongoing upload will be forcefully terminated and the partially uploaded file will be deleted; the next upload will be denied only if the soft quota has been exceeded
You may set limits for soft quota, hard quota, or both. If you don’t want a quota (soft or hard) to be enforced by a certain VFS, then leave its value to 0 (zero).
Solved: insecure FTP data connection (TLS session resumption)
If you are running any version of Syncplify.me Server! prior to 5.1.17, and using the FTPS or FTPES protocol, your client software may start complaining about an "insecure data connection" or lack of "TLS session resumption".
You may see an error message similar to the one here below:
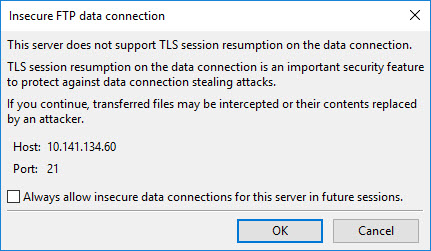
There's an easy solution to that: upgrade to the most recent version of Syncplify Server!
Thank you!
Parametric home directories (VFS)
Another highly requested feature that Syncplify.me Server! offers in all editions is parametric home directories.
Some of our customers, in fact, need to isolate every user in their own directory under a general “container”, the directory name being the same as the user’s username. They also requested that if a particular user’s home directory does not exist, it is automatically created when the user logs in.
Let's say you have two (or more) users, and you want to achieve a directory layout like this:
C:\SFTPData
+----------\user_one
+----------\user_twoThis is very easy to do with just one VFS in Syncplify Server!. First of all, you have to create a VFS with a parametric target, let’s call it “ParamVFS” and point it to C:\SFTPData\{{username}}:
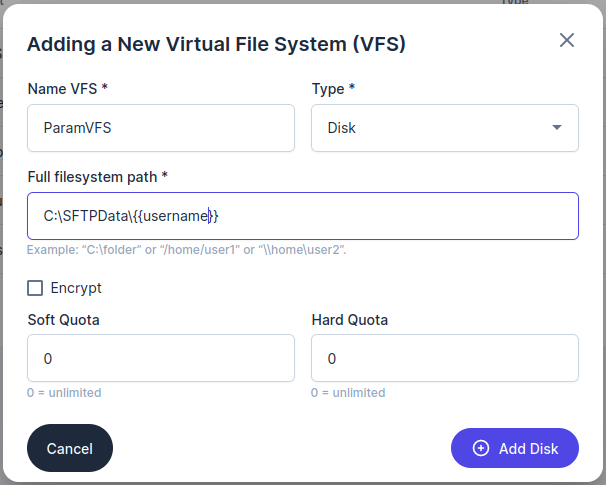
Then, when we create our user profiles for user_one and user_two, choose the “ParamVFS” VFS as their home folder:
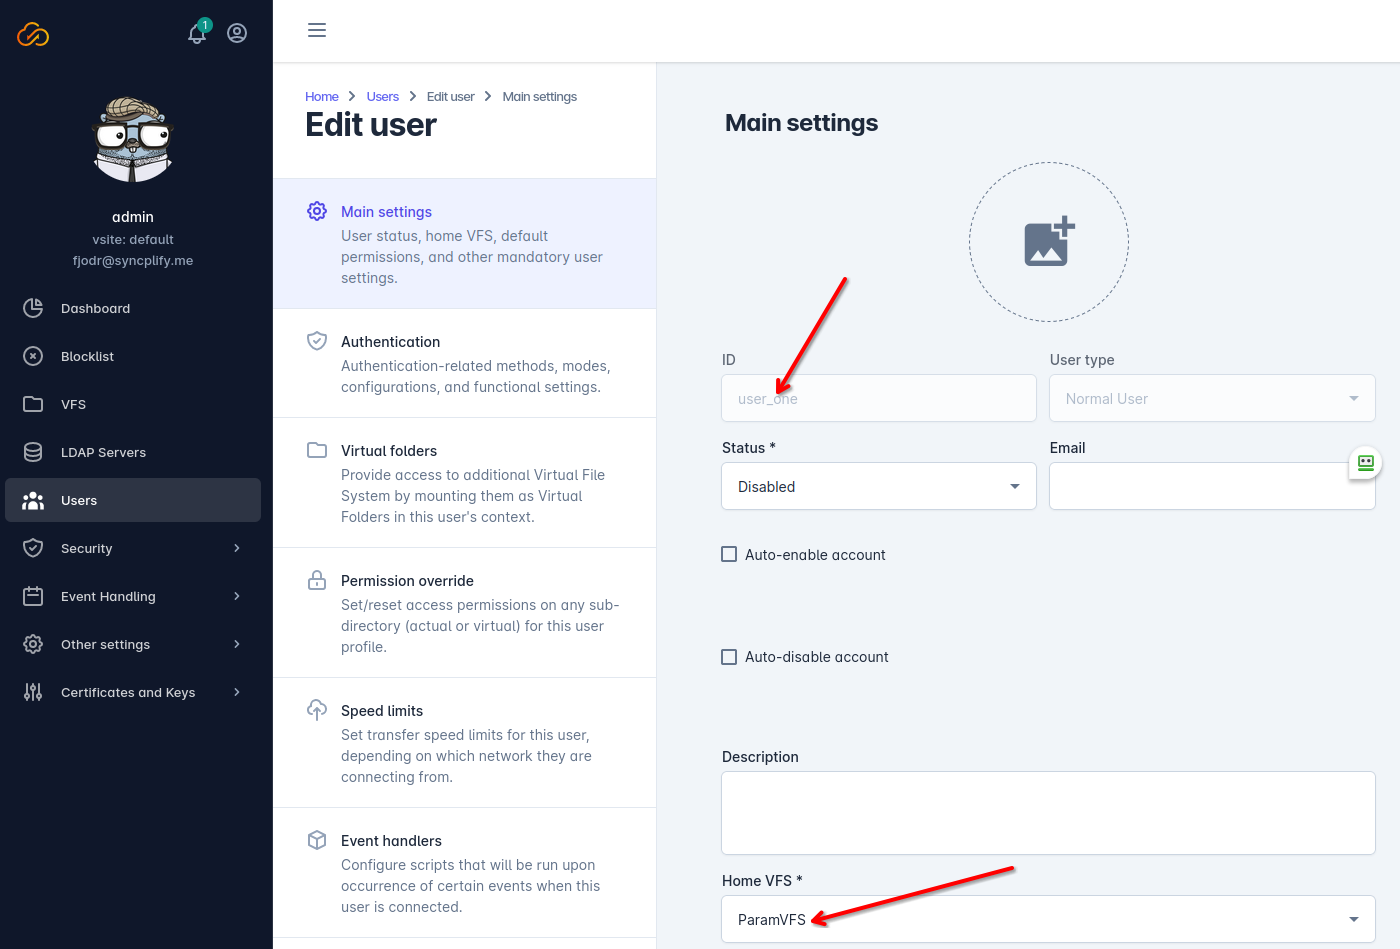
Now the home directory for user user_one will be “C:\SFTPData\user_one“, and the home directory for user user_two will be “C:\SFTPData\user_two“.
Each directory will be automatically created the first (or next) time each user logs in.
Aside from the {{username}} parameter, there are other parameters you can use in your parametric VFS, namely:
- {{user_home}}: the LDAP (or Active Directory) "home" for this user (if defined, not to be taken for granted)
- {{user_desc}}: the content of the "description" field in the User's configuration
- {{today}}: the current date in YYYYMMDD format
- {{today_utc}}: the current date in YYYYMMDD format in the UTC (universal) timezone
- {{sess_custdata}}: the content of the session's custom data (applicable only to the editions of our software that feature scripting and event-handling, as this is configurable only via scripting)
As of version 6, we adopted the double-curly-bracket notation for all our parametric VFS variable names (ex: {{username}}). The old notation with square brackets and percent signs (ex: [%USERNAME%]) is still supported, but this notation will be dropped in the future, so please make sure you update all your configurations accordingly.
Cannot connect: "unexpected message type 30 (expected one of [34])" reason found in log file
Some clients cannot connect to your Syncplify Server! version 6.x, and when you analyze the worker process (the virtual site's) log file you see the following message in it:
ssh: unexpected message type 30 (expected one of [34])
Why does this happen?
The message "type 30" is a pre-RFC4419 group exchange message, and support for the "type 30" message has been removed from OpenSSH release 6.1 and later. To prevent potential vulnerabilities and in an always-ongoing effort to keep our custoemrs and users as safe as possible, we removed it too from our Syncplify Server! software. When this default message in the Diffie-Hellman group exchange algorithm policy is used during SSH key exchange, it generates and logs the above error message, and the key-exchange attempt is aborted by the server.
The solution is to upgrade or reconfigure the client software so that it sends the new and correct message type 34 to request the usage of any diffie-hellman-group-exchange key exchange algorithm.
How to backup your Syncplify Server!'s database
Note: this article only applies to Syncplify Server! v6.x and above. If you're looking for a way to backup your old (v4/v5) database you should look at this article instead.
Syncplify Server! v8 offer several ways to perform a backup of its configuration database (which is always part of a good disaster recovery strategy). This article explains three ways to accomplish this task.
Method #1: from the SuperAdmin UI
The easiest way to backup your entire configuration database is to use the Backup page in the SuperAdmin UI:

Method #2: via REST API
Of course, using a web UI is not very suitable for automation... so, if you want to automate your backups (and you're familiar with REST API) the same function is documented, in standard OpenAPI documentation format, here: https://ss6openapi.syncplify.com/
Method #3: via command line
For those who prefer the old-school command line to a more modern REST API approach, we have also included such capability in the Web/REST service main executable:

Simply open a terminal (or command prompt in Windows), change directory into the directory where Syncplify Server! is installed, and type the following command.
For Windows:
.\ss-webrest.exe backup -d "C:\directory\where\you\want\your\backup"For Linux:
./ss-webrest backup -d /directory/where/you/want/your/backupMethod #4: via command line (but in SyngoDB's native low-level format)
This one is a little bit more laborious, but sometimes it's the only way to acquire a database that contains erroneous data and configurations that make it non-understandable to Syncplify Server!'s system service. This method should always work, even in the worst case scenario.
- Download this on your server: https://download.syncplify.me/ss6dump.zip (on all nodes if it's an HA deployment)
- Put it in its own directory anywhere on the C:\ or root partition (create one if you need, example: C:\ss6dump)
- Run it "as administrator" (under Windows) or via sudo (under Linux)
- It will create a "dump" folder under the folder where the executable is located
- You can then zip up the content of that "dump" folder and attach it to your customer support ticket to Syncplify
Unsupported public key authentication algorithm SshRsa (ssh-rsa)? Here's how to fix it.
An important research paper published in 2023 by Keegan Ryan, Kaiwen He, George A. Sullivan, and Nadia Heninger mathematically demonstrated another weakness in RSA keys, which are commonly used as host keys for SSH/SFTP servers or to authenticate SSH users via PKI.
For such reason, starting from Syncplify Server! v6.2.26 the ssh-rsa algorithm is no longer among the default active ones. Please understand that we have done so to protect our customers and users and ensure that we can keep the reputation we earned in the last decade as the only enterprise-grade SSH/SFTP server on the market that's never been hacked.
Yet, more often than we thought, we receive emails and support tickets informing us that some SSH/SFTP clients attempting to connect to our server software are receiving an error message like this: "Unsupported public key authentication algorithm SshRsa (ssh-rsa)". So, what to do about it?
Well, there are two roads you can follow, one that is formally and actually correct and ensures your server's safety and security, and one that works but weakens the overall safety and security of your server for every one of your users. Let's explore them both.
The correct way to fix this
The only correct way to fix this is to ditch RSA keys completely. They should appear absolutely nowhere in your server's configuration, no RSA host key, no RSA keys to authenticate your users, and no ssh-rsa host-key or PKI algorithm enabled. Then configure all of your clients to use alternative algorithms (Ed25519 is strongly recommended) when they connect to your server. Yes, it's a hassle and it requires a lot of reconfigurations of a lot of moving parts, but no effort is too big compared to the cost (legal, monetary, and material) of being hacked.
The quick-and-dirty (and insecure) way to fix this
You can, of course, keep your RSA keys (host key and user keys) and enable the ssh-rsa algorithm in your server as shown in the screenshot here below:
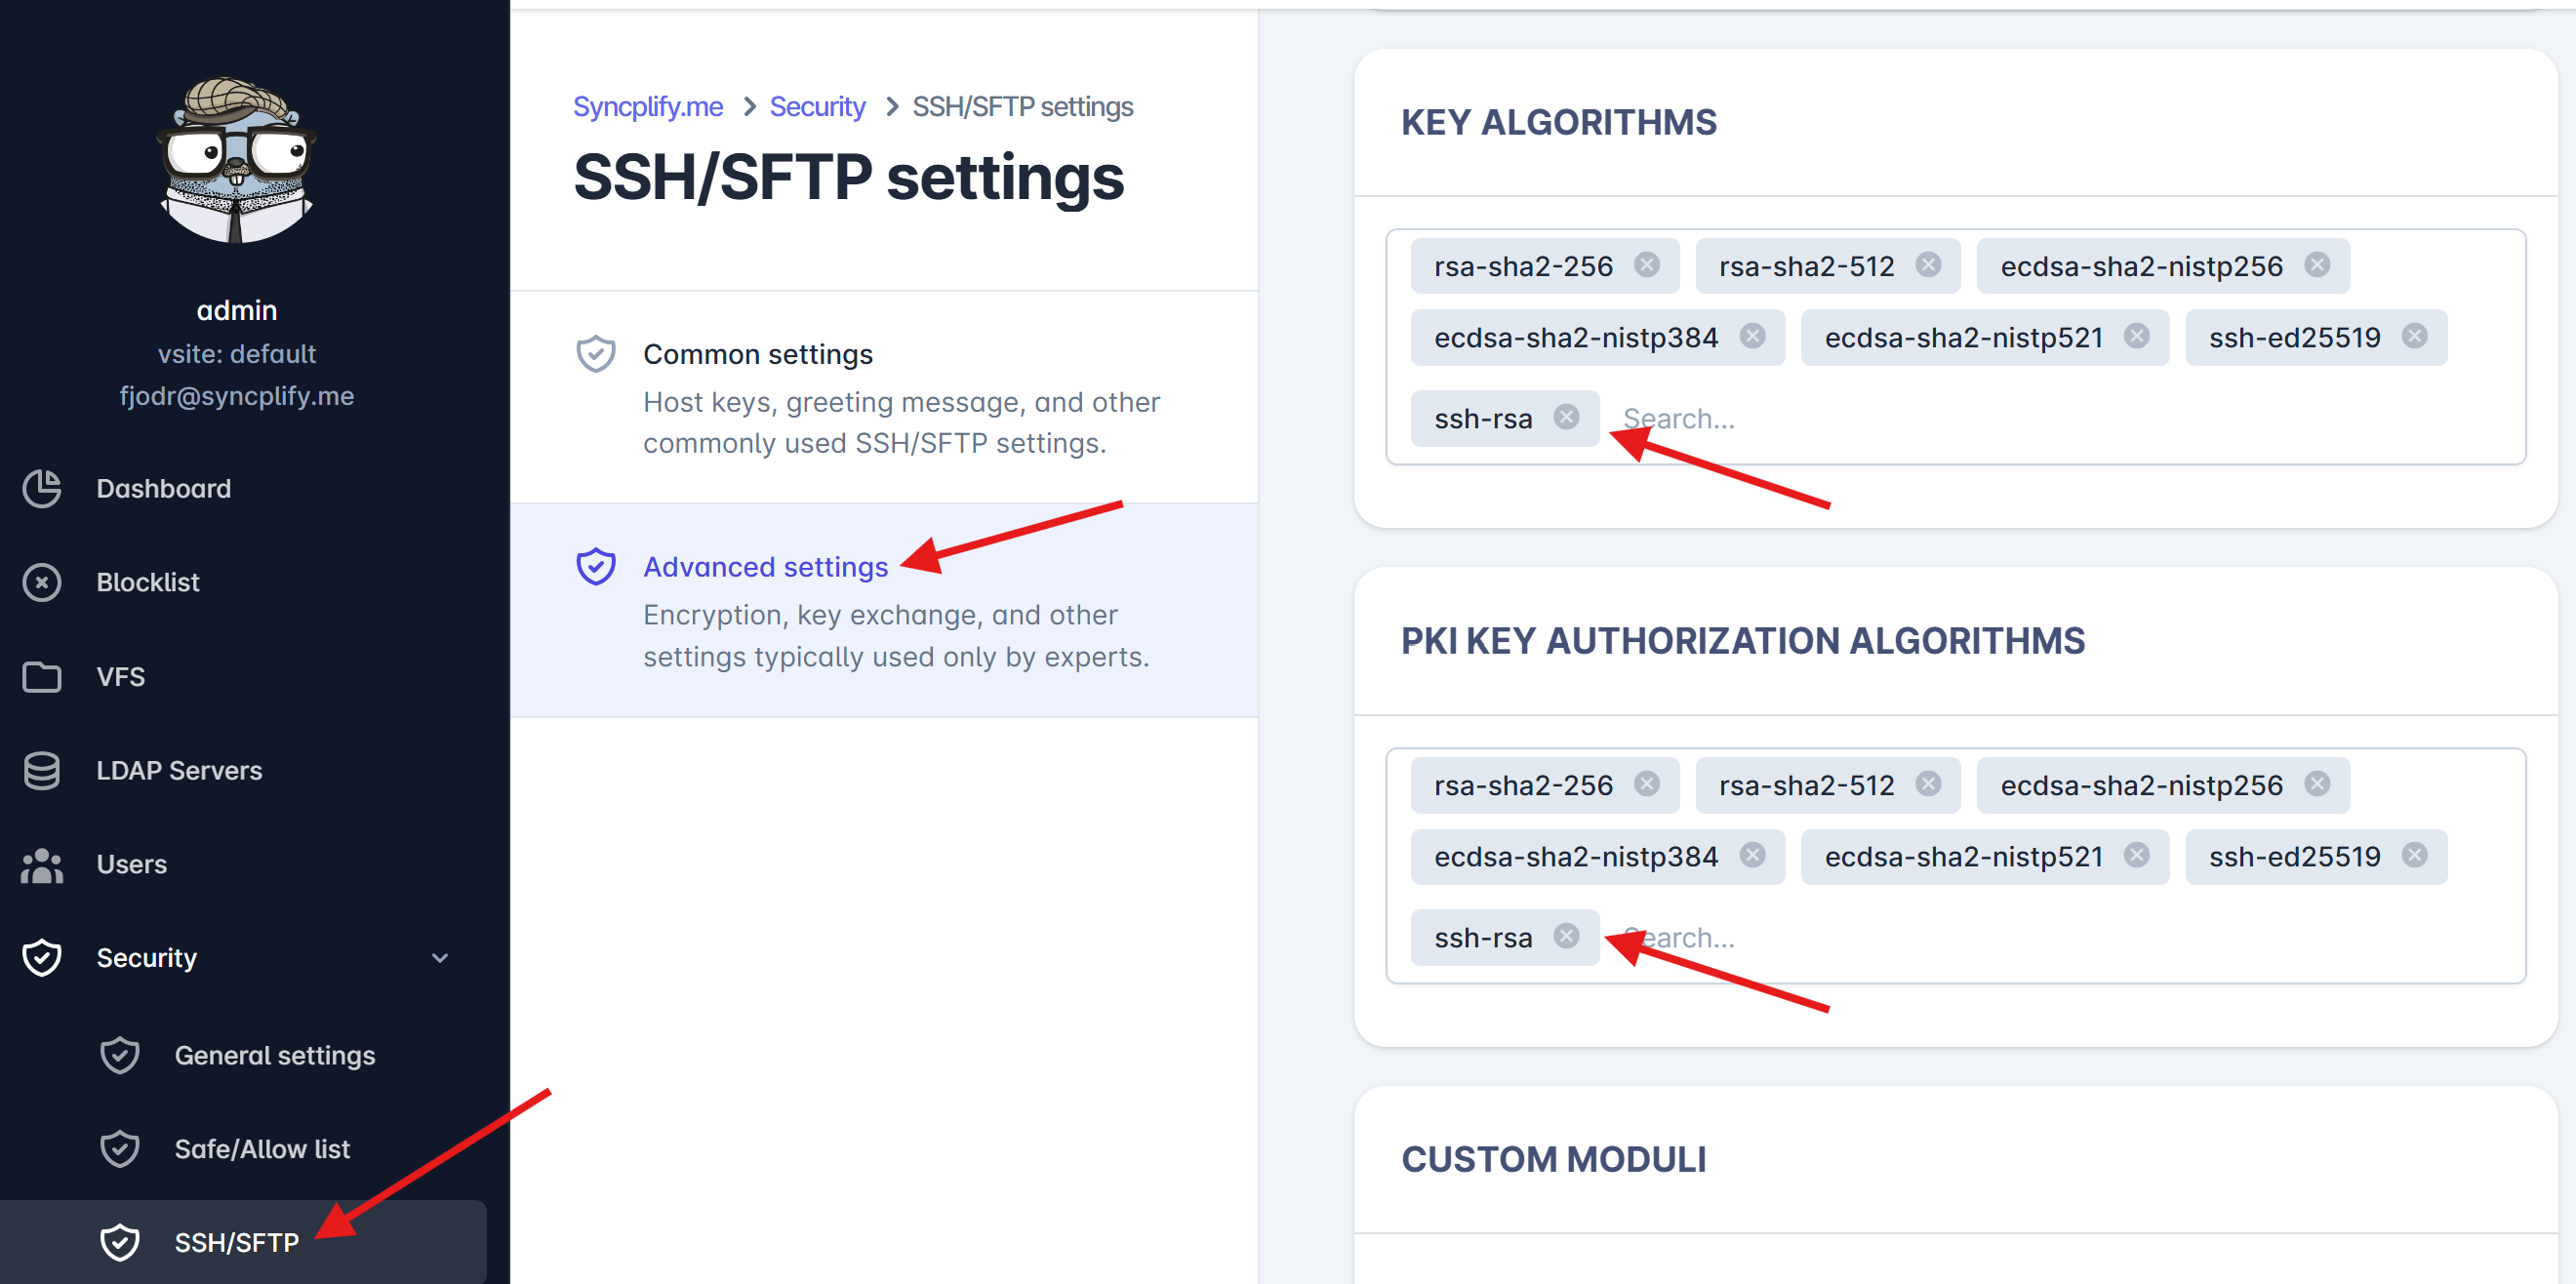
Please keep in mind that any change to the security algorithms of your SSH/SFTP server will only take effect after you restart your Virtual Site from the SuperAdmin UI.
WARNING: While we offer this option for your convenience, it’s important to understand that it does not provide the same level of security as our recommended approach. Syncplify cannot be held responsible for any security breaches that may occur as a result of using this option. We strongly advise selecting the secure option to protect your system, users and data.
How to import many users at once from a CSV file
IMPORTANT: this feature requires Syncplify Server! version 6.2.50 or greater. It was not present in versions prior to 6.2.50 so if you attempt to use this feature in older versions it won't work.
Sometimes, to ease transition from other SFTP servers, it may be useful to have the ability to import user profiles, along with their home VFSs, in bulk from a comma-separated value (CSV) file.
The importusers command does exactly that. Let's see its inline help first, to familiarize ourselves with how it works:

Things to notice:
- It is a command built into the ss6-webrest executable
- It can take various options at command-line:
--csvis mandatory, this is the path to the CSV file containing info on the user profiles to be imported--vsiteis also mandatory, it's the ID (not the friendly name) of the virtual site you wish to import users into--makevfsis boolean and optional, if present the VFS field in the CSV file is expected to be an absolute directory path and a VFS for that path will be created and assigned to the user as its Home-VFS--dryrunis boolean and optional, if present no changes will be made to your Syncplify Server! and the importusers command will only evaluate whether or not the import operation would be successful
Now let's explore the format of the CSV data that is expected by the importusers command. It obviously depends on whether or not the --makevfs parameter is present.
If the --makevfs parameter is present, the CSV must contain data like this:
oneuser,"some password","/home/oneuser","ssh2_scp,ssh2_sftp,ftps,ftpes,https,https_sharing","dirList"
anotheruser,"some other password","/home/differenthome","ssh2_shell,ssh2_scp,ssh2_sftp","dirList,dirMake,dirRename,fileGet,filePut,fileModify,fileRename"
third_user,"different password","/home/oneuser","https,https_sharing","dirList,dirMake,dirRename,dirDelete,dirEditMetadata,fileGet,filePut,fileModify,symlink,fileRename,fileDelete,fileEditMetadata"
test,test123,"/home/oneuser","ssh2_sftp,ftps,ftpes,https,https_sharing","dirList,dirMake,filePut,fileModify"Whereas if the --makevfs parameter is not present, the CSV must contain data like this:
oneuser,"some password",2iSpTdEgRGPuYh0MVx2uWr5zxR4,"ssh2_scp,ssh2_sftp,ftps,ftpes,https,https_sharing","dirList"
anotheruser,"some other password",2l42WNHRjDtQUx8HdhGV5Jwq5j0,"ssh2_shell,ssh2_scp,ssh2_sftp","dirList,dirMake,dirRename,fileGet,filePut,fileModify,fileRename"
third_user,"different password",2mDUX9qjygr3dOOzBx4S6kwLcah,"https,https_sharing","dirList,dirMake,dirRename,dirDelete,dirEditMetadata,fileGet,filePut,fileModify,symlink,fileRename,fileDelete,fileEditMetadata"
test,test123,2mDUa8AaNKnmebSKy1ziUMyns0d,"ssh2_sftp,ftps,ftpes,https,https_sharing","dirList,dirMake,filePut,fileModify"As you can see the only difference is that when --makevfs is present the 3rd field of each record in the CSV is expected to be a fully-qualified and absolute path to a local storage location available in your OS, whereas when --makevfs is absent the import process expects you to provide the ID of an existing VFS already configured in your Syncplify Server!
All other typical CSV format requirements remain in place, like, for example, the need to double-quote strings that contain spaces, wherever they might be.
So, what is the accepted content for each field in each record (line) of the CSV? Here you go:
- Username: all lowercase and absolutely no spaces
- Password: free text (within double-quotes only if it contains spaces)
- VFS ID or Absolute Path: depending on the presence of
--makevfsas explained above - Allowed subsystems: a double-quoted string containing a comma-delimited list of the following valid values:
ssh2_shell,ssh2_command,ssh2_scp,ssh2_sftp,ftp,ftps,ftpes,https,https_sharing - Permissions: a double-quoted string containing a comma-delimited list of the following valid values:
dirList,dirMake,dirRename,dirDelete,dirEditMetadata,fileGet,filePut,fileModify,symlink,fileRename,fileDelete,fileEditMetadata
Here's the typical output of a dry run:

And here's the typical output of an actual import operation:

Limitations
The current version of the importusers command has several limitations and makes several assumptions, namely:
- It can only import "Normal" users, which are users authenticated locally by Syncplify Server!, it cannot import "LDAP" users
- It can only import users that use Password authentication (it can't import PKI auth configurations nor key-pairs)
- It can associate users to any VFS type (Disk, S3, Azure, etc...) if the VFS ID is provided, but when using
--makevfsit can only create Disk-type VFSs - It can only import the following 5 details for each user: username, password, VFS, subsystems, and permissions
- It needs to be run as Administrator (in Windows) or as root/sudo in Linux