Installation
Articles and solutions related to setup, installation, deployment, and first configuration of your Syncplify Server!
- How to be notified of new releases
- Setup on Windows (GUI)
- Setup on Windows (CLI)
- Setup on Linux
- Deploy v8 with Docker
- Updating/upgrading Syncplify Server!: GENERAL RULES
- Upgrading from v4/v5 to v8
- Upgrading from v6/v7 to v8 (Windows)
- Upgrading from v6/v7 to v8 (Linux)
- Upgrading a v6/v7 high-availability (HA) cluster to v8
- Upgrading from v6 to v8 (when everything else fails)
- How to move/migrate your software to a different machine/VM
- How to recover (decrypt) old v4/v5 encrypted VFSs
- High-Availability (HA) general concepts
- High-Availability (HA): how to setup
- Licensing and license codes: a complete overview
How to be notified of new releases
Keeping your software up to date is always highly recommended. Keep in mind that we keep working to improve our software and to fix bugs, so updates and upgrades are of the utmost importance for your experience with the software and for your overall safety.
There only official way to be notified when a new release of our software becomes available is to subscribe to our official release notes.
Thank you for always keeping your software up to date.
Setup on Windows (GUI)
This here below is a quick "how to" and video tutorial showing how to install and setup Syncplify Server! on Windows. It also shows its initial barebone configuration and test of some of its subsystems (protocol handlers).
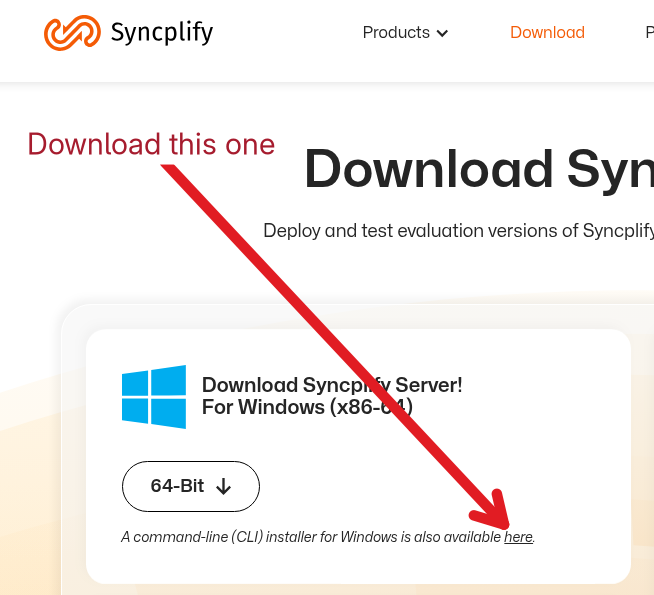
Choosing between the GUI and the CLI installer for Windows
- The GUI installer (shown in the video above) provides a familiar Windows desktop experience, with its graphical wizard that guides the user through the initial process of copying the files to the target system and auto-configuring some OS settings.
- The CLI installer, on the other hand, is designed for command-line based installations, which are more suitable (or even absolutely necessary) for unattended/automated installs, SCCM, or to deploy the software on Windows Server Core editions without the Desktop Experience (as Microsoft calls it).
Did you know?
The Windows GUI and CLI installers are interchangeable, meaning that you can install (for example) version 8.0.0 using the GUI installer, then upgrade to v8.0.1 via the CLI installer, and then upgrade to v8.0.2 with the GUI installer again.
Setup on Windows (CLI)
Some versions of Windows Server, especially the recent 2019 and newer, can be installed without the graphical desktop that gave Windows its name in the first place. This makes for a usage experience that many Linux administrators are most familiar with, allowing Windows Server administrators to run their operating systems without any GUI environment, where every operation has to be performed via CLI (command-line interface) just as they would do within a Linux terminal.
Fear not! We got you covered. The same CLI installer that we have developed for Linux, also works on Windows, and the only difference is how you type in the command line to use it (as Windows relies on PowerShell, while Linux may use a variety of different and mostly-POSIX shells).
The automatic way to install
The simplest and entirely automatic way to install Syncplify Server! on your Windows machine/VM without "Desktop Experience" is to run PowerShell as Administrator, and simply type in (or copy-paste) the following command:
Invoke-Expression (New-Object Net.WebClient).DownloadString('https://dl.syncplify.com/ss-setup-win-x64.ps1')Or the equivalent shorthand version:
irm https://dl.syncplify.com/ss-setup-win-x64.ps1 | iexThis will automatically download the ZIP archive containing the most recent version of the software, extract it to a temporary location, then run the CLI installer for you.
The above should work just fine with PowerShell 6, but PowerShell 7 is highly recommended. Also, please bear in mind that after the CLI portion of the installation, you'll still have to go through the web-based portion of the initial deployment as per the instructions you'll see in your PowerShell window.
Download then install manually
First of all you will need to download the most recent version of the CLI installer for Windows from our website. Extract the archive, and then type the following in a Terminal window (PowerShell or CMD.EXE):
.\ss-setup.exe install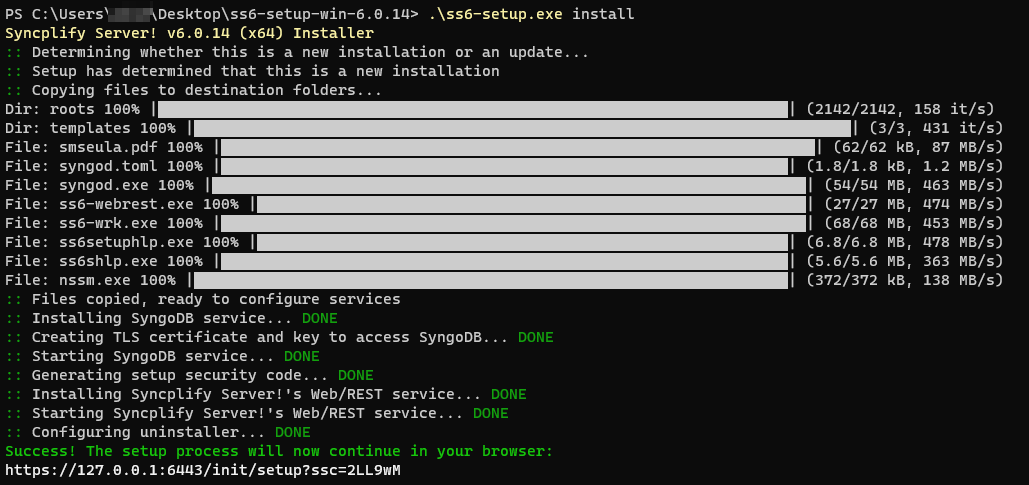
At the end of the setup process, open a browser and point it to the provided URL.
Be careful, the URL references localhost (127.0.0.1) but if you're using a browser on a different computer you will have to change 127.0.0.1 into the current IP address of the machine where you just installed Syncplify Server! on.
The same install command line argument will also update/upgrade your software (without affecting your configuration) if Syncplify Server! is already installed in your system.
How to uninstall
Use the same ss-setup from the zip archive you downloaded (or download the most recent one, doesn't matter) and type the following command into a Terminal window (PowerShell or CMD.EXE):
.\ss-setup.exe uninstallHow to update/upgrade
When the CLI installer is invoked with the install verb, it will automatically try to determine whether the software is already installed on the system, and - if that is the case - perform an update/upgrade rather than a new install.
There is, however, a way to force the CLI installer to perform an update/upgrade, when you already know that this is the case. You can simply add the --update flag to the install verb, like this:
.\ss-setup.exe install --updateAnd, just in case... you can also do a "repair"
Should anything happen, you can always use the same ss6-setup you downloaded and extracted, to "repair" your currently deployed executable and back-end DB configuration, like this:
.\ss-setup.exe install --repairMore useful command-line flags
There are a couple additional command-line flags that you may want or need to use occasionally. Both of them are intended to be used in conjunction with the install verb.
| Flag | Purpose of the flag |
--trace |
Enables trace-level logging for the installation process. This will produce a larger and more detailed installation log, useful to identify the cause of possible installation issues. |
--norollback |
Typically, should something go wrong during installation, a rollback operation is performed, to leave your system unchanged. This flag disables such rollback, so that your system remains partially modified even after a failed installation. This is useful in some cases for debugging. |
That's it. :)
Did you know?
The Windows GUI and CLI installers are interchangeable, meaning that you can install version 8.0.0 using the GUI installer, then upgrade to v8.0.1 via the CLI installer, and then upgrade to v8.0.2 with the GUI installer again.
Setup on Linux
The short one-liner
If you are not interested in a detailed overview and explanation, here's a one-line shell command that will:
- Download the current (latest release) version of the installation archive into a temporary folder
- Extract it and run the CLI setup for you via
sudowhich will install the software or automatically update it to the latest release if it's already installed in your system
For X86-64/AMD64 architecture
If you prefer wget:
wget -nv -O setup.sh https://dl.syncplify.com/ss-setup-linux-x64w.sh && sudo sh setup.shIf you prefer curl:
curl -fsS -o setup.sh https://dl.syncplify.com/ss-setup-linux-x64c.sh && sudo sh setup.shFor ARM architecture
If you prefer wget:
wget -nv -O setup.sh https://dl.syncplify.com/ss-setup-linux-armw.sh && sudo sh setup.shIf you prefer curl:
curl -fsS -o setup.sh https://dl.syncplify.com/ss-setup-linux-armc.sh && sudo sh setup.shDetailed overview and explanation
The following video shows how to install Syncplify Server! on a Linux operating system:
First of all you'll need to download the most recent version of our software from our website. After that, in order to extract it and to install it, here's a handy copy-pastable list of the two commands you'll need.
To extract the downloaded archive:
tar -xvf name_of_downloaded_targz_archive.tar.gzThen to begin installing or updating the software:
sudo ./ss-setup installAt the end of this phase, a URL will be shown to you. Simply open it in a browser to continue with the rest of the setup process.
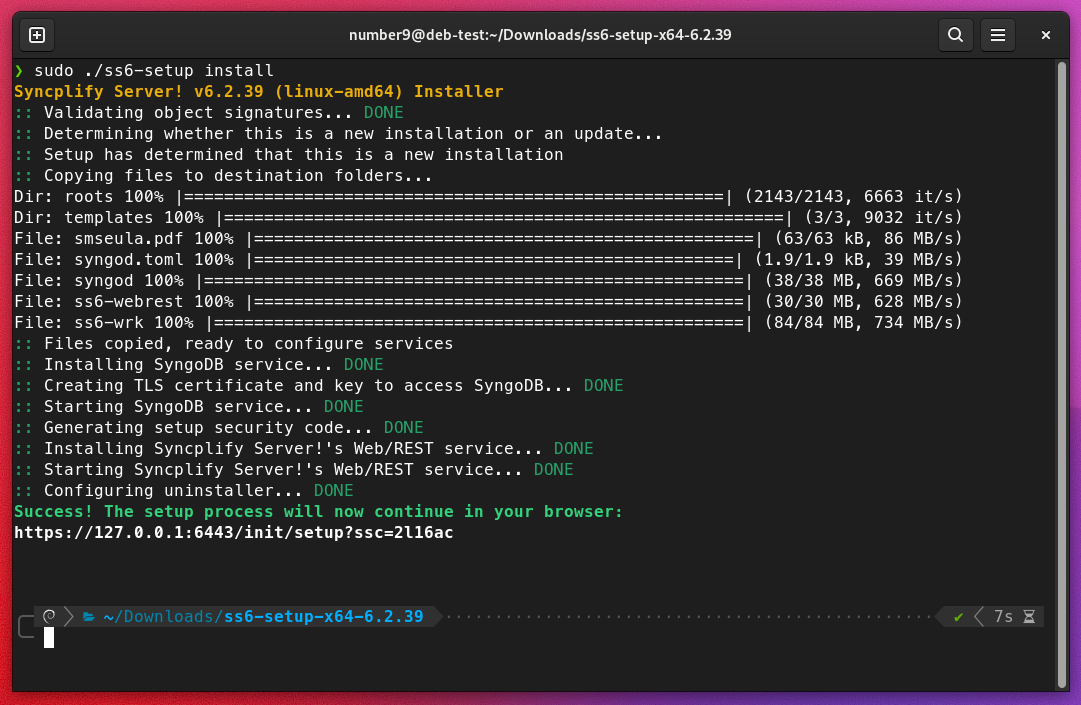
Be careful, the URL references localhost (127.0.0.1) but if you're using a browser on a different computer you will have to change 127.0.0.1 into the current IP address of the machine where you just installed Syncplify Server! on.
How to uninstall
To make uninstallation easier, the installer copies the ss6-setup executable to your /usr/bin directory. Therefore, in order to uninstall Syncplify Server! you can simply open a terminal window anywhere, and type:
sudo ss-setup uninstallAfter that, if you also want to remove the uninstaller, you may (optionally) want to do this, too:
sudo rm /usr/bin/ss-setupHow to update/upgrade
When the CLI installer is invoked with the install verb, it will automatically try to determine whether the software is already installed on the system, and - if that is the case - perform an update/upgrade rather than a new install.
There is, however, a way to force the CLI installer to perform an update/upgrade, when you already know that this is the case. You can simply add the --update flag to the install verb, like this:
sudo ./ss-setup install --updateAnd, just in case... you can also do a "repair"
Should anything happen, you can always use the same ss-setup you downloaded and extracted, to "repair" your currently deployed executable and back-end DB configuration, like this:
sudo ./ss-setup install --repairMore useful command-line flags
There are a couple additional command-line flags that you may want or need to use occasionally. Both of them are intended to be used in conjunction with the install verb.
| Flag | Purpose of the flag |
--trace |
Enables trace-level logging for the installation process. This will produce a larger and more detailed installation log, useful to identify the cause of possible installation issues. |
--norollback |
Typically, should something go wrong during installation, a rollback operation is performed, to leave your system unchanged. This flag disables such rollback, so that your system remains partially modified even after a failed installation. This is useful in some cases for debugging. |
That's it. :)
Deploy v8 with Docker
Syncplify Server! is available as a Docker image on Docker Hub. This page covers how to deploy and operate it using Docker Compose.
Prerequisites
- Linux host OS (we don't support Docker on Windows yet...)
- Docker Engine 24.0 or later
- Docker Compose v2 (the
docker composeplugin, not the legacydocker-compose) - The host must not already use ports 21, 22, 990, 6443, or 6444 for other services
Deploying with Docker Compose
Create a docker-compose.yml file on your Docker host with the following content:
services:
  syncplify-server:
    image: syncplify/ss:latest
    container_name: syncplify-server
    restart: unless-stopped
    environment:
      # Activates the in-process worker supervisor (replaces systemd).
      # Do NOT remove or change this variable.
      - SS_CONTAINER_MODE=1
    ports:
      - "22:22"
      - "21:21"
      - "990:990"
      - "6443:6443"
      - "6444:6444"
      - "44388:44388"
    volumes:
      - /opt/Syncplify/Server/data:/opt/Syncplify/Server/data
      - /opt/Syncplify/Server/log:/opt/Syncplify/Server/log
      # Add one volume mount for each directory you want the SFTP/FTP server
      # to be able to use as a home or root directory for your users.
      # Example:
      - /var/sftpdata:/var/sftpdata
      # Access to the host machine ID is required for licensing.
      - /etc/machine-id:/etc/machine-id:ro
IMPORTANT: Any host directory that you intend to use as a virtual site root, user home, or shared folder must be mounted into the container. The container cannot access host paths that are not explicitly listed under volumes. Add one entry per directory, keeping the host path and container path identical (e.g. - /var/sftpdata:/var/sftpdata). You can use any path that suits your environment.
Then follow the steps below.
1. Create persistent directories
sudo mkdir -p /opt/Syncplify/Server/data /opt/Syncplify/Server/log /var/sftpdataAll configuration, the license file, virtual-site definitions, and the internal database are stored under /opt/Syncplify/Server/data. Logs are written to /opt/Syncplify/Server/log. Both directories survive container restarts and upgrades.
2. Pull the image and start
docker compose pull
docker compose up -d
On the first start the container initializes a clean installation automatically.
3. Complete initial setup
Open a browser and navigate to: https://your-docker-host:6443/init/setup
Follow the on-screen setup wizard to create your first administrator account, configure your license, and set up virtual sites.
IMPORTANT: During initial setup, the setup wizard is accessible to any client that can reach port 6443. Ensure this port is not publicly reachable until setup is complete. You can restrict access temporarily using host firewall rules or Docker network policies.
A more detailed explanation is available in our official manual/documentation.
Updating/upgrading Syncplify Server!: GENERAL RULES
The process to update or upgrade your Syncplify Server! falls into one of the following scenarios. Please read the one that applies to your current situation.
Updating within the same major version (ex: from v8.x.y to v8.w.z)
If the major version remains the same, updating your software to the most recent release is very straightforward: simply download the installer from our official website, and run it.
Your virtual sites, users, VFSs, and configuration will be kept and upgraded automatically as well, so this is truly an automatic and hassle-free procedure.
Upgrading from V6/V7 to V8 (non HA)
Whether you are upgrading from V6 or V7, the procedure is identical. The same steps described in the linked article apply regardless of which version you are currently running.
Since V6, Syncplify Server! has been built on the same architectural foundation, making the upgrade process identical across all versions from V6 onwards. Simply download the V8 installer and run it. Your configuration, virtual sites, users, and VFSs are preserved automatically. For step-by-step instructions, read the other, more detailed, update/upgrade related articles in this knowledge base.
Upgrading from V6/V7 to V8 (for HA deployments)
Since high-availability (HA) has been completely redesigned and reimplemented from scratch in v8, upgrading high-availability (HA) deployments from v6/v7 to v8 requires a more careful planning, and a specific procedure. In short, you will have to:
- Detach and decommission all HA nodes except your first node from your current v6/v7 HA cluster - this will turn your v6/v7 first node into a standalone server (non HA)
- Upgrade the now-standalone node to v8 following the usual procedure
- Then uninstall v6/v6 from your other nodes (2 though N) and install v8 fresh on those nodes adding it to the now-v8 first node to recreate your HA cluster anew
Be advised that any update requires an active maintenance/support plan, the installer will warn you if your maintenance/support plan is expired to give you a chance to renew it.
Upgrading from an older version (v4/v5 to v8)
You can perform an upgrade from an older v4/v5 version of our software. Versions 1 through 3 are too old and cannot be upgraded to v8 (read below in the third section of this article).
These upgrades from v4/v5 are relatively easy, but they do require you to perform a few manual steps, to make sure we describe the entire process and all of its implications in enough detail, with precision and thoroughness, we have written a dedicated knowledge base article on this specific topic.
Please note that you'll need a v8 license, your old v4/v5 license won't work, but if you have an active maintenance/support plan you can request a v8 license FOR FREE.
Upgrading from v1/v2/v3
Upgrading from any version older than v4 is not possible. Versions 1 through 3 were based on a totally different (and now discontinued) technology, so their configuration is not exportable and therefore it cannot be imported into v8.
So, if you're running any version of our software between v1 and v3, your only option is to deploy a brand new and fresh v8, and configure it anew (from scratch). Sorry about that, we had no other option.
Upgrading from v4/v5 to v8
Upgrading from an old (discontinued and unsupported) Syncplify.me Server! v4 or v5 to Syncplify Server! v8 is a process that requires careful planning. The purpose of this article is to help the system administrator minimize this task's complexity.
Before you begin, make sure to execute these twoi preparatory steps:
- Upgrade to the latest release of your current v4/v5 version
- Take a backup of your old V4 or V5
Once you have performed the two preparatory steps, and you have the backup file from your old installation ready at hand, please make sure you read these few short observations and recommendations, they will save you a lot of headaches in the future:
- Windows Users/Groups have been dropped: this is not a Windows-only software anymore; starting with version 6, Syncplify Server! is cross-platform (Windows and Linux) so all dependencies that are uniquely tied to a specific operating system had to be removed (Active Directory users/groups are still supported and will be imported as LDAP users/groups)
- LDAP settings are now stricter: all security aspects of your LDAP connections have been boosted and improved, this though may require some reconfiguration of your settings, please make sure you check out the relevant manual section
- Your scripts (if any) will be lost: after 8 years of honorable service, we had to say goodbye to our old scripting engine; in the spirit of unifying and uniforming our product suite, all of our software products will from now on utilize SyncJS (same as AFT!) as their only built-in scripting language
- Old or insecure host keys will not be imported: the import (restore) process checks all of the host keys in your backup, if any of them is found to be insecure it will not be imported and a new host key will be auto-generated in its place
- [Related to the above] If The ssh-rsa PKI-auth algorithm may become disabled after upgrade: there are many good reasons to ditch the RSA algorithm entirely, but if your setup or your clients need it, this article explains how to use it.
- Encrypted VFSs (if any) cannot be imported, and the users using them won't be imported either (as a consequence) - there is a way to decrypt your old V4/V5 at-rest encrypted VFS contents but you will still have to recreate your VFS profiles and users accounts manually afterwards in your new v8 (this was sadly necessary, as the AES "mode" used in our old V4/V5 at-rest encrypted VFSs is no longer considered secure by the researchers at NIST)
- Passwords containing certain specific special characters (like for example) won't work after importing them in v8: the problem is not v8, but a self-consistent encoding bug in the old v4/v5. Most of your passwords will work just fine after upgrading to v8, only those containing a tiny subset of special characters won't, but you can re-set them (set them again) in v8, including the offending special characters, and after re-setting them they will work just fine in v8 as well (let us reinforce the fact that v8 has no problem with any special character, the problem was the old v4/v5).
- User account limits may have changed: the BASIC edition now supports up to 100 user accounts, while the PROFESSIONAL and ULTIMATE editions still support an unlimited number of accounts; please assess whether or not you might need to upgrade your license to a higher edition of our software
- Other minor changes here and there: minor things like, for example, certificates must be imported using their PEM-encoded (cross-platform) format, old/insecure encryption and key-exchange algorithms have been dropped... basically, after the upgrade it's recommended to check the entire configuration to make sure it's still 100% consistent
For these reasons we do not recommend in-place upgrades, what we recommend instead is to perform a migration-upgrade. Please, read below for more details.
Performing a migration-upgrade is as simple as:
- Installing Syncplify Server! V8 on a new machine or VM (fresh operating system preferably)
- Importing your old V4/V5 backup in 1 click
Important note for existing V4/V5 license holders: every new major version, traditionally, uses a new license code type, so if you own a v4/v5 license it won't work with v8. But if you do have an active maintenance/support subscription, you can simply request a free v8 upgraded license code by submitting a ticket here.
But what if, in spite of the best-practices and recommendations here above, you still wish to perform an in-place upgrade?
In-place upgrades are certainly possible, though not highly recommended. Here's the key points to keep in mind in order to successfully perform an in-place upgrade:
- First and foremost, before you start, take a full snapshot or backup of your machine/VM - this is the best way to roll-back your fully functional old v4/v5 in case anything happens
- The procedure explained here above (for migration-upgrades) remains valid for in-place upgrades as well, with only one remarkable difference (addition): AFTER taking your old v4/v5 backup, and BEFORE starting v8 installation, you'll have to stop and disable all of your old version's system services, as shown in the picture here below:

Final steps
As with all major version upgrades, upgrading to v8 provides an opportunity to review your entire configuration to enhance your security posture. We highly recommend taking advantage of this opportunity. If your previous version (the one you're upgrading from) was configured to use algorithms that are now considered weak, note that v8 may still support some of these algorithms for backward compatibility with legacy systems. After completing the upgrade, you may want to manually disable these weaker algorithms to ensure optimal security.
Upgrading from v6/v7 to v8 (Windows)
This article covers the upgrade process from Syncplify Server version 6/7 to version 8 on Windows systems. The accompanying video demonstrates each step of this straightforward procedure.
The procedure below only applies to stand-alone server upgrades, if you're running a Syncplify Server! v6/v7 HA cluster, please, check out this article instead.
Prerequisites
Before beginning the upgrade:
- Ensure you have a functional Syncplify Server v6/v7 installation
- Ensure you have a valid license with active maintenance/support plan coverage (as a general rule, an active maintenance plan is required for all upgrades)
- Download the most recent version of the software
- Close any applications that might be accessing the server
Upgrade Process
The upgrade from v6/v7 to v8 is designed to be seamless and automatic:
- Run the installer - Double-click the v8 installer executable
- Grant privileges - Accept the Windows User Account Control (UAC) prompt
- Accept license - Review and accept the software license agreement
- Wait for completion - The installer handles all migration tasks automatically
Post-Upgrade Verification
After installation completes:
- Refresh your browser (F5) to load the new interface
- Verify your virtual sites are functioning correctly
- Confirm your license information transferred properly
- Log into each virtual site's Admin UI and carefully double check every setting
Important Notes
- All existing configurations, virtual sites, and license information are preserved during the upgrade
- No manual migration steps are required
- The upgrade process typically completes within a few minutes
- Your server will be briefly unavailable during the installation
Need Help?
Watch the demonstration video below for a visual walkthrough of this process, or contact support if you encounter any issues during your upgrade, please, log into your Syncplify Customer Portal and submit a support ticket from there.
Upgrading from v6/v7 to v8 (Linux)
System Requirements
Before starting the upgrade process, ensure your Linux system meets the requirements for Syncplify Server! v8 and that you have administrative privileges (sudo access).
The procedure below only applies to stand-alone server upgrades, if you're running a Syncplify Server! v6/v7 HA cluster, please, check out this article instead.
Prerequisites Checklist
- Take a full system backup or VM snapshot to quickly go back in time should anything bad happen
- Have an active Syncplify Server! v6/v7 installation
- Valid license with active maintenance/support plan coverage (as a general rule, an active maintenance plan is required for all upgrades)
- Have root or sudo privileges on the target system
- Backup of current configuration (recommended)
Perform the Upgrade
- Download the most recent version of the software
- Extract the archive in a temporary location
- Open a terminal window in the directory where you extracted the installation files
- Type
sudo ./ss-setup installand follow the on-screen prompts
Post-Upgrade Steps
After the upgrade completes successfully:
- Clear your browser cache if the interface appears outdated
- Test all configured virtual sites for proper functionality
- Verify user accounts and permissions are intact
- Review the updated manual and documentation for new v8 features
Upgrading a v6/v7 high-availability (HA) cluster to v8
If you are running a Syncplify Server! v6/v7 HA cluster, then you probably already know that the most significant enhancement v8 bring to the game is its 100% new, much improved, and completely revolutionized HA subsystem.
A 100% new HA subsystem, though, also implies that old systems (v6/v7) and new systems (v8) are not designed to work together, and their underlying database layout is radically different, so in-place upgrades of v6/v7 HA clusters are strongly discouraged.
This here below is the correct (and the only formally sanctioned) way to perform such upgrade.
Before you begin: the procedure outlined here below requires that you own valid licenses for all of your current v6/v7 HA nodes, and that the maintenance/support plans for all such licenses are active and not expired.
Step #1: take a full backup or snapshot of your entire machine or VM
Better safe than sorry. A full system backup or a VM snapshot allows you to magically go back in time should anything undesirable happen during the upgrade process. This is only a precaution, though, as the procedure explained in this article is designed not to affect your running v6/v7 cluster at all.
Step #2: take a full backup of your v6/v7 configuration
This one is simple. Log into the SuperAdmin UI on any one of your v6/v7 HA cluster nodes, and export a full configuration backup from there. No need to do this on every node, a single backup exported from just one of your HA nodes already contains all you need to migrate the whole cluster to v8.
Step #3: install your first v8 node
This is a simple multi-step process:
- Spin up a new machine or VM, fresh operating system, nothing installed on it
- Follow the documented procedure, depending on your operating (Windows or Linux) to install your first Syncplify Server! v8 node as a stand-alone server
- After installation, import your v6/v7 backup into this newly deployed v8 node
Check point: once you get here you have a fully functional single-node (stand-alone) Syncplify Server! v8 node that has all of your old v6/v7 functionality... just not in HA (yet).
Step #4: recreate your HA cluster by adding more nodes
Now that your new v8 is up and running as a stand-alone server, test its functionality, and if it works as intended, you can follow the documented procedure to add additional nodes to it and re-establish your high-availability (HA) cluster.
Step #6: move your licenses
Your v8 cluster is ready and configured, but it's likely still running on the TRIAL licenses you activated as part of the setup process. If so, please do not forget to enact the documented procedure to move your licenses from your old v6/v7 nodes over to your new v8 nodes.
Success: if everything was executed correctly, you now have a fully functional Syncplify Server! v8 HA cluster running all the virtual sites, subsystems, and users that your previous v6/v7 cluster used to run.
Step #6 (optional): decommission your old v6/v7 nodes
Once you have verified that your new v8 cluster works perfectly, you may (under your sole and complete responsibility) want to decommission your old v6/v7 nodes to reclaim those resources or recondition them for different use.
Upgrading from v6 to v8 (when everything else fails)
More than 99.8% of v6 to v8 upgrades complete successfully without requiring any troubleshooting.
In very rare cases, the v6 database cannot be automatically exported. If this happens, there is a documented workaround available on our developers’ blog.
In an even smaller number of cases, all other documented upgrade methods may still fail (though it seems only on Windows). Only in those cases, please follow the procedure below. This method is guaranteed to work, but it does require several manual steps by the system administrator.
Step-by-Step Manual Upgrade Procedure
- Create a backup of your v6.2.60 configuration
Use the SuperAdmin UI to generate a full configuration backup. - Stop and disable all v6 system services
Stopping the services is not sufficient — they must also be disabled to prevent automatic restart. - Download the latest v8.x CLI installer
Download it from our website and make sure you select the CLI installer, not the GUI version.

- Extract the installer package
- Run the installer as Administrator
Execute the following command:.\ss-setup.exe install -F(The capital -F flag is essential.) - Import your v6 backup into v8
After the v8 installation completes successfully, log in to the v8 SuperAdmin UI and import the backup created in Step 1.
If you carefully follow the steps above, the upgrade to v8 will complete successfully and your configuration will be fully restored.
How to move/migrate your software to a different machine/VM
If you intend to do a migration-upgrade (move from one VM to another while upgrading the software at the same time, this article is not for you. You should follow this procedure instead.
This procedure applies only to Syncplify Server v6 and later versions. For older versions (v4 or v5), please use this other knowledge base article instead.
If you need to migrate your Syncplify Server! to a different/new machine or VM, please, keep in mind that this article explains the only correct procedure to accomplish the goal.
No worries, it's really easy. Simply follow these steps in this exact order:
- Log into the SuperAdmin web UI on your "old" machine/VM, the one you want to decommission, and take a full backup of Syncplify Server!'s configuration from the BACKUP page; then from the LICENSE page in the same UI use the Deactivate button to free up your license and be able to re-activate it later on your new VM
- Make sure you deploy a new machine/VM with a fresh operating system, and don't install anything else on it for now, only the operating system
- Copy the backup file (a .zip archive) to the new machine/VM
- Download the latest Syncplify Server! installer on the new machine/VM and install it as you normally would if it were a fresh/new deployment
- Once the installer is done you can log into your new Syncplify Server!'s SuperAdmin UI on the new machine/VM and do the following, in this exact order:
- activate the license first (the one you previously deactivated from the old machine/VM)
- from the RESTORE page in the SuperAdmin UI perform a restore of the backup you took from your old machine/VM onto this new node
IMPORTANT: when you use the Deactivate License function you're freeing up that license code so that it can be reactivated on another (different) machine, you will not be able to reactivate it on the same machine you have deactivated it from. This automatic deactivation requires your server to be online (have direct, unrestricted, unproxed Internet access), if you're running your server offline, please contact us to have your license deactivated.
How to recover (decrypt) old v4/v5 encrypted VFSs
As explained in our developers blog, starting from Syncplify Server! version 6 we had to change the way encrypted VFSs operate, because the old way (v4/v5) can no longer be considered 100% safe. This was not a lighthearted decision, but it had to be taken.
So what now? What does this entail for customers who were using these encrypted VFSs in old v4/v5, and now wish to upgrade to the latest v8 to take advantage of all the new features and its improved speed and stability?
Fear not. We have developed a little tool (mentioned in the blog article above) which can greatly help you with the transition.
Before we begin, it's important to understand one important detail: encrypted VFSs cannot be imported from a v4/v5 backup into your new v8, and as a result all user profiles using such encrypted VFSs also cannot be imported. So after upgrading to v8 your old encrypted VFSs (and the user profiles that used them) will be missing.
Here's what to do to recover access to the data stored in those old v4/v5 encrypted VFSs:
- Download the DiskAES256Decrypt.zip archive from our website, and extract it into a directory of your choice on the machine/VM where the encrypted VFSs content is stored
- Run it, and decrypt the content of each old v4/v5 encrypted VFS into fresh new empty folders (one per folder)
- In your new Syncplify Server! v8, create a new encrypted VFS for each one of the old ones, all of these new VFSs must point to empty folders/directories
- In your new Syncplify Server! v8, manually create the user profiles to use the newly created encrypted VFSs
- Use an actual SFTP client software to log into those user profiles and re-upload the contents from the decrypted (in clear) directories: Syncplify Server! v8 will then automatically re-encrypt all of those files as they are being uploaded via the SFTP client
This is a one-time operation, once done you'll be good to go for the entire life of your Syncplify Server! v8 (and all future versions for the foreseeable future).
High-Availability (HA) general concepts
The most important improvement brought about by Syncplify Server! version is the simplicity with which you can create a true active-active high-availability (HA) set with it.
In fact, as of version 5.x (and subsequent versions) you don’t have to deploy a database replica-set anymore, which is hard to do and requires at least 5 virtual machines (2 for the SFTP nodes, and 3 for the database); Syncplify Server! can achieve a fully fault-tolerant, active-active, highly-available deployment with as few as 2 nodes. To operate correctly, however, all nodes in the cluster must have their system clocks synchronized with a reliable time source. Enabling NTP on all nodes is the recommended way to ensure this requirement is consistently met.
Of course, Syncplify is in the secure file transfer business, not in the networking business nor in the storage business, so you’ll have to provide the networking and storage components yourself, but this is also true with any other SFTP server on the market.
So, without any further ado, let’s dig in.
If you do have a Load Balancer, we definitely recommend you use it. In such case your deployment will look somewhat like this:
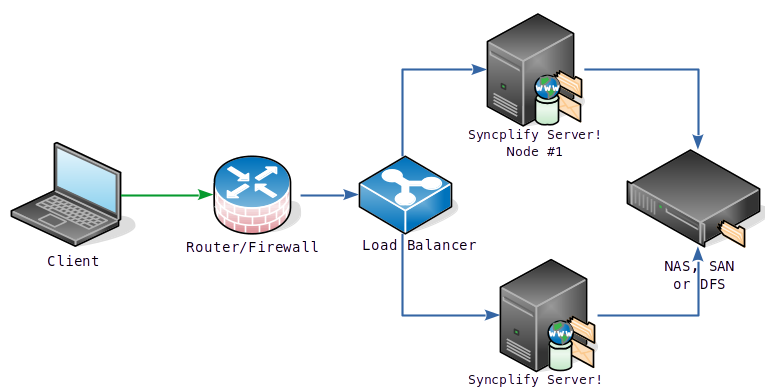
If you don’t have a Load Balancer, you can still achieve a remarkable level of High Availability by creating multiple “A records” on your DNS associated with the Host Name of the FTP/SFTP server, and configuring your DNS to provide round-robin responses. Clearly, unlike the Load.
Balancer, your DNS will not be able to probe your SFTP nodes to see if they’re alive, but it will direct all client connections equally to both nodes, de facto spreading out incoming traffic just like a load-balanced HA would.
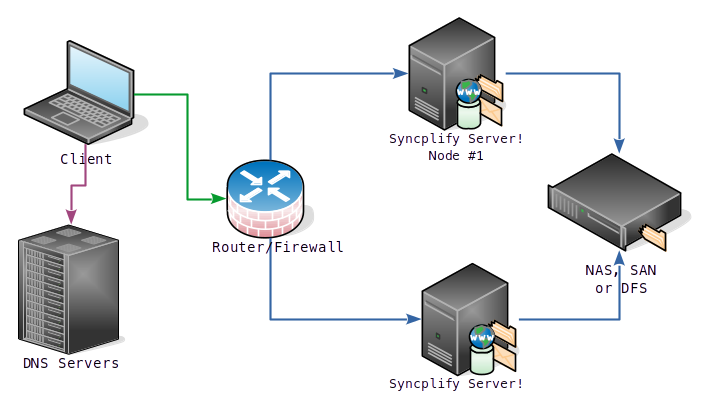
It is important to understand that in both of the cases shown here above, it is still your responsibility to provide shared storage to all SFTP nodes. In our charts, we show this can be a Windows DFS or a NAS or a SAN of your choice. It can also be any network file system that your SFTP nodes can access natively (for example, an iSCSI Target is perfectly fine).
High-Availability (HA): how to setup
This article assumes you've already read, understood, and are familiar with the general concepts explained here.
Once you have decided how to deploy your Syncplify Server! high-availability set, going from theory to practice is actually quite simple: it's just a two-step process.
Step #1: deploy the first node as if it were a single stand-alone server
This procedure is very well explained here (for Windows) and here (for Linux).
Before proceeding with Step #2, ensure that the system clock on every node in your HA cluster (including the one you are about to add) is synchronized with a reliable time source. The recommended way to achieve this is by enabling NTP on all nodes. If even a single node has an out-of-sync clock, the entire HA cluster will not function.
Step #2: adding the second (or n-th) node to make your HA set
If you are familiar with the single-node setup of Syncplify Server! (see step #1) then you surely have noticed that, at the beginning of the web-based part of the installation process, you're presented with the following choice:
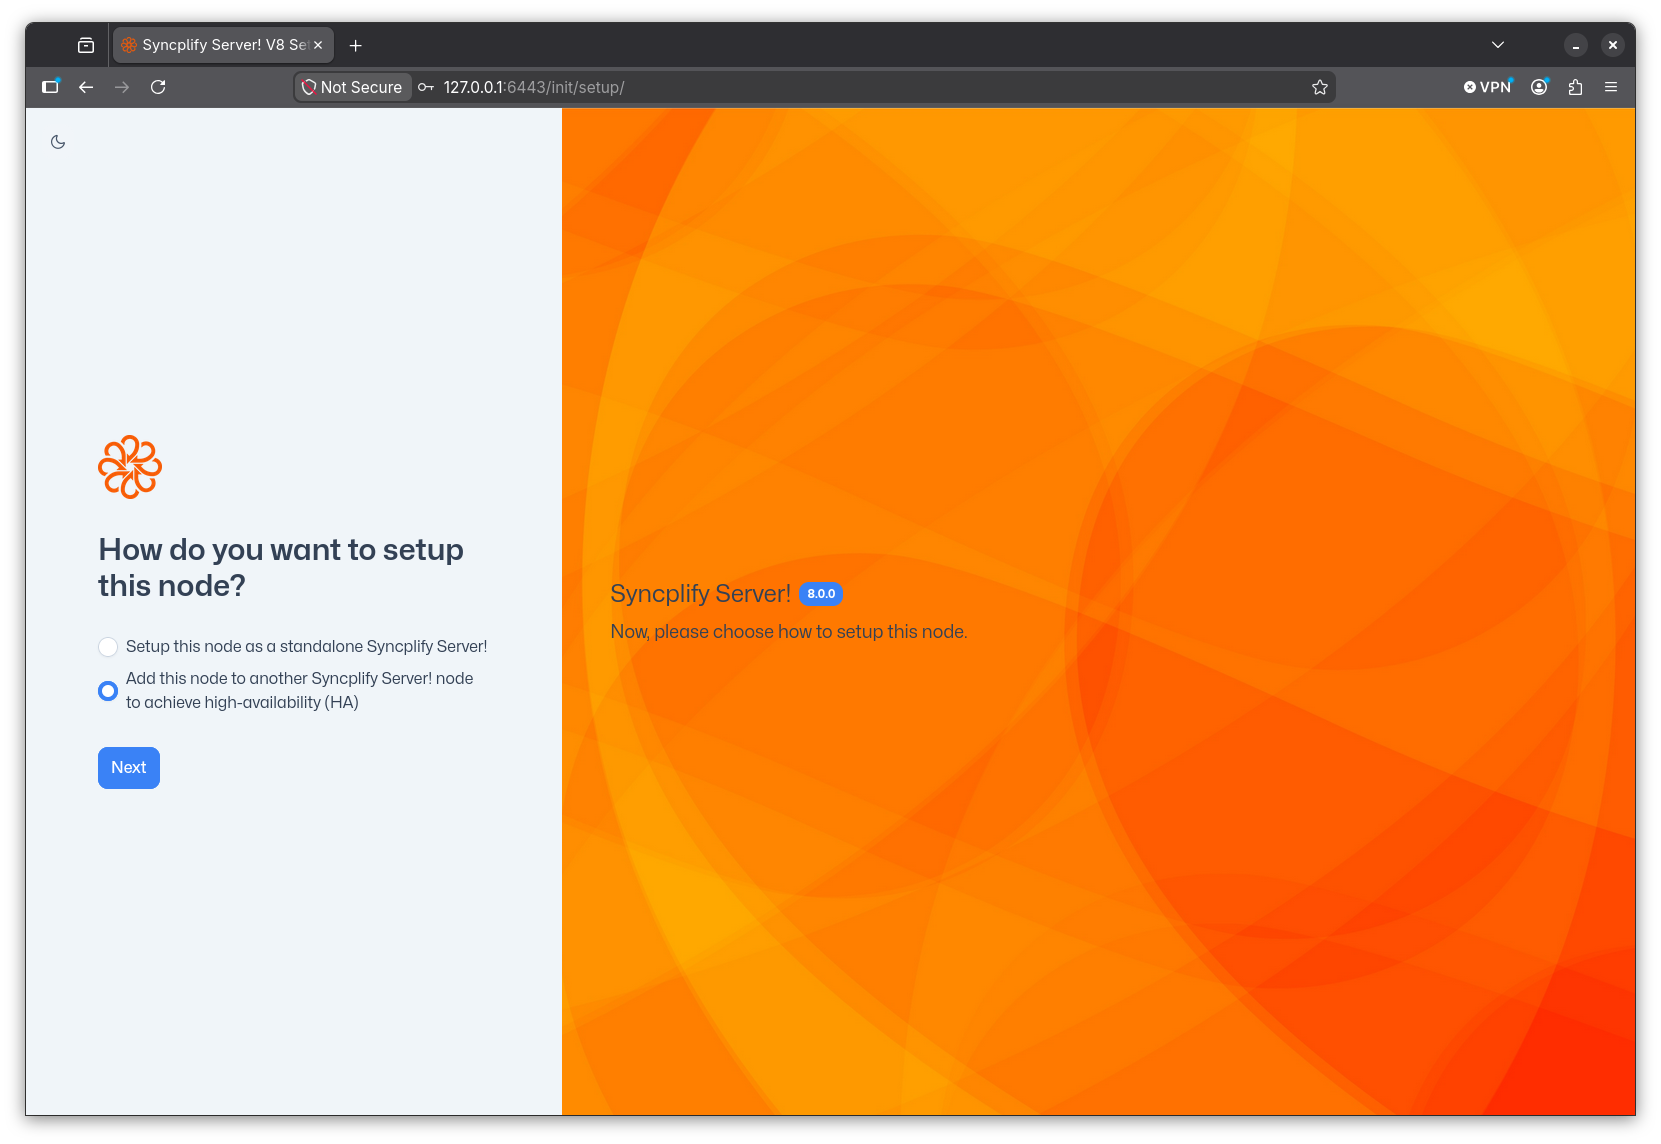
To deploy your HA set you simply have to install Syncplify Server! on another node (machine or VM) and, when presented with the above choice, you'll select the "Add this node to another..." option.
You will then need to type the IP address and port (separated by a single colon) of the first node, the one you previously installed as a single stand-alone server. For best performance and optimal routing you should always use the nodes' internal (LAN) IP addresses here.
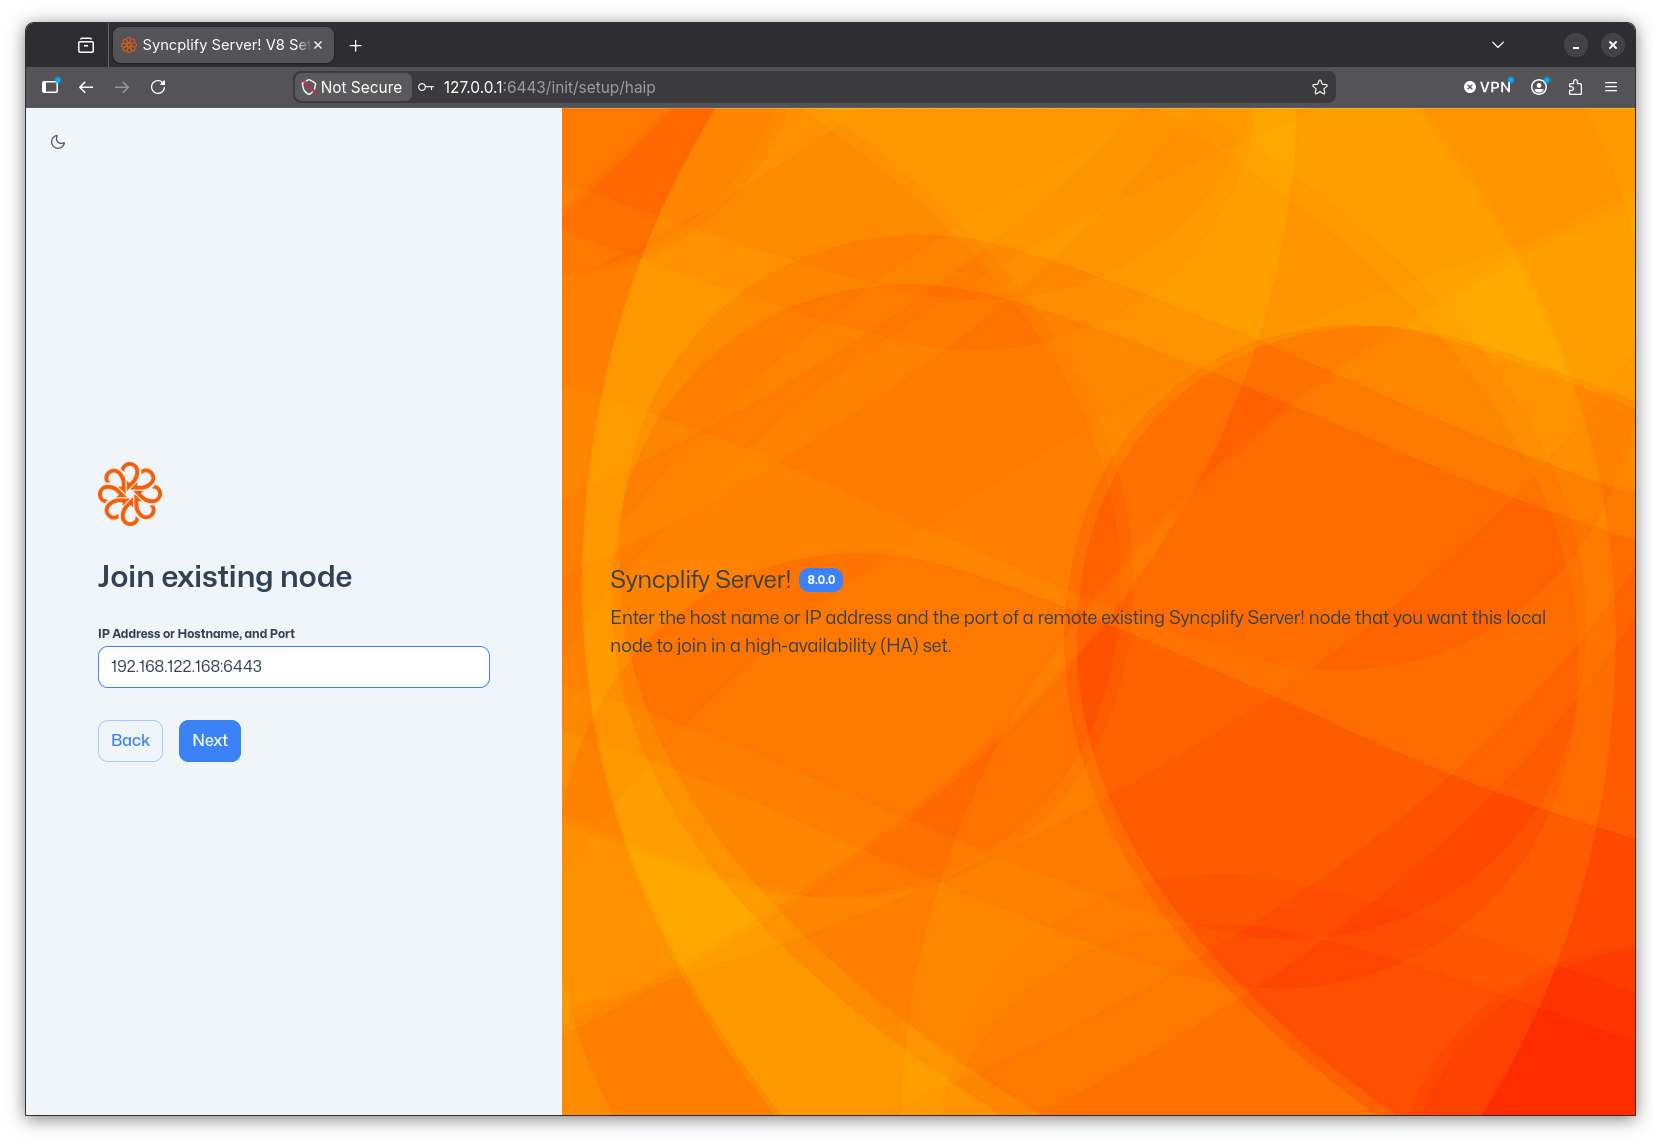
Do not try to be creative here, do not type anything exotic like the nodes' NetBEUI names "just because Windows knows it" or similar oddities. It will not work. Please, just follow the instructions and type the LAN IP address and port of the existing node you want to join to create your high-availability set. Thank you!
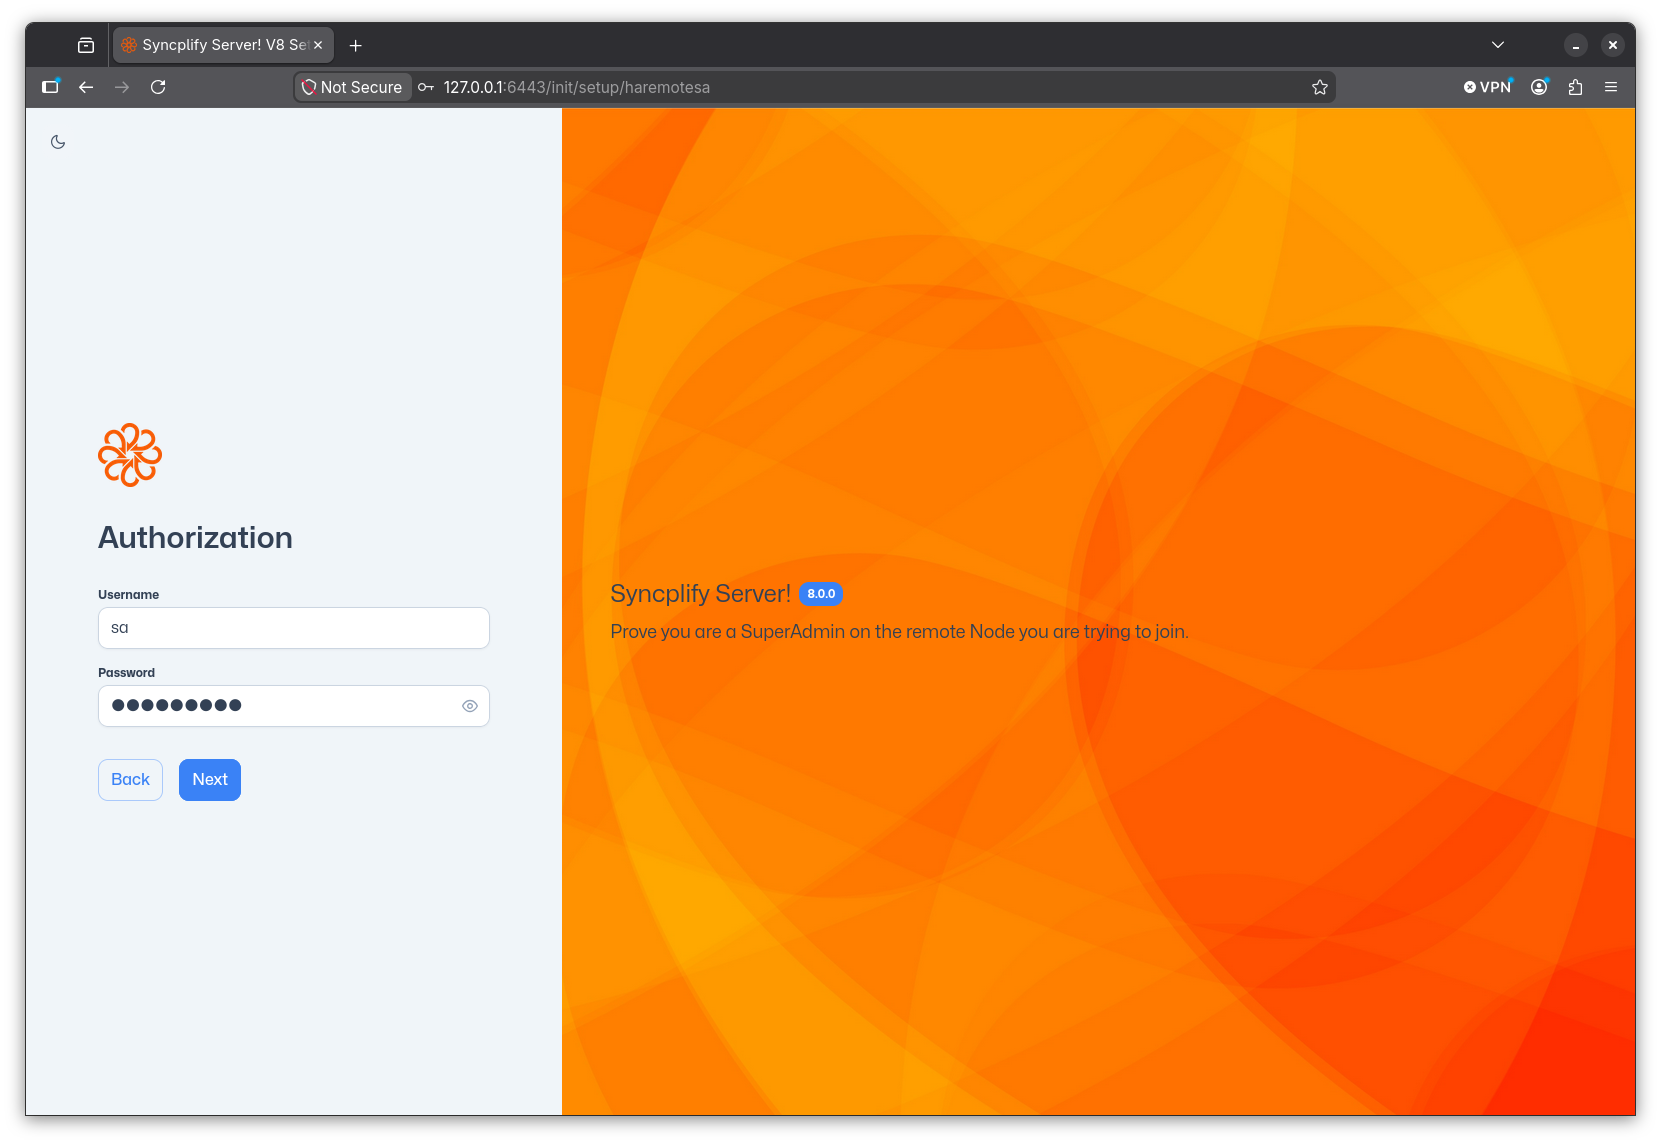
At this point you will have to provide the SuperAdmin credentials of the remote node you wish to join.
Once you click Next the node you're setting up with attempt to join the remote node to establish itself into the HA cluster. You will see a spinning progress - this process can take a while, so please be patient.

If everything goes well, once the newly installed node has become part of your HA cluster, you will simply be redirected to the SuperAdmin UI where you can login with the credentials you already know.
You'll notice a few things when you log into the SuperAdmin UI and your node is part of an HA cluster. Each virtual site card in the Virtual Sites page will now show the status of all the cluster nodes:
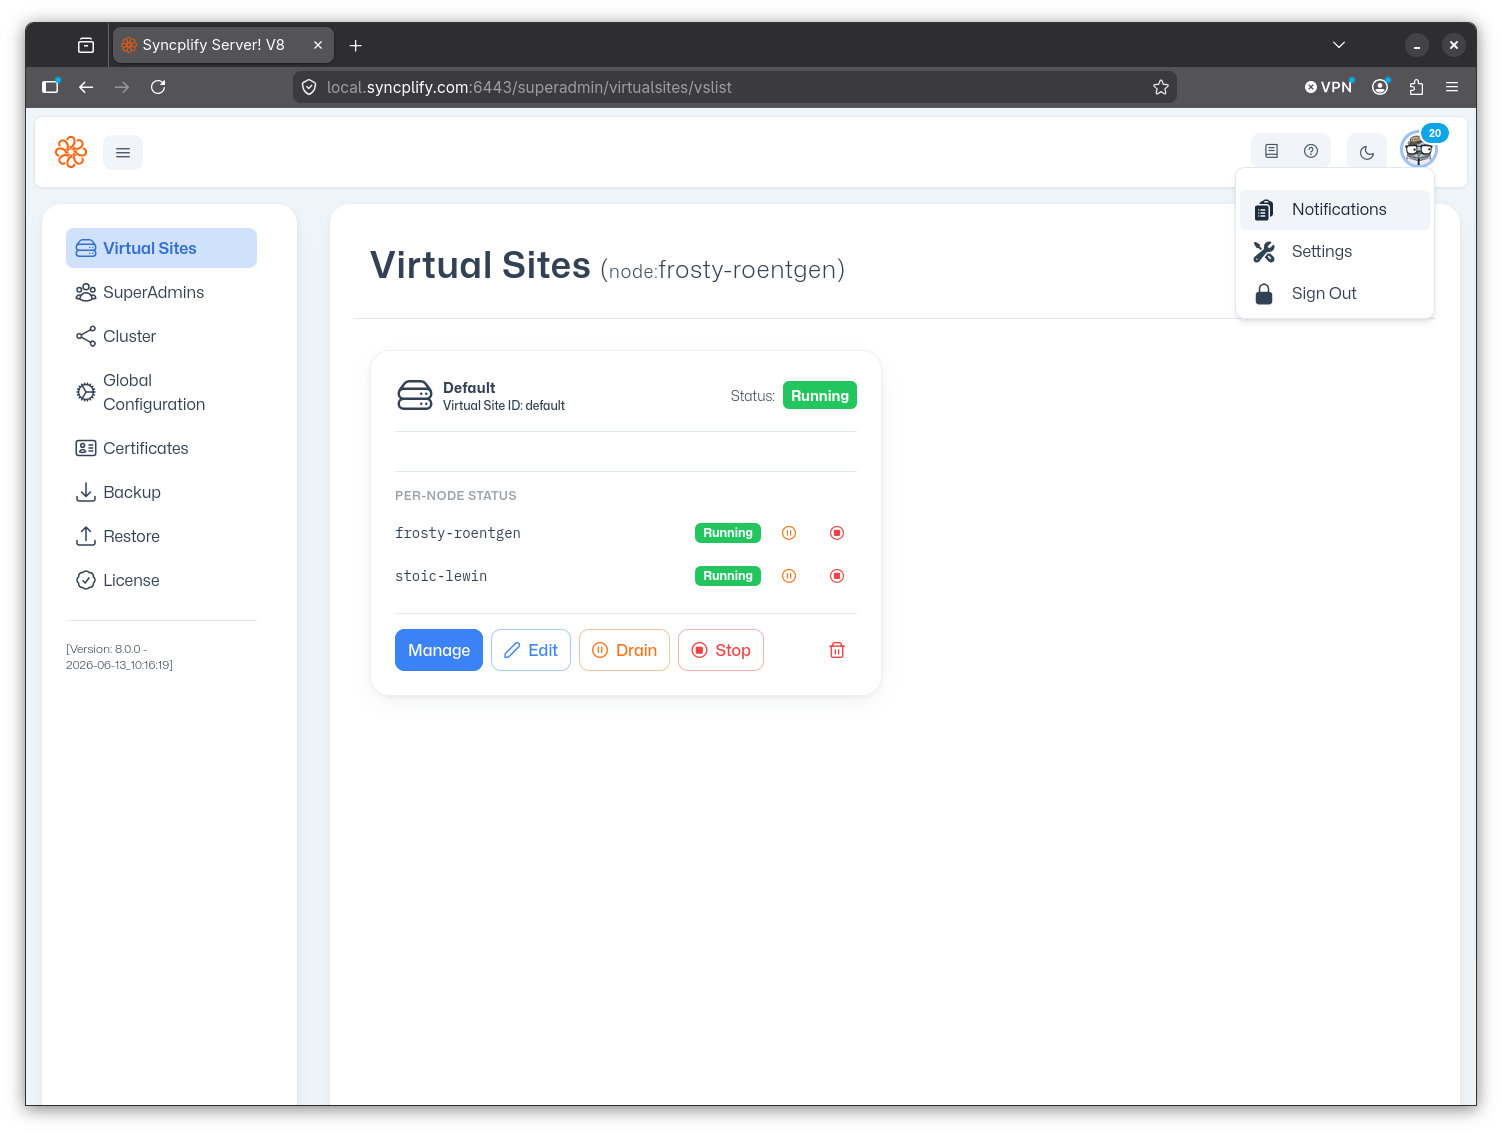
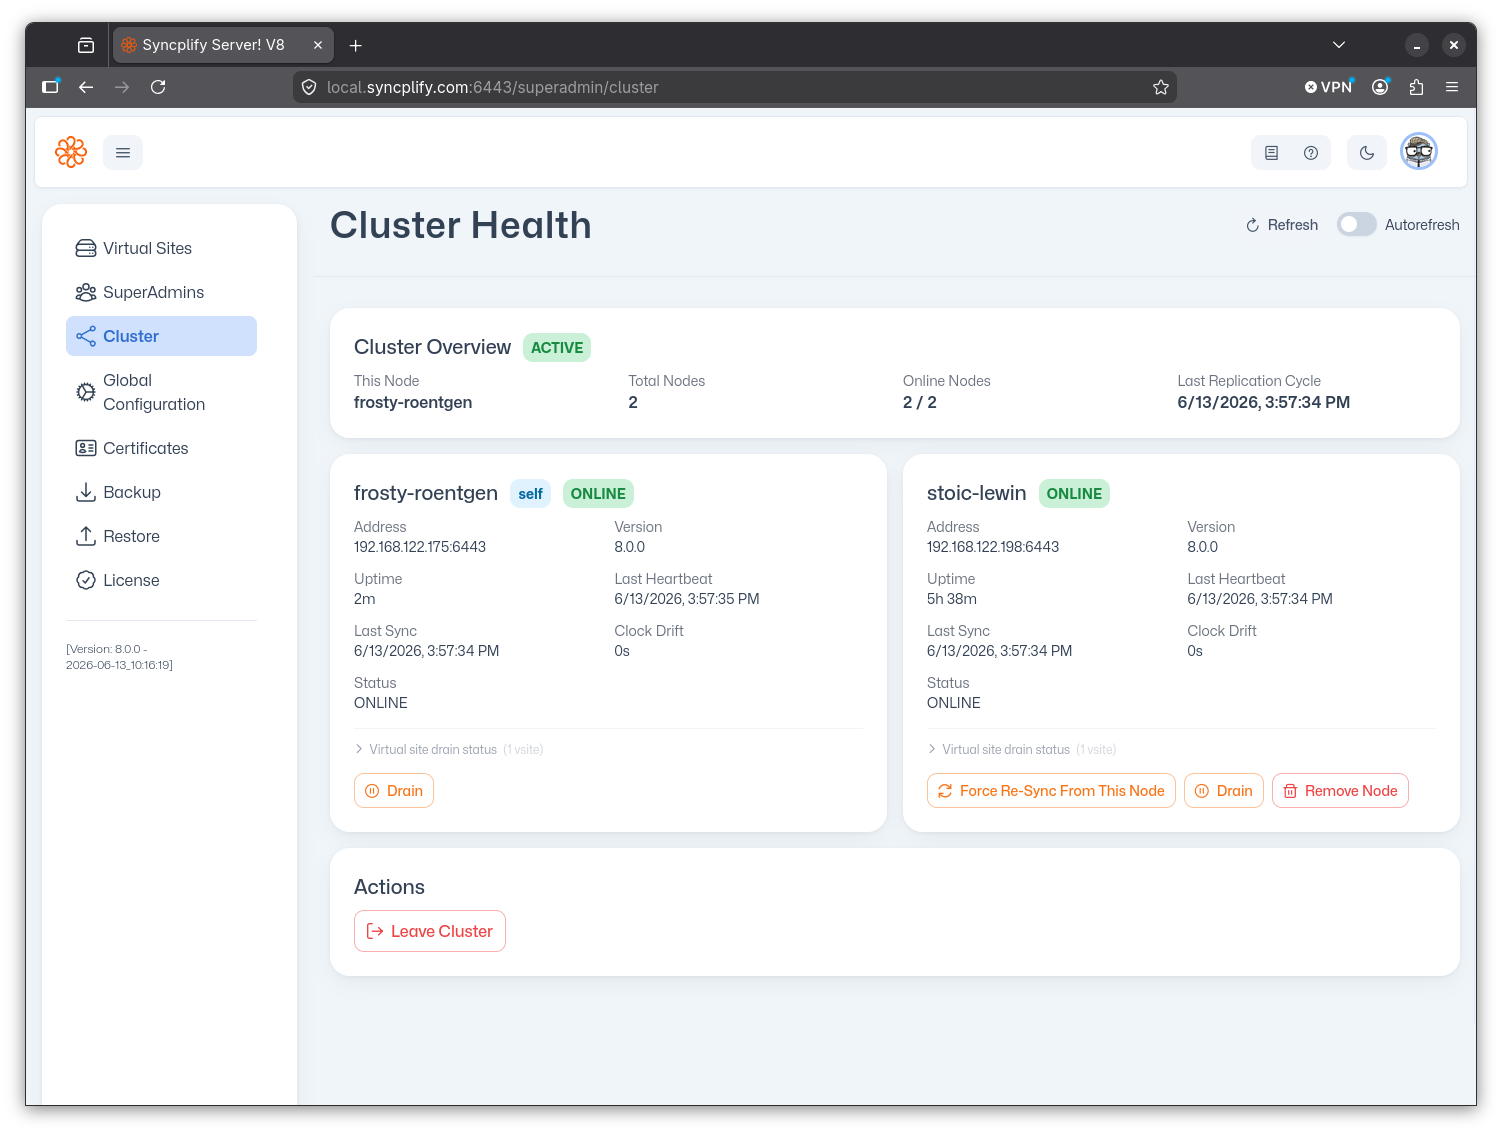
And there is now a new page in the SuperAdmin UI, called Cluster, that provides you full observability and maintenance actions for your entire HA cluster and each node that's part of it:
Step #3: safe-list your load balancer(s)
If your HA deployment includes a load balancer (or multiple load balancers), this step is mandatory.
Load balancers continuously probe SFTP nodes by opening connections and then closing them, often without completing authentication. This is normal and expected behavior. Syncplify Server!'s built-in Protector! mechanism, however, cannot distinguish between a load balancer health-check and a connection-flood attack. Without intervention, Protector! will eventually auto-block the load balancer's IP address, which will bring down the entire cluster from the clients' perspective.
The fix is straightforward: add the IP address of every load balancer to the safe-list. Safe-listed addresses are never auto-blocked by Protector!, regardless of how they behave. This is precisely the scenario the safe-list was designed for.
For a full explanation of the difference between the block-list, allow-list, and safe-list, see this article.
Licensing and license codes: a complete overview
In this article, we provide a compendium, sort of a min-FAQ, regarding the most common questions and pieces of knowledge that every Syncplify Server! user should know about Syncplify Server!'s licenses and licensing system. So here we go:
Is the license perpetual? Or is the maintenance/support plan mandatory?
Once a license has been activated, said license is perpetual relatively to the machine/VM it's been activated on, and a maintenance/support plan is not required to keep it active (as long as you never update the software).
Given the above very specific statement, it is of paramount importance to understand the following:
- An active maintenance/support plan is required to activate the license for the first time, or to reactivate the same license on a new machine/VM when you migrate the software to a new system
- An active maintenance/support plan is required to install any update or upgrade (major, minor, and hot-fixes)
What’s the license code format?
License codes look kind-of like this: S6UF-R3EP-9XDJ-BJJ7-U33Z-PKGA (not a real license, just meant as an example)
The first two characters (here above highlighted in green) are always the letter S followed by the major version the license is applicable to. So you know what version of the software can accept the license you're looking at.
Will my old (v4, v3, v5…) license code work with the most recent version of the software?
No. As you can guess by the different license code formats, you need a license code that was issued for the exact version of the software you are trying to activate. The good news is, though, that if you are covered by a maintenance/support plan, you can request one for free to Syncplify.
I have an active maintenance/support subscription for an older version, and I wish to convert it to a maintenance/support plan for the most recent version. How do I do that?
Simply open a support ticket with Syncplify, and our team will provide a dedicated link and proper instructions on how to do so.
I run Syncplify Server! on dynamic hardware, and every so often my v3/v4/v5 license reverted back to “free” because hardware changes were detected. Will this still happen with v6+ licenses?
No. We’ve done a lot of work to change this behavior, and we are confident that deactivations “by mistake” should not occur anymore. Our software can now tell the difference between, say, resizing an existing VM, and moving to an entirely different VM. Your v6/v7/v8 license will remain active as long as you make changes to the hardware of your existing VM, and will self-deactivate only if you try to use it also on a different VM. This provides us with a decent level of protection against abuse, but – more importantly – provides our customers with the level of flexibility they need to run our software in virtualized/cloud/elastic environments.
Will my license expire? Do I have to renew it?
No. Licenses never expire, if you never alter, move, or update/upgrade the software. But licenses can automatically self-deactivate if you do something you're not entitled to, like updating/upgrading the software while not covered by a maintenance/support plan. That's why we strongly encourage all customers to keep their maintenance/support plan current, and to renew it every year: that way all updates/upgrades within the same major version will be totally free of charge, and between different major versions they will come with significant discounts. Not to mention that you need an active maintenance/support plan in order to request support if you need it.