# Syncplify AFT!
# Operation
Topics that cover typical operational tasks in Syncplify AFT!
# Understanding what Syncplify AFT! is
True **Managed File Transfer (MFT)** requires the interoperation of 2 parts:
- a file transfer server (that's what [Syncplify Server!](https://www.syncplify.me/syncplify-server.html) is)
- an automated file transfer client (that's what [Syncplify AFT!](https://www.syncplify.me/aft-client.html) is)
While Syncplify Server! has been well established on the market as one of the overall best SFTP/FTPS servers for several years, we just recently released its MFT counterpart: **Syncplify AFT!**
The video here below shows the main features found in **Syncplify AFT!** and is a good general overview of the product itself.
# Breaking Changes: AFT! v3 to v4
This document lists every change in AFT! v4 that requires a script or configuration to be updated before it will run as expected. Read it before upgrading any production instance.
The short answer for most users: **the vast majority of AFT! v3 scripts will run in v4** without any modification. The only scripts that need changes are those that use any of the features listed below.
#### `FsWatcher.Start()` now requires a callback
V3 pattern (no longer works):
```javascript
watcher.Start();
while (true) {
Sleep(500);
if (HaltSignalReceived) {
break;
}
var evt = watcher.Events();
for (var i = 0; i < evt.length; i++) {
if (evt[i].Event == 'WRITE') {
doSomethingWith(evt[i].Object);
}
}
}
```
V4 pattern (new):
```javascript
watcher.Start(function(evt) {
// evt = { TimeStamp, Event, Object }
if (evt.Event == EVT_WRITE) {
doSomethingWith(evt.Object);
}
});
WaitForHaltSignal();
watcher.Stop();
```
**What changed:**
- `Start()` now requires a callback function as its only argument. Calling it with no arguments silently does nothing.
- `Events()` has been removed. There is no longer a queue to poll.
- `WaitForHaltSignal()` replaces the `while/Sleep/HaltSignalReceived` loop. It blocks until a halt signal is received, using no CPU and producing no log noise.
- `Stop()` is a new required step after `WaitForHaltSignal()` returns. It waits until the internal event goroutine has fully exited before returning, ensuring no further callbacks fire after the script continues past that point.
**Event-type note:** in v3 the event types were uppercase strings (`"WRITE"`, `"CREATE"`, `"REMOVE"`, `"RENAME"`, `"CHMOD"`). In v4 they are now named constants (`EVT_WRITE`, `EVT_CREATE`, `EVT_REMOVE`, `EVT_RENAME`, `EVT_CHMOD`). Update any `==` comparisons accordingly.
#### RemoteWatcher constructor now takes a VFS name
V3 pattern (no longer works):
```javascript
var rcli = new SftpClient();
rcli.Host = 'files.example.com:22';
rcli.User = 'uploader';
rcli.Pass = 's3cr3t';
rcli.Connect();
var rw = new RemoteWatcher(rcli);
```
V4 pattern (new):
```javascript
// "production-sftp" is the name of an entry in the AFT! VFS Library
var rw = new RemoteWatcher("production-sftp");
```
**What changed:** the constructor no longer accepts a live client object. It accepts a string: the name of a named VFS connection profile stored in the AFT! Virtual File Systems library. The engine resolves the profile, decrypts its credentials, and opens the connection internally. Credentials never appear in script source code in v4.
**To migrate:** create a Virtual File System entry for each remote system your RemoteWatcher scripts target, then replace the client construction code with `new RemoteWatcher("profile-name")`.
#### `HaltSignalReceived` is now a function, not a property
V3 pattern (no longer works):
```javascript
if (HaltSignalReceived) { // property access, no parentheses
break;
}
```
V4 pattern (new):
```javascript
if (HaltSignalReceived()) { // function call, parentheses required
break;
}
```
**Why this matters:** in v4, `HaltSignalReceived` is a JavaScript function. A bare reference to a function (without calling it) is always truthy in JavaScript, regardless of the actual halt state. A script that uses `if (HaltSignalReceived)` without parentheses will evaluate the condition as `true` on the very first iteration and **exit immediately**, never processing any events.
**Note:** most scripts that reach v4 with `FsWatcher` or `RemoteWatcher` will be rewritten to use the callback pattern and `WaitForHaltSignal()` anyway, at which point this property is rarely needed. It remains available for scripts that prefer explicit polling.
#### `*FromSecret` credential properties have been removed
In v3, every client object exposed shortcut properties that accepted a secret name and resolved it internally. These properties no longer exist in v4.
V3 pattern (no longer works):
```javascript
var sftpcli = new SftpClient();
sftpcli.User = 'uploader';
sftpcli.PassFromSecret = 'name-of-my-secret'; // v3 shortcut property
var s3cli = new S3Client();
s3cli.APIKeySecretFromSecret = 'aws-secret-name'; // v3 S3 shortcut property
cli.Options.OTFEKeyFromSecret = 'otfe-key-secret'; // v3 OTFE shortcut property
```
V4 pattern (new):
```javascript
var sftpcli = new SftpClient();
sftpcli.User = 'uploader';
sftpcli.Pass = GetSecret('name-of-my-secret'); // call GetSecret() inline
var s3cli = new S3Client();
s3cli.AccessSecret = GetSecret('aws-secret-name'); // AccessSecret is the v4 field name
cli.Options.OTFEKey = GetSecret('otfe-key-secret'); // OTFEKey is the v4 field name
```
**What changed:** the `*FromSecret` shortcut properties (`PassFromSecret`, `APIKeySecretFromSecret`, `Options.OTFEKeyFromSecret`, and any others of the same pattern) have been removed. In v4 `GetSecret("name")` is a first-class global function. Call it directly and assign its return value to the appropriate credential field.
**Migration:** search all script files for the string `FromSecret`. Each occurrence maps mechanically to a `GetSecret()` call: replace `client.XFromSecret = "name"` with `client.X = GetSecret("name")`, substituting the base field name (`Pass`, `AccessSecret`, `OTFEKey`, etc.).
#### Admin accounts are not migrated
AFT! v3 stored admin passwords as SHA-256 hashes of `random_salt + username + password`. AFT! v4 uses **bcrypt**, which is an incompatible format. Because the plain-text passwords cannot be recovered from the v3 hashes, migrating admin accounts would only produce accounts that nobody could log into.
`aft import-from-aft3`, therefore, does not import any admin profiles. AFT! v4 creates the initial admin account during first-run setup. Any additional admin accounts must be recreated manually in the v4 web UI after the initial setup is complete.
#### Blockly script type removed
AFT! v3 allowed scripts to be authored in Blockly (a visual block-based editor). AFT! v4 supports only SyncJS JavaScript scripts. Blockly scripts are skipped during migration with a warning listing each one by name; they cannot be run in v4.
If any Blockly scripts are still in use, their logic must be rewritten from scratch in JavaScript after upgrading.
# How to trigger AFT! jobs from the command line
AFT! provides two commands for running scripts from a shell or a CI/CD pipeline.
**Command**
**What it does**
`aft start`
Calls the REST API of a running AFT! instance and queues the job there. The script runs inside the service, with full access to the VFS Library and secrets. Returns immediately; the job runs in the background.
`aft run`
Executes a `.syncjs` file directly in the calling shell process. No API key needed. The script runs to completion before the command returns.
#### `aft start`: trigger a stored script via API
##### Prerequisite
Create an API key in the AFT! web UI under Settings > API Keys. Make sure the key's IP allowlist includes the machine you will be calling from. For calls from the same machine, 127.0.0.1 is sufficient.
[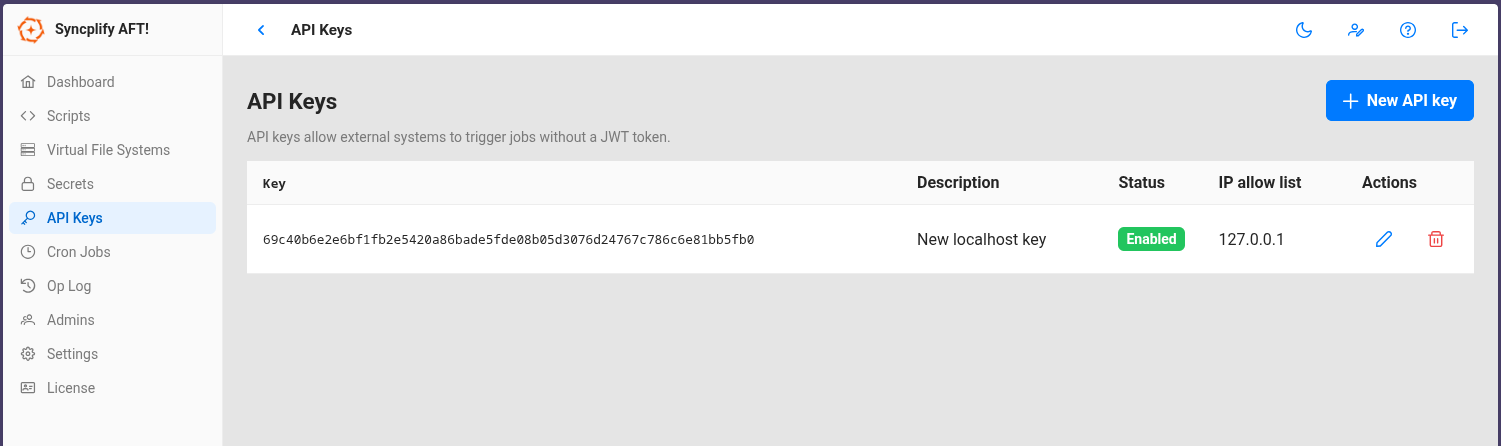](https://kb.syncplify.com/uploads/images/gallery/2026-04/image.png)
##### Minimal example
Linux/MacOS:
```bash
./aft start -n "My Backup Job" -a "xiM2ruBm2QZkhTSN6BPd9BqmxVEBVbrgNYVMkNQb6hfj"
```
Windows (PowerShell):
```powershell
.\aft.exe start -n "My Backup Job" -a "xiM2ruBm2QZkhTSN6BPd9BqmxVEBVbrgNYVMkNQb6hfj"
```
Script names are matched case-insensitively.
##### With parameters and a remote instance
Linux/MacOS:
```bash
aft start \
-n "My Backup Job" \
-a "xiM2ruBm2QZkhTSN6BPd9BqmxVEBVbrgNYVMkNQb6hfj" \
--params '{"character":"goofy"}' \
--host "192.168.1.10:44399"
```
Windows (PowerShell):
```powershell
.\aft.exe start `
-n "My Backup Job" `
-a "xiM2ruBm2QZkhTSN6BPd9BqmxVEBVbrgNYVMkNQb6hfj" `
--params '{"character":"goofy"}' `
--host "192.168.1.10:44399"
```
Inside the script, read the parameter with `Param("character")`.
`--host` defaults to `127.0.0.1:44399` when omitted.
#### `aft run`: execute a script file directly
The ***Allow CLI Run*** option must be enabled in AFT! Settings. It is **disabled by default** but an administrator can enable it.
##### Minimal example
Linux/MacOS:
```bash
./aft run -f "/opt/scripts/my-transfer.syncjs"
```
Windows (PowerShell):
```powershell
.\aft.exe run -f "C:\Scripts\my-transfer.syncjs"
```
##### With parameters
Linux/MacOS:
```bash
./aft run -f "/opt/scripts/my-transfer.syncjs" -p '{"destination":"/archive/2026"}'
```
Windows (PowerShell):
```powershell
.\aft.exe run -f "C:\Scripts\my-transfer.syncjs" -p '{"destination":"D:\Archive\2026"}'
```
##### Notes
- `aft run` executes **synchronously**: the command blocks until the script finishes and exits with code 0 on success, or code 1 if the script crashes or fails.
- If `aft serve` is running on the same machine, `aft run` automatically delegates to the running service so the script has full access to the VFS Library and secrets. If `aft serve` is not running, it opens the local database directly.
- This makes aft run a natural fit for OS-cron jobs, CI/CD pipelines, and shell scripts that need a definitive exit code.
# Calling the AFT! REST API directly to trigger a job
If you need to trigger an AFT! job from a script or tool that cannot run the aft start command, you can call the REST API directly. All you need is an API key and the name of the script you want to run.
Create the API key in the AFT! web UI under **API Keys**, and make sure its IP allow-list includes the machine making the request.
##### Windows (PowerShell)
Minimal example:
```powershell
$headers = @{ "X-API-Key" = "your-api-key-here" }
$body = @{ scriptName = "My Backup Job" } | ConvertTo-Json
Invoke-RestMethod -Method POST `
-Uri "https://127.0.0.1:44399/v1/jobs" `
-Headers $headers `
-ContentType "application/json" `
-Body $body `
-SkipCertificateCheck
```
With parameters:
```powershell
$headers = @{ "X-API-Key" = "your-api-key-here" }
$body = @{
scriptName = "My Backup Job"
params = @{ destination = "/archive/2026"; character = "goofy" }
} | ConvertTo-Json -Depth 3
Invoke-RestMethod -Method POST `
-Uri "https://127.0.0.1:44399/v1/jobs" `
-Headers $headers `
-ContentType "application/json" `
-Body $body `
-SkipCertificateCheck
```
##### Linux/MacOS
Minimal example:
```bash
curl -sk -X POST https://127.0.0.1:44399/v1/jobs \
-H "X-API-Key: your-api-key-here" \
-H "Content-Type: application/json" \
-d '{"scriptName":"My Backup Job"}'
```
With parameters:
```bash
curl -sk -X POST https://127.0.0.1:44399/v1/jobs \
-H "X-API-Key: your-api-key-here" \
-H "Content-Type: application/json" \
-d '{"scriptName":"My Backup Job","params":{"destination":"/archive/2026","character":"goofy"}}'
```
##### Request-body reference
**Field**
**Type**
**Description**
`scriptName`
*string*
Name of the stored script to run (case-insensitive). Use this in new integrations.
`scriptId`
*string*
Script ID. Kept for backward compatibility with AFT! v3 integrations; prefer `scriptName`.
`filePath`
*string*
Path to a `.syncjs` file on disk. Alternative to `scriptName`/`scriptId`.
`params`
*object*
Named parameters passed to the script as a flat key/value object.
Exactly one of `scriptName`, `scriptId`, or `filePath` must be provided. On success the API returns `201 Created` with a job info object containing the job ID, which you can use to poll `GET /v1/adm/jobs/{id}` for status.
The `-SkipCertificateCheck` / `-sk` flags are needed when AFT! is using a self-signed TLS certificate, which is the default for local installations.
# Locked yourself out of AFT!'s web UI? Don't panic.
If you have lost access to AFT! because all admin passwords are forgotten, or because a misconfigured allowlist or CORS setting is blocking access to the web UI, the `aft reinit` command lets you recover without losing any of your data.
The command resets the server configuration to factory defaults and removes all admin accounts. The next time you open the web UI you will be prompted to create the first admin account, exactly as after a fresh install. All scripts, VFS configurations, named secrets, API keys, and cron jobs are untouched.
#### Prerequisites
`aft reinit` enforces two hard requirements before it will do anything. If either condition is not met the command exits immediately with an error message and makes no changes to the database:
1. `aft reinit` opens the embedded database file directly. The database has a single-writer lock: while the service is running it holds that lock, and aft reinit will not be allowed to proceed. **Stop the service first.**
2. Because `aft reinit` bypasses all authentication and directly alters the database, the operating system itself **must confirm you are authorized to do so**. The command will refuse to run without elevated privilege.
Linux/macOS/FreeBSD: use `sudo` or run from a root shell.
Windows: open a PowerShell with "Run as Administrator" before running the commands.
#### Step-by-step recovery
Linux/MacOS/\*BSD:
```bash
sudo aft svc stop
sudo aft reinit
sudo aft svc start
```
Windows (PowerShell run as Administrator):
```powershell
.\aft.exe svc stop
.\aft.exe reinit
.\aft.exe svc start
```
Once the service is running again, **open the web UI in your browser**. The setup wizard will appear and ask you to create the first admin account. After that you have full access to all your existing data.
#### What gets reset, and what is preserved
**Item**
**After `reinit`**
Server configuration (port, bind address, allowlists, CORS, JWT lifetime)
Reset to factory defaults
Admin accounts
All deleted
Scripts
Preserved
VFS configuration
Preserved
Named secrets
Preserved
API keys
Preserved
Cron jobs
Preserved
Operational log
Preserved
License
Preserved
# Scripting
Scripting examples and techniques in SyncJS, the JavaScript-based scripting language behind Syncplify AFT!
# Monitoring a local folder and uploading files to your SFTP server when they change
This article refers to **AFT! v4.0.0+**, if you're still on an older AFT! version, please, [refer to this article instead](https://kb.syncplify.com/books/syncplify-aft/page/old-monitoring-a-local-folder-and-uploading-files-to-your-sftp-server-when-they-change).
This article explains how to implement real-time folder backup using Syncplify AFT! scripting. Two approaches are presented: one optimized for low-frequency changes, and one for high-frequency changes. Both use `FsWatcher` to monitor a local folder and `SftpClient` to upload changed files to a remote SFTP server as soon as they appear.
#### How It Works
AFT! scripts run as long-lived jobs. Rather than executing once and exiting, they loop indefinitely by calling `WaitForHaltSignal()`, which blocks the script until an operator stops the job from the web UI or via the API. This makes them ideal for reactive, always-on automation tasks like real-time backup.
The `FsWatcher` object monitors a local directory (and optionally its subdirectories) for filesystem events. When an event occurs, it invokes a callback function with an event object containing two key fields:
- `evt.Event`: the type of event (one of `EVT_CREATE`, `EVT_WRITE`, `EVT_REMOVE`, `EVT_RENAME`, `EVT_CHMOD`)
- `evt.Object`: the full path of the affected file or directory
The script filters the events it cares about and takes action accordingly.
#### Choosing The Right Approach
The two strategies differ in how they manage the SFTP connection lifecycle:
**Connect On Demand**
**Persistent Connection**
**SFTP connection**
Opened and closed per event
Opened once at startup
**Best for**
Infrequent changes
Frequent changes
**Risk**
Higher latency per upload
Idle timeout disconnections
If files in the watched folder change many times per minute, opening and closing a TCP connection for each event adds unnecessary overhead. In that case, a persistent connection is the better choice. Conversely, if files change rarely (for example, a few times per hour), keeping a connection open indefinitely risks hitting the server's idle timeout. Opening on demand avoids that entirely.
##### Script 1: Connect on Demand
In this approach, the SFTP client is created fresh inside the event callback. Each detected change results in a new connection being opened, the file uploaded, and the connection immediately closed.
```javascript
// Real-time backup: CONNECT ON DEMAND
// Suitable for folders where files change very infrequently. A fresh SFTP connection
// is opened and closed for each detected change, avoiding idle connection timeouts.
// Configure which filesystem events trigger a backup upload.
var watcher = new FsWatcher();
watcher.NotifyCreate = true;
watcher.NotifyWrite = true;
watcher.NotifyRemove = false;
watcher.NotifyRename = false;
watcher.NotifyChmod = false;
try {
// Watch the source folder recursively (true = include all subdirectories).
watcher.WatchDir("C:\\YourSourceFolder", true);
watcher.Start(function(evt) {
// Ignore events we don't care about.
if (evt.Event !== EVT_CREATE && evt.Event !== EVT_WRITE) {
return;
}
Log("change detected: " + evt.Object + ", connecting to SFTP");
// Open a fresh connection for each event, upload the changed file, then close.
var scli = new SftpClient();
scli.Host = "your-sftp-server.example.com:22";
scli.Username = "your-username";
scli.Password = GetSecret("your-password-secret-name");
scli.HostKeySHA256 = "your-servers-public-key-sha256-fingerprint";
if (scli.Connect()) {
// UploadWithPath preserves the relative path structure on the remote side.
scli.UploadWithPath(evt.Object, "/remote/backup/path", 0);
scli.Close();
} else {
Log.Error("could not connect to SFTP server to upload: " + evt.Object);
}
scli = null;
});
// Block here until an operator sends a halt signal via the AFT! web UI or API.
WaitForHaltSignal();
Log("halt signal received, shutting down");
} finally {
// Always stop the watcher on exit, whether normal or due to an error.
watcher.Stop();
}
```
A few things worth noting:
`watcher.WatchDir("C:\\YourSourceFolder", true)`: the second argument (**true**) enables recursive watching. Any file created or modified inside a subdirectory, at any depth, will trigger the callback. AFT!'s `FsWatcher` also automatically tracks newly created subdirectories, so folders that did not exist when the watcher started are covered without any extra logic.
`UploadWithPath(evt.Object, "/remote/backup/path", 0)`: unlike a plain `Upload`, `UploadWithPath` preserves the relative directory structure of the source file when writing it to the remote destination. The third argument is the number of leading path components to strip. Passing 0 means the full path (minus the drive letter on Windows) is reconstructed on the remote side, maintaining a mirror of the local structure.
`scli.HostKeySHA256`: this is the SHA-256 fingerprint of the SFTP server's public host key. Setting it enables strict host key verification, which prevents man-in-the-middle attacks. The fingerprint can be obtained from your SFTP server administrator or by inspecting the server's known host key. Omitting it is not recommended in production environments.
The `try/finally` block — the watcher is started inside `try` and always stopped in `finally`. This guarantees that system resources (file handles and OS-level filesystem notification handles) are released even if the script exits due to an error.
##### Script 2: Persistent Connection
In this approach, the SFTP client is created and connected before the watcher starts. The same connection is reused for every upload event throughout the lifetime of the job.
```javascript
// Real-time backup: PERSISTENT SFTP connection
// Suitable for folders where files change frequently. The SFTP connection is opened
// once at startup and kept alive by the constant upload activity.
// Connect first, then start watching. On halt, stop the watcher and close the connection.
// Set up and connect the SFTP client before starting the watcher.
var scli = new SftpClient();
scli.Host = "your-sftp-server.example.com:22";
scli.Username = "your-username";
scli.Password = GetSecret("your-password-secret-name");
scli.HostKeySHA256 = "your-servers-public-key-sha256-fingerprint";
// Configure which filesystem events trigger a backup upload.
var watcher = new FsWatcher();
watcher.NotifyCreate = true;
watcher.NotifyWrite = true;
watcher.NotifyRemove = false;
watcher.NotifyRename = false;
watcher.NotifyChmod = false;
// Fail fast: abort if the server is unreachable at startup.
if (!scli.Connect()) {
Log.Error("could not connect to SFTP server, aborting");
Exit();
}
try {
// Watch the source folder recursively (true = include all subdirectories).
watcher.WatchDir("C:\\YourSourceFolder", true);
watcher.Start(function(evt) {
if (evt.Event === EVT_CREATE || evt.Event === EVT_WRITE) {
Log("uploading: " + evt.Object);
// UploadWithPath preserves the relative path structure on the remote side.
scli.UploadWithPath(evt.Object, "/remote/backup/path", 0);
}
});
// Block here until an operator sends a halt signal via the AFT! web UI or API.
WaitForHaltSignal();
Log("halt signal received, shutting down");
} finally {
// Always clean up both the watcher and the connection on exit.
watcher.Stop();
scli.Close();
}
```
The structure differs from Script 1 in a few important ways:
**Connect before watching:** the `scli.Connect()` call happens at the top level, before `WatchDir` or `Start`. If the connection fails at startup, the script calls `Exit()` immediately. There is no point starting the watcher if there is nowhere to send the files.
**No per-event connection setup:** the callback is intentionally minimal. It logs the filename and calls `UploadWithPath`. The absence of connect/close calls inside the callback is not an oversight; it is the entire point of this pattern.
`finally` **closes both:** in this version, the `finally` block must stop the watcher and close the SFTP connection. The watcher must be stopped first so no new uploads are attempted after the connection is gone.
#### When to Use Each Pattern
Use Connect on Demand when:
- The watched folder receives new or modified files at most a few times per hour
- The remote SFTP server enforces a short idle connection timeout
- You prefer simplicity and do not want to think about connection state
Use Persistent Connection when:
- Files change frequently (multiple times per minute or more)
- Upload latency matters and you want to avoid the TCP handshake overhead per event
- The remote server's idle timeout is long enough, or keep-alives are configured
Both patterns are valid. The choice is an operational one based on your environment.
#### A VFS-based alternative
For backup purposes like the ones shown in this article, using a Remote Client Object (as seen here above) is oftentimes the best option, because of the inherent flexibility and advanced configuration options. After all, Remote Client Objects are purpose-built exactly to carry out these tasks.
But if you need a quick way to achieve the same goal, and you don't need advanced features like atomic uploads, `chtimes` after successful uploads, rule-based skipping, etc, you may prefer the simplicity of a VFS-based approach. Virtual File Systems, in fact, manage the state of their remote connection automatically and internally, hiding all that complexity, and providing an even easier-to-use paradigm.
Here's a version of the above scripts rewritten to use a VFS instead of a Remote Client Object. Note: the named VFS configuration must exist in AFT! before running this script.
```javascript
// Real-time backup using VirtualFS
// Because VirtualFS manages the underlying connection automatically (reconnecting
// as needed), a single script covers both the "infrequent changes" and "frequent
// changes" scenarios with no manual connect/close logic anywhere.
//
// The preferred approach is VirtualFSByName, which resolves credentials from the
// VFS Library so no passwords ever appear in script source. Alternatively, construct
// the VFS inline (see the commented example further below).
var sourceFolder = "C:\\YourSourceFolder";
var remoteFolder = "/remote/backup/path";
// Configure which filesystem events trigger a backup upload.
var watcher = new FsWatcher();
watcher.NotifyCreate = true;
watcher.NotifyWrite = true;
watcher.NotifyRemove = false;
watcher.NotifyRename = false;
watcher.NotifyChmod = false;
// Resolve the SFTP connection from the VFS Library.
// Credentials, host key, and all options are stored in the named profile.
var sftp = new VirtualFSByName("your-sftp-vfs-name");
// Inline alternative, if you prefer to specify the target directly in the script:
// var sftp = new VirtualFS(VfsTypeSFTP, "sftp://username:password@your-sftp-server.example.com:22", "");
try {
watcher.WatchDir(sourceFolder, true);
watcher.Start(function(evt) {
if (evt.Event !== EVT_CREATE && evt.Event !== EVT_WRITE) {
return;
}
// Compute the remote path by stripping the local source root prefix and
// normalising backslashes to forward slashes for the remote side.
var relativePath = evt.Object.substring(sourceFolder.length).replace(/\\/g, "/");
var targetPath = remoteFolder + relativePath;
Log("uploading: " + evt.Object + " -> " + targetPath);
// Use ImportFile, which automatically ensures that target directory-tree
// is created if it doesn't already exist
var r = sftp.ImportFile(evt.Object, targetPath);
if (!r.Ok()) {
Log.Error("upload failed for " + evt.Object + ": " + r.ErrorMsg());
}
});
// Block here until an operator sends a halt signal via the AFT! web UI or API.
WaitForHaltSignal();
Log("halt signal received, shutting down");
} finally {
// Always stop the watcher on exit, whether normal or due to an error.
watcher.Stop();
}
```
Now you know all the options at your disposal. The choice is yours.
# Monitoring a remote VFS and downloading files to your local disk when they change
This article shows how to monitor a remote directory and automatically download each new file the moment it appears, using the `RemoteWatcher` object. Unlike a cron-scheduled one-shot script that polls on a fixed interval and then exits, this script runs as a persistent job and reacts in near-real-time: as soon as the next poll cycle detects a new file, your callback fires and the download begins.
#### How It Works
`RemoteWatcher` takes the name of a VFS profile from the VFS Library and polls the remote directory for you. You configure which events you care about, tell it which directory to watch, and hand it a callback. AFT! takes care of the polling loop, the reconnection logic, and the automatic tracking of newly created subdirectories so you never miss a file that lands in a subfolder that did not exist when the watcher started.
The callback receives an event object with two fields:
- `evt.Event`: the type of change (`EVT_CREATE`, `EVT_REMOVE`, `EVT_MODIFY`)
- `evt.Object`: the full remote path of the file that changed
For an inbound pickup scenario you only care about `EVT_CREATE`. Files that are modified in place or deleted are irrelevant.
The script also opens a separate `VirtualFSByName` handle on the same profile. The watcher uses it internally for polling; this second handle is for the actual `ExportFile` call that copies the remote file to the local inbox.
```javascript
// Remote inbound file pickup
// Monitors a named VFS for newly arrived files and downloads each one to a
// local inbound folder as it appears. Runs persistently until halted.
var remoteVfsName = "your-sftp-vfs-name"; // named VFS profile from the VFS Library
var remoteInboxDir = "/remote/inbox"; // remote directory to poll for new arrivals
var localInboxDir = "/local/inbound"; // local destination for downloaded files
var pollIntervalSeconds = 30; // how often to poll the remote directory
// Configure which remote events to act on.
// For most inbound pickup scenarios only newly created files matter.
var watcher = new RemoteWatcher(remoteVfsName);
watcher.NotifyCreate = true;
watcher.NotifyRemove = false;
watcher.NotifyModify = false;
// Optionally restrict pickups to specific file patterns.
// watcher.InclusionFilter = ["*.csv", "*.xml"];
// Open a VFS handle for downloading each newly detected file.
// The RemoteWatcher monitors the directory internally; this separate handle
// is used for the actual ExportFile call.
var vfs = new VirtualFSByName(remoteVfsName);
try {
watcher.WatchDir(remoteInboxDir, true); // true = recurse into subdirectories
watcher.Start(pollIntervalSeconds, function(evt) {
if (evt.Event !== EVT_CREATE) {
return;
}
// evt.Object is the full remote path of the newly detected file.
var remotePath = evt.Object;
var fileName = ExtractName(remotePath) + ExtractExt(remotePath);
var localPath = localInboxDir + "/" + fileName;
Log.Info("new remote file detected: " + remotePath);
var r = vfs.ExportFile(remotePath, localPath);
if (!r.Ok()) {
Log.Error("download failed for " + remotePath + ": " + r.ErrorMsg());
} else {
Log.Info("downloaded to: " + localPath);
}
});
// Block here until an operator sends a halt signal via the AFT! web UI or API.
WaitForHaltSignal();
Log.Info("halt signal received, shutting down");
} finally {
// Always stop the watcher on exit, whether normal or due to an error.
watcher.Stop();
}
```
A few things worth noting.
`watcher.WatchDir(remoteInboxDir, true)`: the second argument enables **recursive watching**. If the partner drops files into subdirectories, they will be picked up automatically. AFT!'s `RemoteWatcher` also tracks newly created subdirectories at runtime, so folders that did not exist at startup are covered without any extra logic on your part.
`watcher.Start(pollIntervalSeconds, callback)`: the first argument is the polling interval in seconds. Unlike `FsWatcher` (which receives OS-level push notifications), a remote watcher can only detect changes by comparing successive directory listings, so it must poll. Tune the interval to balance freshness against load on the remote server. Thirty seconds is a reasonable default for most trading partner scenarios.
`InclusionFilter`: if you only want specific file types, uncomment the filter line and list the patterns. Files that do not match are silently ignored before the callback is ever invoked.
The `try/finally` block ensures that `watcher.Stop()` is always called even if an exception is thrown, releasing the goroutine that drives the polling loop.
#### Running this script
Because the script calls `WaitForHaltSignal()`, it runs as a persistent job rather than a one-shot execution. Trigger it once from the **Scripts** page in the Admin UI (or via API using the `POST /v1/adm/jobs` endpoint) and leave it running. When you need to stop it, use the halt button in the UI or call the `DELETE /v1/adm/jobs/{id}` API.
# Relaying files from S3 to an SFTP server without local staging
A common integration pattern is moving files from a cloud object storage bucket (S3 or any S3-compatible service) to an SFTP server that a partner or downstream system expects to read from. The naive approach downloads each file to local disk first and then uploads it, which wastes disk space and roughly doubles transfer time. AFT!'s `CopyToVFS` method eliminates the intermediate step by streaming data directly between the two VFS back-ends in a single call. This article shows how to build that relay as a scheduled cron job.
#### How It Works
You open two VFS handles: one for the S3 source and one for the SFTP destination. Both are resolved by name from the VFS Library, so no credentials appear in the script. Then you list the source directory, loop over the files, and call `src.CopyToVFS(srcPath, dest, dstPath)` for each one. The host application handles the streaming; your script is just the orchestration glue.
```javascript
// S3 to SFTP relay
// Reads all files from a named S3 VFS and copies each one directly to a named
// SFTP VFS. No intermediate local file is created; CopyToVFS streams data
// between the two back-ends. Designed to run as a scheduled cron job.
var s3VfsName = "your-s3-vfs-name"; // source: named S3 VFS in the VFS Library
var sftpVfsName = "your-sftp-vfs-name"; // destination: named SFTP VFS in the VFS Library
var sourceDir = "/outbox"; // source directory on S3
var destDir = "/inbound/from-s3"; // destination directory on SFTP
var src = new VirtualFSByName(s3VfsName);
var dest = new VirtualFSByName(sftpVfsName);
// List the source directory sorted oldest-first so files arrive at the
// destination in the same order they were written.
var listing = src.ReadDir(sourceDir, SortByTime, SortAsc);
if (!listing.Ok()) {
Log.Error("failed to list source directory: " + listing.ErrorMsg());
Exit(1);
}
var entries = listing.Infos();
var relayed = 0;
var failed = 0;
Log.Info("relaying " + entries.length + " entries from S3 to SFTP");
for (var i = 0; i < entries.length; i++) {
var f = entries[i];
// ReadDir returns both files and directories; skip directories.
if (f.Type !== "FILE") {
continue;
}
var srcPath = sourceDir + "/" + f.Name;
var dstPath = destDir + "/" + f.Name;
var r = src.CopyToVFS(srcPath, dest, dstPath);
if (!r.Ok()) {
Log.Error("relay failed for " + f.Name + ": " + r.ErrorMsg());
failed++;
} else {
Log.Info("relayed: " + f.Name + " (" + f.Size + " bytes)");
relayed++;
}
}
Log.Info("relay complete: " + relayed + " succeeded, " + failed + " failed");
if (failed > 0) {
Exit(1);
}
```
`src.ReadDir(sourceDir, SortByTime, SortAsc)`: listing oldest-first means the SFTP server receives files in the order they were originally written to S3. For most downstream systems this ordering is important, for example when files are numbered sequences or must be processed chronologically.
`f.Type !== "FILE"`: `ReadDir` returns both files and directory entries. Skipping non-file entries prevents the relay from trying to copy directory prefixes as if they were objects.
`Exit(1)` at the end: a non-zero exit code tells the AFT! job engine that the run was not entirely clean. This surfaces in the job history and can trigger alerts in external monitoring tools. A run that relayed everything successfully exits with the default code 0.
#### Turning the relay into a move
If files should be moved rather than copied, simply use `MoveToVFS` instead of `CopyToVFS`:
```javascript
var r = src.MoveToVFS(srcPath, dest, dstPath);
if (r.Ok()) {
relayed++;
} else {
failed++;
}
```
#### Using this with other back-ends
The same script works for any combination of VFS types. Swap the named VFS profiles in the VFS Library to relay from Azure to GCS, from SFTP to S3, from local disk to Azure, and so on. The script logic does not change at all.
# Transforming a CSV file in transit between two systems
Sometimes the gap between two systems that need to exchange data is entirely a formatting problem: wrong column order, different delimiter, extra header columns the receiving system does not understand, or a computed field that must be added before import. Rather than standing up a dedicated ETL platform for light transformations, you can express the transformation as a few lines of JavaScript and let AFT! handle both the transfer and the rewriting in a single job. This article walks through a pattern that downloads a CSV file from one VFS, transforms it in memory, and delivers the result to a second VFS.
#### How It Works
The script exports the source file to a local temporary location, reads and parses it, applies your transformation, serializes the result back to CSV, writes the output to a second temporary file, and then imports that file to the destination. A `try/finally` block ensures both temporary files are always cleaned up, even if an error occurs mid-run.
```javascript
// CSV transform pipeline
// Downloads a CSV file from a source VFS, applies a transformation, and
// uploads the result to a destination VFS. Temporary files are always
// deleted on exit.
var srcVfsName = Params("src_vfs") || "source-system";
var srcPath = Params("src_path") || "/exports/data.csv";
var dstVfsName = Params("dst_vfs") || "target-system";
var dstDir = Params("dst_dir") || "/imports/";
// Build a timestamped output filename so destination files never collide.
var ts = FormatDateTime("YYYY-MM-DD_HHmmss");
var dstFileName = "data-" + ts + ".csv";
var tmpIn = GetTempFileName(); // local temporary file for the downloaded source
var tmpOut = GetTempFileName(); // local temporary file for the transformed output
try {
// Download
var src = VirtualFSByName(srcVfsName);
var dlResult = src.ExportFile(srcPath, tmpIn);
if (!dlResult.Ok()) {
Log.Error("download failed: " + dlResult.ErrorMsg());
Exit(1);
}
// Parse
var raw = ReadTextFile(tmpIn);
var rows = ParseCSV(raw, ","); // second argument is the delimiter; omit for comma default
// Transform
// Replace the body of this loop with your own logic.
// This example uppercases column 0 (a name field) and skips the original header row.
var header = ["ID", "NAME_UPPER", "VALUE"]; // write your own output header
var output = [header];
for (var i = 1; i < rows.length; i++) { // i = 1 to skip the source header
var row = rows[i];
if (row.length < 3) continue; // skip blank or malformed lines
output.push([
row[0], // ID: pass through unchanged
row[1].toUpperCase(), // NAME: transform applied here
row[2] // VALUE: pass through unchanged
]);
}
// Serialize and write
var csv = FormatCSV(output, ",");
WriteTextToFile(tmpOut, csv);
// Upload
var dst = VirtualFSByName(dstVfsName);
var ulResult = dst.ImportFile(tmpOut, dstDir + dstFileName);
if (!ulResult.Ok()) {
Log.Error("upload failed: " + ulResult.ErrorMsg());
Exit(1);
}
Log.Info("transformed and delivered " + dstFileName + " (" + (output.length - 1) + " rows)");
} finally {
DelFile(tmpIn);
DelFile(tmpOut);
}
```
`ParseCSV(raw, ",")`: returns a two-dimensional array where each element is a row and each element of a row is a field. The second argument is the delimiter. Omit it and the engine defaults to a comma. Use `"\t"` for tab-separated files.
`FormatCSV(output, ",")`: the inverse of `ParseCSV`. Takes a two-dimensional array and joins it back into a string using the delimiter you supply. Both functions handle quoting and embedded newlines according to RFC 4180.
`var output = [header]; ... output.push([...])`: the transformation loop is the only part you need to change for a different requirement. Deleting columns is as simple as not including them in the pushed array. Adding a computed column means appending a new element. Sorting requires pulling the data rows (indices 1 to n) out into a separate array, sorting it, and merging it back with the header.
The `try/finally` cleanup block is not optional. If the upload fails or the transformation throws an exception, reaching `DelFile` on both temporaries is essential. Leaving temporary files accumulating on the AFT! host is both a security concern and a disk-space concern over time.
#### Changing the source delimiter
Some partners deliver semicolon-delimited files that are technically not standard CSV. Pass `";"` as the second argument to `ParseCSV` and `FormatCSV` to handle them without any other changes.
#### Selecting a subset of columns
To drop columns from the output, simply do not include them in the push call. There is no need to filter the input; just address the indexes you want.
#### Adding a computed column
Append a new element to each pushed row:
```java
output.push([
row[0],
row[1].toUpperCase(),
row[2],
(parseFloat(row[2]) * 1.21).toFixed(2) // computed tax-inclusive total
]);
```
Remember to add a corresponding header in the `header` array at the top so the receiving system knows what it is getting.
# Integrating AFT! with an external workflow API
Many serious file transfer operations are parts of larger business workflows. A data pipeline might require a "claim" step where the downstream system registers its intent to process a batch before any files move, and a "completion" step where status is reported back once the transfer finishes, whether successfully or not. AFT! can play the role of execution engine in those orchestration patterns by making HTTP calls before and after the actual file movement. This article shows how to build a script that claims a job from an external API, performs the transfer, and always reports the outcome back to that same API, even if the transfer fails.
#### How It Works
The script receives a job identifier as a runtime parameter so the same script definition can be reused across multiple jobs without modification. It calls a claim endpoint on the orchestration API to retrieve the VFS names and paths to use for this particular run. It then performs the transfer and calls a report endpoint with the outcome.
```javascript
// REST API integration: claim, transfer, report
// Receives a job ID as a runtime parameter, claims the job from an external
// orchestration API to discover source and destination details, performs the
// file transfer, and always reports the outcome back to the API.
var jobId = Params("job_id"); // passed in when triggering the job
var apiBase = GetSecret("orch-api-url");
var apiToken = GetSecret("orch-api-token");
if (!jobId) {
Log.Error("job_id parameter is required");
Exit(1);
}
// Step 1: Claim the job from the orchestration API.
// This tells the API that AFT! is about to start work and retrieves the
// source/destination details for this specific run.
var claimResp = HttpCli()
.Url(apiBase + "/jobs/" + jobId + "/claim")
.Bearer(apiToken)
.Post(null);
if (!claimResp.Ok()) {
Log.Error("claim failed: HTTP " + claimResp.StatusCode());
Exit(1);
}
var job = JSON.parse(claimResp.BodyAsString());
var transferOk = false;
// Step 2: Perform the transfer.
try {
var src = VirtualFSByName(job.sourceVfs);
var dst = VirtualFSByName(job.destVfs);
var cpResult = src.CopyToVFS(job.sourcePath, dst, job.destDir);
if (!cpResult.Ok()) {
Log.Error("transfer failed: " + cpResult.ErrorMsg());
} else {
Log.Info("transfer complete: " + job.sourcePath + " -> " + job.destVfs + job.destDir);
transferOk = true;
}
} catch (err) {
Log.Error("transfer exception: " + err.toString());
}
// Step 3: Always report the outcome, success or failure.
// The orchestration system needs to know what happened regardless of how
// the transfer ended so it can route the workflow correctly.
var reportPayload = JSON.stringify({
jobId: jobId,
status: transferOk ? "completed" : "failed",
agent: "aft"
});
var reportResp = HttpCli()
.Url(apiBase + "/jobs/" + jobId + "/report")
.Bearer(apiToken)
.Header("Content-Type", "application/json")
.Post(reportPayload);
if (!reportResp.Ok()) {
Log.Error("report endpoint returned HTTP " + reportResp.StatusCode());
// Do not re-Exit here; fall through to the final exit below with the right code.
}
if (!transferOk) {
Exit(1);
}
```
`Params("job_id")`: the `Params` function retrieves values passed to the job at trigger time. When you trigger this script from the AFT! API or from the CLI, you supply the parameter as a key/value pair. The script logic stays generic; the job-specific data comes in at runtime.
`GetSecret("orch-api-token")`: storing the bearer token as a named secret keeps credentials out of the script source entirely. Rotate the secret in the AFT! secrets store and every script that calls `GetSecret` automatically picks up the new value without any changes to the script.
`claimResp.BodyAsString()`: returns the raw response body as a string. Wrap it in `JSON.parse()` to work with the object. `HttpCli` does not parse JSON automatically; the choice of which body fields to use is left to the script.
The report call sits outside the `try/catch` and sends regardless of outcome. This is deliberately unconditional. If you only report on success or only on error, the orchestration system can end up waiting indefinitely for a status it will never receive, which is worse than almost any other failure mode.
#### Triggering the script with parameters from the CLI
```bash
aft start --scriptid --apikey --params '[{"name":"job_id","value":"abc-123"}]'
```
Params are a JSON array of `{name, value}` objects. The same format is accepted by the `POST /v1/jobs` REST endpoint, so any HTTP client or orchestration system can trigger AFT! jobs and pass context in directly.
#### Triggering from the REST API with curl
```bash
curl -s -X POST https://127.0.0.1:44399/v1/jobs \
-H "X-API-Key: your-api-key" \
-H "Content-Type: application/json" \
-d '{"scriptId":"your-script-id","params":[{"name":"job_id","value":"abc-123"}]}'
```
The job starts immediately and responds with a job ID you can use to poll the status endpoint.
# Getting alerted when a remote file has not been updated recently enough
Upstream systems fail silently all the time. An ETL job crashes, a partner's export process hangs, a cron entry gets accidentally deleted. When that upstream system deposits a file on an SFTP server for you to consume, you might not notice the failure until it bubbles up into a downstream data quality problem hours or days later. This article shows how to write a scheduled AFT! script that independently verifies that a specific remote file exists and has been updated within an acceptable time window, and sends an email alert if either condition fails.
#### How It Works
The script connects to an SFTP server, calls `Stat` on the expected file path, and checks the modification timestamp. There are three outcomes: the connection itself fails (the server is unreachable), the file does not exist, or the file exists but is too old. The script sends an alert email for all three and exits with code `1`. If the file is current, a single informational log line is written and the script exits normally with no email sent.
```javascript
// File staleness alert
// Checks whether an expected file on a remote SFTP server has been updated
// recently enough. Sends an email alert if the file is missing or has not been
// modified within the configured threshold. Designed to run on a schedule,
// for example every hour, to catch upstream pipeline failures early.
var expectedFilePath = "/remote/data/latest-export.csv"; // full remote path to verify
var maxAgeHours = 25; // alert if the file is older than this many hours
var alertFrom = "aft-monitor@example.com";
var alertTo = "ops-team@example.com";
var alertSubject = "AFT alert: stale or missing file on SFTP";
var cli = new SftpClient();
cli.Host = GetSecret("sftp-host");
cli.User = GetSecret("sftp-user");
cli.Pass = GetSecret("sftp-password");
if (!cli.Connect()) {
// A connection failure means we cannot verify the file, so treat it as an alert condition.
Log.Error("SFTP connection failed, sending alert");
SendMail(
alertFrom, alertTo, alertSubject,
"AFT could not connect to the SFTP server to verify " + expectedFilePath + "."
);
Exit(1);
}
try {
var info = cli.Stat(expectedFilePath);
if (info === null) {
var missingMsg = "Expected file is missing on the SFTP server: " + expectedFilePath;
Log.Error(missingMsg);
SendMail(alertFrom, alertTo, alertSubject, missingMsg);
Exit(1);
}
var ageMs = new Date().getTime() - new Date(info.TimeStamp).getTime();
var ageHours = ageMs / (1000 * 60 * 60);
if (ageHours > maxAgeHours) {
var staleMsg = "File has not been updated in " + Math.floor(ageHours) + " hours " +
"(limit: " + maxAgeHours + "h). Path: " + expectedFilePath;
Log.Warn(staleMsg);
SendMail(alertFrom, alertTo, alertSubject, staleMsg);
} else {
Log.Info("file is current: " + expectedFilePath +
" (last modified " + Math.floor(ageHours) + "h ago)");
}
} finally {
cli.Close();
}
```
`maxAgeHours = 25`: set this slightly higher than the expected update interval to give a tolerance margin before alerting. A daily file that is normally updated at midnight should use something like 25 or 26 hours so a minor scheduling slip does not trigger a false alarm.
`cli.Stat(expectedFilePath)`: `Stat` returns a `DirListItem` object containing `Name`, `Type`, `Size`, and `TimeStamp`, or `null` if the file does not exist. Checking for `null` before accessing `info.TimeStamp` is essential; skipping the check will throw a runtime exception if the file is missing.
Connection failure is treated as an alert, not just an error to log and ignore: if AFT! cannot reach the SFTP server, it also cannot confirm the file is there, which is itself an alarm condition worth surfacing to your team.
#### Alerting via Slack instead of email
Replace `SendMail` with `SendToSlackWebHook` everywhere in the script:
```javascript
var webhookUrl = GetSecret("slack-webhook-url");
SendToSlackWebHook(webhookUrl, staleMsg, "AFT Monitor", ":warning:");
```
Store the webhook URL as a secret so it never appears in script source.
#### Checking multiple files in one job
Wrap the `Stat` and age check logic in a helper function and call it for each path:
```javascript
var monitors = [
{ path: "/feeds/customers.csv", maxHours: 25 },
{ path: "/feeds/orders.csv", maxHours: 2 }
];
```
A single cron job can then cover your entire estate of expected files, and you get one combined alert email if anything is amiss.
# Automatically encrypting files before uploading them to a remote server
When you deliver files to a third-party SFTP server you cannot always trust that the storage on the other end is encrypted. PGP encryption solves that problem at the application layer: only the holder of the matching private key can ever read the file, regardless of how the server stores it. This article shows how to combine `FsWatcher` with `PGPEncryptFile` to automatically encrypt every file that lands in a local outbound folder and upload the encrypted copy to an SFTP server. The script runs persistently until halted.
#### How It Works
`FsWatcher` monitors a local directory for new files. When a file appears, the callback calls `PGPEncryptFile` to produce an encrypted copy, uploads that copy via a named SFTP VFS, and then deletes the local temp file. The original unencrypted file is left untouched; you manage its lifecycle separately.
The recipient PGP public key path is retrieved from the AFT! Secrets store at startup, so neither the key material nor its location ever appears in the script source.
```javascript
// PGP encrypt before upload
// Watches a local folder for newly created files, encrypts each one with a
// recipient PGP public key, uploads the encrypted copy to a remote SFTP server
// via a named VFS, then removes the local encrypted temp file. Runs persistently
// until halted.
var localWatchDir = "/local/outbound"; // local folder to monitor for new files
var remoteDestDir = "/remote/encrypted-inbox"; // remote destination for encrypted files
var sftpVfsName = "your-sftp-vfs-name"; // named SFTP VFS in the VFS Library
var recipientKeyFile = GetSecret("pgp-pubkey-path"); // path to recipient PGP public key file
var watcher = new FsWatcher();
watcher.NotifyCreate = true;
watcher.NotifyWrite = false;
watcher.NotifyRemove = false;
watcher.NotifyRename = false;
watcher.NotifyChmod = false;
// Wait a moment before firing so newly written files are fully closed.
watcher.DelayBySeconds = 2;
var sftp = new VirtualFSByName(sftpVfsName);
try {
// Watch only the top-level directory; subdirectories are not processed.
watcher.WatchDir(localWatchDir, false);
watcher.Start(function(evt) {
if (evt.Event !== EVT_CREATE) {
return;
}
var sourceFile = evt.Object;
var encryptedFile = GetTempFileName() + ".pgp";
Log.Info("encrypting: " + sourceFile);
if (!PGPEncryptFile(sourceFile, encryptedFile, recipientKeyFile)) {
Log.Error("PGP encryption failed for: " + sourceFile);
return;
}
// Append .pgp to the original filename so the recipient can identify
// the algorithm and strip the suffix after decryption.
var remoteName = ExtractName(sourceFile) + ExtractExt(sourceFile) + ".pgp";
var remotePath = remoteDestDir + "/" + remoteName;
Log.Info("uploading encrypted file to: " + remotePath);
var r = sftp.ImportFile(encryptedFile, remotePath);
if (!r.Ok()) {
Log.Error("upload failed: " + r.ErrorMsg());
} else {
Log.Info("uploaded: " + remotePath);
}
// Remove the local encrypted temp file regardless of upload outcome.
// The original unencrypted file is left in place; manage its lifecycle
// separately based on your retention policy.
DelFile(encryptedFile);
});
// Block here until an operator sends a halt signal via the AFT! web UI or API.
WaitForHaltSignal();
Log.Info("halt signal received, shutting down");
} finally {
watcher.Stop();
}
```
`watcher.DelayBySeconds = 2`: this small delay prevents the callback from firing while the producer process is still writing the file. Without it, `PGPEncryptFile` might try to read a file that is only half-written. Two seconds is enough for almost all local writes; increase it if your producer writes large files slowly.
`GetTempFileName() + ".pgp"`: `GetTempFileName()` returns a unique path in the system temp directory. Appending `.pgp` is not strictly necessary for the encryption to work, but it makes the temp file recognisable if you ever need to inspect the temp directory manually.
`DelFile(encryptedFile)`: the encrypted temp file is deleted after every event, successful upload or not. Keeping it around would accumulate encrypted copies in the temp directory with no benefit.
#### Storing the key path as a secret
Rather than hardcoding the path to the recipient's public key in the script, store it in the AFT! Secrets store. In the Admin UI, go to **Secrets**, create a new secret named `pgp-pubkey-path`, and set its value to the absolute path of the public key file on the machine running AFT!. `GetSecret` retrieves it at runtime without ever touching the script source.
#### Encrypting for multiple recipients
`PGPEncryptFile` accepts a single public key file. To encrypt for multiple recipients simultaneously, concatenate all their ASCII-armored public key blocks into one `.asc` keyring file and pass that path. Any holder of a corresponding private key will be able to decrypt the result.
# Automatically removing old files from a remote archive
Without a cleanup policy, a remote archive grows indefinitely. Storage costs accumulate quietly, and eventually someone has to do a manual purge under time pressure. This article shows how to write a scheduled AFT! script that connects to an S3 bucket, inspects the modification time of every file in an archive directory, and deletes anything older than a configurable retention threshold. The same pattern works for any remote service that AFT! supports; just swap `S3Client` for `SftpClient`, `AzureClient`, or `GCSClient`.
#### How It Works
The script connects to S3 with credentials from the Secrets store, lists the archive directory using `LIST_FILES` (which excludes directory prefixes), and iterates over the results. For each file it computes the age in milliseconds by comparing `f.TimeStamp` against the current time. Files within the retention window are skipped; files that have exceeded it are deleted.
```javascript
// Remote archive cleanup
// Connects to an S3 bucket and deletes files in the archive directory that are
// older than the configured retention period. Intended to run as a scheduled
// cron job, for example once a day after the nightly backup completes.
var retentionDays = 90; // delete files older than this many days
var archiveDir = "/archive"; // remote directory to clean up
var cli = new S3Client();
cli.Region = GetSecret("s3-region");
cli.AccessKey = GetSecret("s3-access-key");
cli.SecretKey = GetSecret("s3-secret-key");
cli.Bucket = GetSecret("s3-bucket-name");
if (!cli.Connect()) {
Log.Error("failed to connect to S3");
Exit(1);
}
try {
// LIST_FILES requests file entries only; directory prefixes are excluded.
var files = cli.ListDir(archiveDir, LIST_FILES);
Log.Info("scanning " + files.length + " files in " + archiveDir);
var nowMs = new Date().getTime();
var retentionMs = retentionDays * 24 * 60 * 60 * 1000;
var deleted = 0;
var retained = 0;
for (var i = 0; i < files.length; i++) {
var f = files[i];
var ageMs = nowMs - new Date(f.TimeStamp).getTime();
if (ageMs < retentionMs) {
retained++;
continue;
}
// Build the full remote path; ListDir returns bare filenames when
// operating on a specific directory.
var fullPath = archiveDir + "/" + f.Name;
var ageDays = Math.floor(ageMs / (24 * 60 * 60 * 1000));
if (cli.Delete(fullPath)) {
Log.Info("deleted: " + f.Name + " (age: " + ageDays + " days)");
deleted++;
} else {
Log.Error("failed to delete: " + fullPath);
}
}
Log.Info("cleanup complete: " + deleted + " deleted, " + retained + " retained");
} finally {
cli.Close();
}
```
`new Date(f.TimeStamp).getTime()`: `f.TimeStamp` is the modification time of the S3 object as reported by the API. Passing it directly to the `Date` constructor produces a JavaScript `Date` object you can compare arithmetically. The difference in milliseconds divided by the appropriate factor gives you age in seconds, minutes, hours, or days.
`LIST_FILES`: passing this constant to `ListDir` tells AFT! to return only file objects. S3 "directories" are just key prefixes, not real objects, and they have no meaningful timestamp. Excluding them avoids a spurious deletion attempt.
The `try/finally` block ensures `cli.Close()` is always called even if the body throws an exception.
#### Running across subdirectories
Replace `ListDir` with `ListDirR` to scan the archive recursively:
```javascript
var files = cli.ListDirR(archiveDir, LIST_FILES);
```
`ListDirR` returns the relative path from the listing root in `f.Name`, so the `fullPath` construction and `cli.Delete(fullPath)` calls work without any other changes.
#### Testing before you delete
Add a dry-run flag when you first deploy this to a production environment:
```javascript
var dryRun = true; // set to false to enable actual deletion
if (dryRun) {
Log.Info("dry run: would delete " + fullPath + " (age: " + ageDays + " days)");
} else {
if (cli.Delete(fullPath)) { deleted++; }
}
```
Run it once with `dryRun = true`, review the job log, and flip the flag only when you are satisfied the retention threshold is correct.
#### Using MinIO or another S3-compatible service
Add `Endpoint` and `UsePathStyle` before calling `Connect`:
```javascript
cli.Endpoint = "https://minio.internal.example.com";
cli.UsePathStyle = true;
```
Everything else stays the same.
# A simple "health monitor" script
One of the new functions available in SyncJS as of AFT! v4.0.0 (and higher) is TcpConnect, which performs a quick connect/disconnect cycle to any desired host on any desired port, and returns whether or not the connection was successful (that's whether or not the server listening on that port on the specified host is up).
This is ideal to build very simple "health monitor" scripts, here's an example:
```javascript
var host = "your.host.com";
var port = 443;
var alertTo = "alerts@yourdomain.com";
var alertFrom = "aft-monitor@yourdomain.com";
// TcpConnect returns true if the TCP handshake succeeds within the timeout.
// We use a 5-second timeout (5000 ms).
if (TcpConnect(host, port, 5000)) {
Log.Info(host + ":" + port + " is reachable, all good");
} else {
var subject = "ALERT: " + host + ":" + port + " is unreachable";
var body = "The TCP connectivity check for " + host + ":" + port + " failed.\n" +
"The host may be down, the port may be blocked, or the network may be unreachable.\n\n" +
"Please investigate immediately.";
Log.Error(host + ":" + port + " is unreachable, sending alert to " + alertTo);
if (!SendMail(alertFrom, alertTo, subject, body)) {
Log.Error("alert email could not be sent, check the SMTP configuration in AFT! settings");
}
}
```
Simple. Nothing fancy. If the host is up, it just logs a line, if the host is down it emails you to let you know.
As of v4.0.0, AFT! is no longer just file-transfer as code, with the power and flexibility of SyncJS you can do a lot more than in the past.
# Sending a Slack summary after a batch file transfer
Per-file notifications are noisy. A job that uploads fifty files and sends fifty Slack messages trains people to ignore all of them, which defeats the purpose. A better pattern is to collect the results of an entire batch, build a single formatted summary, send it once, and exit. This article shows how to write a script that downloads all new files from a remote directory, counts successes and failures, tracks total bytes transferred, and delivers one Slack message at the end of the run.
#### How It Works
The script retrieves the list of files waiting in a remote directory, downloads each one to a local inbox folder, tracks counters through the loop, and then sends a formatted Slack notification summarizing the outcome. A guard at the top skips the Slack notification entirely if the remote directory is empty so your Slack channel does not fill up with "nothing to do" messages overnight.
```javascript
// Batch transfer with Slack summary notification
// Downloads all files from a remote directory into a local inbox, tracks
// success/failure and total byte count, and sends a single Slack message
// summarising the batch.
var remoteVfsName = Params("src_vfs") || "partner-sftp";
var remoteDir = Params("src_dir") || "/outbound/";
var localInbox = Params("dst_dir") || "/data/inbox/";
var webhookUrl = GetSecret("slack-webhook-url");
var vfs = VirtualFSByName(remoteVfsName);
var rdRes = vfs.ReadDir(remoteDir, SortByName, SortAsc);
if (!rdRes.Ok()) {
Log.Error("cannot list remote directory: " + rdRes.ErrorMsg());
Exit(1);
}
var files = rdRes.Infos().filter(function(f) { return f.Type === "FILE"; });
if (files.length === 0) {
Log.Info("no files to process, exiting quietly");
Exit(0);
}
var filesOk = 0;
var filesFailed = 0;
var totalBytes = 0;
for (var i = 0; i < files.length; i++) {
var f = files[i];
var srcPath = remoteDir + f.Name;
var dstPath = localInbox + f.Name;
var res = vfs.ExportFile(srcPath, dstPath);
if (res.Ok()) {
filesOk += 1;
totalBytes += f.Size;
Log.Info("downloaded: " + f.Name);
} else {
filesFailed += 1;
Log.Error("failed: " + f.Name + " (" + res.ErrorMsg() + ")");
}
}
// Format total bytes into a human-readable label.
function bytesLabel(n) {
if (n >= 1073741824) return (n / 1073741824).toFixed(2) + " GB";
if (n >= 1048576) return (n / 1048576).toFixed(2) + " MB";
if (n >= 1024) return (n / 1024).toFixed(2) + " KB";
return n + " B";
}
var stamp = FormatDateTime("YYYY-MM-DD HH:mm");
var icon = filesFailed > 0 ? ":warning:" : ":white_check_mark:";
var summary = "[" + stamp + "] Batch from " + remoteVfsName + " complete. " +
filesOk + " succeeded, " + filesFailed + " failed. " +
"Total: " + bytesLabel(totalBytes) + ".";
SendToSlackWebHook(webhookUrl, summary, "AFT Transfer Bot", icon);
if (filesFailed > 0) {
Exit(1);
}
```
`files.filter(...)`: `ReadDir` returns both files and subdirectories. Filtering on `f.Type === "FILE"` ensures the loop only processes actual files, not directory entries, which cannot be downloaded as files.
`Exit(0)` for an empty batch: calling `Exit(0)` sends a clean successful status to the job engine without any Slack notification. This is the right approach for scheduled jobs that run more frequently than files arrive; the AFT! job log records the run, but your team's Slack channel stays quiet.
`SendToSlackWebHook(webhookUrl, summary, "AFT Transfer Bot", icon)`: the third argument is the sender display name that appears in Slack, and the fourth is a Slack emoji shortcode for the icon. Choosing a different emoji when there are failures (`:warning:`) versus all successes (`:white_check_mark:`) lets people scan the channel at a glance without reading every message.
`Exit(1)` after the Slack message when failures occurred: the exit code feeds back to the AFT! job engine and is recorded in the job status. If this job is triggered by a cron schedule, a non-zero exit marks the run as crashed, which lets you configure alerting at the job engine level as a secondary safety net.
#### Setting up the Slack webhook
In your Slack workspace, go to the App Directory, find the Incoming Webhooks app, and create a new webhook pointed at the channel you want to post to. Copy the webhook URL and store it in AFT! as a secret named `slack-webhook-url`. The URL is sensitive, treat it like a credential; anyone who has it can post to your channel.
#### Richer formatting with Slack Block Kit
`SendToSlackWebHook` sends a plain-text message. For richer formatting with sections, dividers, and fields laid out in columns, build a Block Kit payload manually and use `HttpCli` to post it directly to the webhook URL:
```javascript
var payload = JSON.stringify({
blocks: [
{ type: "section", text: { type: "mrkdwn", text: "*Batch complete*: " + filesOk + " files, " + bytesLabel(totalBytes) } }
]
});
var hc = new HttpCli()
var resp = hc.Url(webhookUrl)
.Header("Content-Type", "application/json")
.Post(payload);
```
This gives you the full Slack formatting palette without any additional dependencies.
# [OLD] Monitoring a local folder and uploading files to your SFTP server when they change
This article refers to all **AFT! versions prior to v4.0.0**. If you're looking to achieve the same task with AFT! v4.0.0+ please [read this article instead](https://kb.syncplify.com/books/syncplify-aft/page/monitoring-a-local-folder-and-uploading-files-to-your-sftp-server-when-they-change).
Let's say you have an SFTP server somewhere, and you want to use it as some form of "real-time backup". That implies monitoring a local folder/directory on your computer's hard disk (or SSD), and:
- detect when new files are created and upload them
- detect when files are modified and upload them
Furthermore, there are several other aspects to consider. For example:
- your SFTP server may (should) not allow your client to be always connected
- you may need to "delay" your uploads, because the OS (file-system) needs time to finish writing the local file before you can access it and upload it to the remote SFTP server
AFT! can help you with all of that.
Here below you can see a well-commented AFT! script (in pure SyncJS language) that shows you how to do all of the above the right way, taking all the above-mentioned circumstances into account:
```javascript
{
// Let's enable console feedback, in case we're running this script via the shell
ConsoleFeedback = true;
// First, let's create the file-system watcher
watcher = new FsWatcher();
// Then we elect to delay notification by *at least* 300 seconds (5 minutes)
// (useful to allow the file system to finish whatever operation is ongoing)
watcher.DelayBySeconds = 300;
// We may choose *not* to be notified of certain events
watcher.NotifyRename = false;
watcher.NotifyRemove = false;
watcher.NotifyChmod = false;
// We can specify inclusion and exclusion filters (optional, not mandatory)
watcher.InclusionFilter = ['*.*'];
watcher.ExclusionFilter = ['notes.txt', 'budget.xlsx'];
// Almost ready, let's tell the object what folder we want to monitor
watcher.WatchDir('C:\\TestFolder', false);
// And then start the watcher
watcher.Start();
// We need to keep checking events indefinitely, an endless cycle is what we need
while (true) {
// Let's sleep for 500 milliseconds at each cycle, to keep CPU usage low
Sleep(500);
// When inside an endless cycle, it's always safe to check if we received a Halt signal at every cycle
if (HaltSignalReceived()) {
break;
}
// No Halt signal? Good, then let's acquire the list of pending event that we need to process
evt = watcher.Events()
// Do we have at least 1 event to process?
if (evt.length > 0) {
// We only connect to the server IF there are events to be processes
var scli = new SftpClient();
scli.Host = 'your.sftpserver.com:22';
scli.User = 'your_username';
scli.Pass = 'your_password';
scli.Options.UploadPolicy = AlwaysOverwrite;
if (scli.Connect()) {
// Cycle over all pending events...
for (var i = 0; i < evt.length; i++) {
if (evt[i].Event == 'WRITE') {
// If it is a WRITE event (new or modified file) let's upload it to the server
scli.UploadWithPath(evt[i].Object, '/destinationpath', 1);
}
}
// Do not forget to close the connection
scli.Close();
}
// Set the client object to null to save memory
scli = null;
}
}
}
```
Happy coding!